Инструкция для HOTPOINT-ARISTON FH 21 IX

(скачивание инструкции бесплатно)
Формат файла: PDF
Доступность: Бесплатно как и все руководства на сайте. Без регистрации и SMS.
Дополнительно: Чтение инструкции онлайн
background image

24

GB

Precautions and tips

!

 This appliance has been designed and manufactured in compliance with 

international safety standards. The following warnings are provided for safety 

reasons and must be read carefully.

General safety

•  The appliance was designed for domestic use inside the home and is 

not intended for commercial or industrial use.

•  The appliance must not be installed outdoors, even in covered areas. It is 

extremely dangerous to leave the appliance exposed to rain and storms.

•  When moving or positioning the appliance, always use the handles 

provided on the sides of the oven.

•  Do not touch the appliance while barefoot or with wet or damp hands and 

feet.

• 

The appliance must be used by adults only for the preparation of 

food, in accordance with the instructions provided in this booklet. 

Any other use of the appliance (e.g. for heating the room) constitutes 

improper use and is dangerous. The manufacturer may not be held 

responsible for any damage caused as a result of improper, incorrect 

and unreasonable use of the appliance.

• 

Do not touch the heating elements or certain parts of the oven door 

when the appliance is in use; these parts become extremely hot. 

Keep children well away from the appliance.

•  Make sure that the power supply cables of other electrical appliances do 

not come into contact with the hot parts of the oven.

•  The ventilation and heat dispersal openings must never be obstructed.

•  Always grip the oven door handle in the centre: the ends may be hot.

•  Always use oven gloves when placing cookware in the oven or when 

removing it.

•  Do not use aluminium foil to line the bottom of the oven.

•  Do not place flammable materials in the oven: if the appliance is switched 

on accidentally, the materials could catch fire.

•  Always make sure the knobs are in the “●”/“

” position when the appliance 

is not in use.

•  When unplugging the appliance, always pull the plug from the mains 

socket; do not pull on the cable.

•  Do not perform any cleaning or maintenance work without having 

disconnected the appliance from the electricity mains.

•  If the event of malfunctions, under no circumstances should you attempt 

to perform the repairs yourself. Contact an authorised Service Centre (see 

Assistance).

•  Do not rest objects on the open oven door.

•  Do not let children play with the appliance.

•  The appliance should not be operated by people (including children) 

with reduced physical, sensory or mental capacities, by inexperienced 

individuals or by anyone who is not familiar with the product. These 

individuals should, at the very least, be supervised by someone who 

assumes responsibility for their safety or receive preliminary instructions 

relating to the operation of the appliance.

•  The appliance is not intended to be operated by means of an external 

timer or separate remote-control system.

Disposal

•  When disposing of packaging material: observe local legislation so that 

the packaging may be reused.

•  The European Directive 2012/19/EC on Waste Electrical and 

Electronic Equipment (WEEE), requires that old household electrical 

appliances must not be disposed of in the normal unsorted municipal 

waste stream. Old appliances must be collected separately in order 

to optimise the recovery and recycling of the materials they contain 

and reduce the impact on human health and the environment.  

The crossed out “wheeled bin” symbol on the product reminds you of your 

obligation, that when you dispose of the appliance it must be separately 

collected. 

  Consumers should contact their local authority or retailer for information 

concerning the correct disposal of their old appliance.

Respecting and conserving the environment

•  You can help to reduce the peak load of the electricity supply network 

companies by using the oven in the hours between late afternoon and the 

early hours of the morning. The cooking mode programming options, the 

“delayed cooking” mode (see Cooking modes) and “delayed automatic 

cleaning” mode (see Care and Maintenance) in particular, enable the user 

to organise their time efficiently.

•  Always keep the oven door closed when using the GRILL modes: This 

will achieve improved results while saving energy (approximately 10%).

•  Regularly check the door seals and wipe clean to ensure they are free 

of debris so that they stick properly to the door and do not allow heat to 

disperse.

Maintenance and care

Switching the appliance off

Disconnect your appliance from the electricity supply before carrying out 

any work on it.

Cleaning the appliance

•  The stainless steel or enamel-coated external parts and the rubber seals 

may be cleaned using a sponge that has been soaked in lukewarm water 

and neutral soap. Use specialised products for the removal of stubborn 

stains. After cleaning, rinse and dry thoroughly. Do not use abrasive 

powders or corrosive substances.

•  The inside of the oven should ideally be cleaned after each use, while it is 

still lukewarm. Use hot water and detergent, then rinse well and dry with 

a soft cloth. Do not use abrasive products.

•  All accessories - with the exception of the sliding racks - can be washed 

like everyday crockery, and are even dishwasher safe.

!

 Never use steam cleaners or pressure cleaners on the appliance.

Cleaning the oven door

Clean the glass part of the oven door using a sponge and a non-abrasive 

cleaning product, then dry thoroughly with a soft cloth. Do not use rough 

abrasive material or sharp metal scrapers as these could scratch the surface 

and cause the glass to crack. For more thorough cleaning purposes, the oven 

door may be removed:

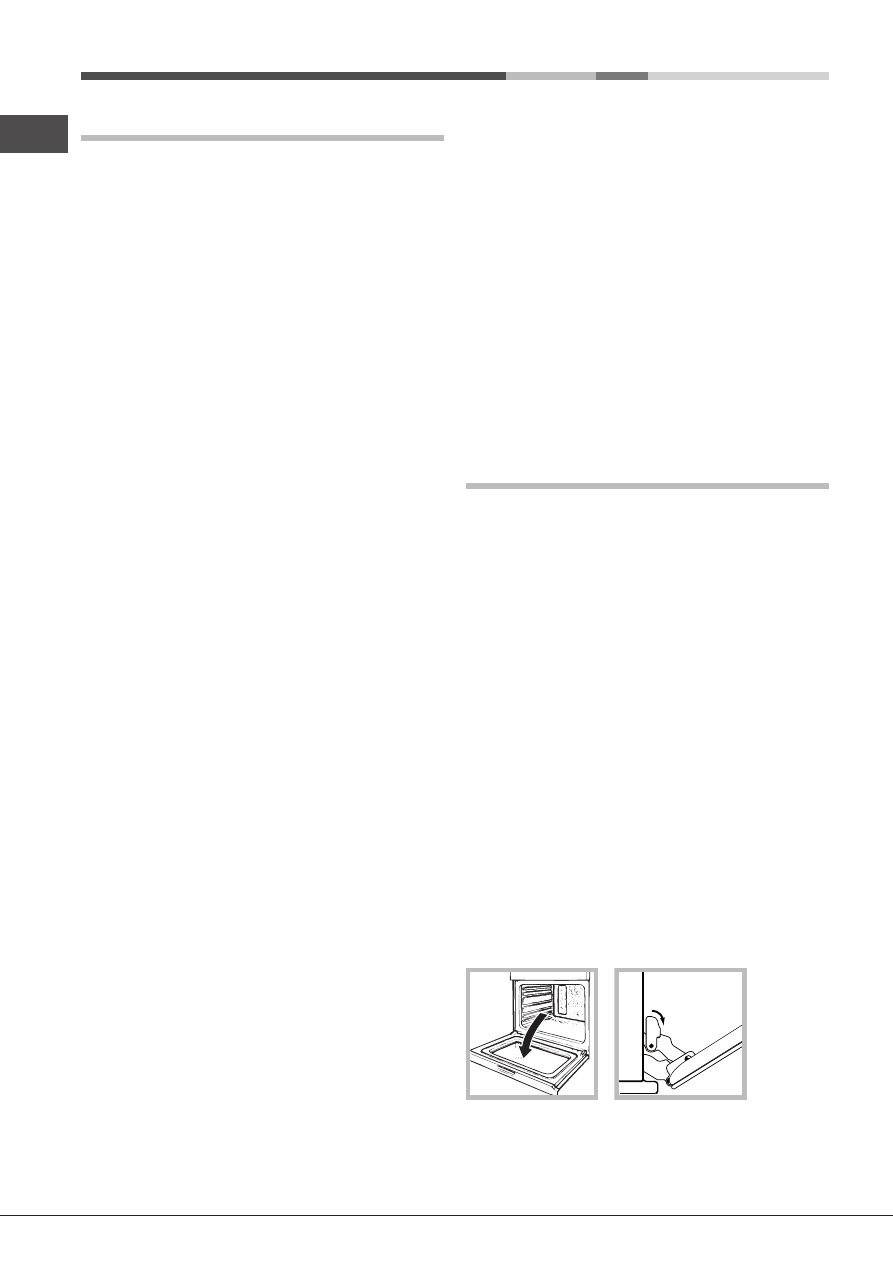
1. Open the oven door fully (see diagram);

2. Lift up and turn the small levers located on the two hinges (see diagram);


1
2
3
4
5
6
7
8
9
10
11
12
13
14
15
16
17
18
19
20
21
22
23
24
25
26
27
28
29
30
31
32
33
34
35
36
37
38
39
40
41
42
43
44
45
46
47
48
49
50
51
52
53
54
55
56
57
58
59
60
61
62
63
64
65
66
67
68
Оглавление инструкции
  • Страница 1 из 69
    FH 21 /HA FH 21 IX/HA FHS 21 IX/HA S Français Mode d’emploi FOUR Sommaire Mode d’emploi,1 Avertissements,4 Assistance,8 Description de l’appareil,10 Description de l’appareil,12 Installation,26 Mise en marche et utilisation,28 Programmes,28 Précautions et conseils,30 Nettoyage et entretien,30
  • Страница 2 из 69
    Deutsch Română Bedienungsanleitung BACKOFEN Inhaltsverzeichnis Bedienungsanleitung,2 Hinweise,5 Kundendienst,9 Beschreibung Ihres Gerätes,11 Beschreibung Ihres Gerätes,13 Installation,44 Inbetriebsetzung und Gebrauch,46 Programme,46 Vorsichtsmaßregeln und Hinweise,48 Reinigung und Pflege,48
  • Страница 3 из 69
    Avvertenze Warnings ATTENZIONE: Questo apparecchio e le sue parti accessibili diventano molto caldi durante l’uso. Bisogna fare attenzione ed evitare di toccare gli elementi riscaldanti. Tenere lontani i bambini inferiori agli 8 anni se non continuamente sorvegliati. Il presente apparecchio può
  • Страница 4 из 69
    Avertissements Advertencias ATTENTION : Cet appareil ainsi que ses parties accessibles deviennent très chauds pendant leur fonctionnement. Il faut faire attention à ne pas toucher les éléments chauffants. Ne pas faire approcher les enfants de moins de 8 ans à moins qu’ils ne soient sous
  • Страница 5 из 69
    Advertências Hinweise ATENÇÃO: Este aparelho e as suas partes acessíveis aquecem muito durante a utilização. É preciso ter atenção e evitar tocar os elementos que aquecem. Manter afastadas as crianças com menos de 8 anos, caso não estejam a ser vigiadas. O presente aparelho pode ser utilizado por
  • Страница 6 из 69
    Belangrijk Предупреждения PAS OP: Dit apparaat en zijn bereikbare onderdelen worden tijdens gebruik zeer heet. Zorg ervoor de verwarmende elementen niet aan te raken. Zorg ervoor dat kinderen die kleiner dan 8 jaar oud zijn niet dichtbij het apparaat kunnen komen, tenzij onder constant toezicht.
  • Страница 7 из 69
    Avertizări ATENŢIE: Acest aparat şi părţile sale accesibile devin foarte calde în timpul folosirii. Trebuie să fiţi atenţi şi să nu atingeţi elementele de încălzire. Îndepărtaţi copiii sub 8 ani dacă nu sunt supravegheaţi continuu. Acest aparat poate fi utilizat de copiii de peste 8 ani şi de
  • Страница 8 из 69
    Assistenza Assistance ! Non ricorrere mai a tecnici non autorizzati. ! Never use the services of an unauthorised technician. Comunicare: • Il tipo di anomalia; • Il modello della macchina (Mod.) • Il numero di serie (S/N) Queste ultime informazioni si trovano sulla targhetta caratteristiche posta
  • Страница 9 из 69
    En el SAT encontrará recambios, accesorios y productos específicos para la limpieza y mantenimiento de su electrodoméstico a precios competitivos. ESTAMOS A SU SERVICIO Сервисное обслуживание ! Никогда не обращайтесь к неуполномоченным техникам. Assistência ! Nunca recorra a técnicos não
  • Страница 10 из 69
    Descrizione dell’apparecchio Descripción del aparato Vista d’insieme Vista en conjunto 1 2 3 4 5 6 7 8 9 1 2 3 4 5 6 7 8 9 POSIZIONE 1 POSIZIONE 2 POSIZIONE 3 POSIZIONE 4 POSIZIONE 5 GUIDE di scorrimento dei ripiani Ripiano LECCARDA Ripiano GRIGLIA Pannello di controllo POSICIÓN 1 POSICIÓN 2
  • Страница 11 из 69
    Beschreibung Ihres Gerätes Descrierea aparatului Geräteansicht Vedere de ansamblu 1 2 3 4 5 6 7 8 9 1 2 3 4 5 6 7 8 9 EINSCHUBHÖHE 1 EINSCHUBHÖHE 2 EINSCHUBHÖHE 3 EINSCHUBHÖHE 4 EINSCHUBHÖHE 5 GLEITFÜHRUNGEN für die Einschübe Einschub FETTPFANNE Einschub BACKOFENROST Bedienfeld POZITIA 1 POZITIA 2
  • Страница 12 из 69
    Descrizione dell’apparecchio Descrição do aparelho Pannello di controllo Painel de comandos 1 2 3 4 1 2 3 4 Spia TERMOSTATO Manopola TERMOSTATO Manopola CONTAMINUTI Manopola PROGRAMMI Indicador luminoso TERMOSTATO Selector do TERMÓSTATO Selector do CONTADOR DE MINUTOS Selector PROGRAMAS Description
  • Страница 13 из 69
    Beschrijving van het apparaat Bedieningspaneel 1 2 3 4 Controlelampje THERMOSTAAT THERMOSTAATKNOP Knop TIMER Knop PROGRAMMA’S Описание изделия Панель управления 1 2 3 4 Индикатор ТЕРМОСТАТА Регулятор ТЕРМОСТАТА Рукоятка ТАЙМЕРА Рукоятка ПРОГРАММЫ Descrierea aparatului Panoul de control 1 2 3 4
  • Страница 14 из 69
    Installazione ! È importante conservare questo libretto per poterlo consultare in ogni momento. In caso di vendita, di cessione o di trasloco, assicurarsi che resti insieme all’apparecchio per informare il nuovo proprietario sul funzionamento e sui relativi avvertimenti. Centraggio e fissaggio Per
  • Страница 15 из 69
    • la tensione di alimentazione sia compresa nei valori nella targhetta caratteristiche (vedi sotto); • la presa sia compatibile con la spina dell’apparecchio. In caso contrario sostituire la presa o la spina; non usare prolunghe e multiple. TARGHETTA CARATTERISTICHE IT Dimensioni* larghezza cm 43,5
  • Страница 16 из 69
    IT Avvio e utilizzo Programmi ATTENZIONE! Il forno è dotato di un sistema di arresto griglie che consente di estrarle senza che queste fuoriescano dal forno. (1) Per estrarre completamente le griglie è sufficiente, come indicato sul disegno, alzarle, prendendole dalla parte anteriore e tirarle. (2)
  • Страница 17 из 69
    Tabella cottura Programmi Peso (Kg) Posizione dei ripiani Preriscaldamento (minuti) Temperatura consigliata Durata cottura (minuti) Tradizionale Anatra Arrosto di vitello o manzo Arrosto di maiale Biscotti (di frolla) Crostate Lasagne Agnello Sgombro Plum-cake Bignè Pan di spagna Torte salate 1 1 1
  • Страница 18 из 69
    IT Precauzioni e consigli ! L’apparecchio è stato progettato e costruito in conformità alle norme internazionali di sicurezza. Queste avvertenze sono fornite per ragioni di sicurezza e devono essere lette attentamente. Sicurezza generale • L’apparecchio è stato concepito per un uso di tipo non
  • Страница 19 из 69
    IT 3 (con controporta in vetro). afferrare la porta ai due lati esterni, richiudendola lentamente ma non del tutto. Tirare la porta verso di sé estraendola dalle cerniere (vedi figura). Rimontare la porta seguendo il procedimento in senso contrario. Controllare le guarnizioni Controllare
  • Страница 20 из 69
    Installation ! Please keep this instruction booklet in a safe place for future reference. If the appliance is sold, given away or moved, please make sure the booklet is also passed on to the new owners so that they may benefit from the advice contained within it. Centring and fixing Secure the
  • Страница 21 из 69
    • The appliance is earthed and the plug is compliant with the law. • The socket can withstand the maximum power of the appliance, which is indicated on the data plate. • The voltage is in the range between the values indicated on the data plate. • The socket is compatible with the plug of the
  • Страница 22 из 69
    GB Start-up and use Cooking modes WARNING! The oven is provided with a stop system to extract the racks and prevent them from coming out of the oven (1). As shown in the drawing, to extract them completely, simply lift the racks, holding them on the front part, and pull (2). ! The first time you
  • Страница 23 из 69
    Cooking advice table Cooking modes Convection Oven Pastry Mode Foods Duck Roast veal or beef Pork roast Biscuits (short pastry) Tarts Lasagne Lamb Mackerel Plum-cake Cream puffs Sponge-cake Savoury pies Raised Cakes Tarts Fruit cakes Brioches Weight (in kg) Rack position Pre-heating time (min)
  • Страница 24 из 69
    GB Precautions and tips ! This appliance has been designed and manufactured in compliance with international safety standards. The following warnings are provided for safety reasons and must be read carefully. General safety • The appliance was designed for domestic use inside the home and is not
  • Страница 25 из 69
    GB Grip the door on the two external sides and close it approximately half way.Pull the door towards you lifting it out of its seat (see diagram). To replace the door, reverse this sequence. Inspecting the seals Check the door seals around the oven regularly. If the seals are damaged, please
  • Страница 26 из 69
    Installation ! Conservez ce mode d’emploi pour pouvoir le consulter à tout moment. En cas de vente, de cession ou de déménagement, veillez à ce qu’il suive l’appareil pour informer le nouveau propriétaire sur son fonctionnement et lui fournir les conseils correspondants. Centrage et fixation Pour
  • Страница 27 из 69
    • la prise est bien apte à supporter la puissance maximale de l’appareil, indiquée sur la plaquette signalétique; • la tension d’alimentation est bien comprise entre les valeurs indiquées sur la plaquette signalétique; • la prise est bien compatible avec la fiche de l’appareil. Si ce n’est pas le
  • Страница 28 из 69
    FR Mise en marche et utilisation ATTENTION! Le four est équipé d’un système d’arrêts de grilles qui permet de les retirer sans que ces dernières sortent entièrement du four (1). Pour sortir complètement les grilles il suffit, comme illustré, de les soulever en les saisissant par l’avant et de les
  • Страница 29 из 69
    Tableau de cuisson Programmes Aliments Poids (Kg) Niveau enfournem ent Préchauffa ge (minutes) Température préconisée 15 15 15 15 15 10 10 10 10 10 10 15 15 15 15 15 200 200 200 180 180 190 180 180 170 180 170 200 160 180 180 160 Durée cuisson (minutes) Canard Rôti de veau ou de b œuf Rôti de porc
  • Страница 30 из 69
    FR Précautions et conseils ! Cet appareil a été conçu et fabriqué conformément aux normes internationales de sécurité. Ces conseils sont fournis pour des raisons de sécurité et doivent être lus attentivement. Sécurité générale • Cet appareil a été conçu pour un usage familial, de type non
  • Страница 31 из 69
    FR 3. (Avec contre-porte en verre) saisissez la porte par les côtés, refermez-la lentement mais pas complètement.Tirez la porte vers vous en la dégageant de ses charnières (voir figure). Remonter la porte en refaisant en sens inverse les mêmes opérations. Contrôle des joints Contrôler
  • Страница 32 из 69
    Instalación ! Es importante conservar este manual para poder consultarlo en todo momento. En caso de venta, de cesión o de mudanza, verifique que permanezca junto al aparato para informar al nuevo propietario sobre su funcionamiento y sobre las advertencias correspondientes. ! Lea atentamente las
  • Страница 33 из 69
    normas vigentes (el cable a tierra no debe ser interrumpido por el interruptor). El cable de alimentación eléctrica se debe colocar de modo tal que no alcance en ningún punto una temperatura que supere en 50°C la temperatura ambiente (por ejemplo, la parte posterior del horno). ! El instalador es
  • Страница 34 из 69
    ES Puesta en funcionamiento y uso ATENCIÓN! El horno está dotado de un sistema de bloqueo de las parrillas que permite quitarlas sin que sobresalgan del horno (1). Para quitar completamente las parrillas, como se indica en el dibujo, es suficiente levantarlas cogiéndolas de la parte delantera y
  • Страница 35 из 69
    Tabla de cocción Programas Horno Tradiciónal Horno Dulce Alimentos Pato Asado de ternera o de vaca Asado de cerdo Bizcochos (de pastaflora) Torta glaseada Lasañas Corsero Caballa Plum-cake Hojaldre con crema Bizcocho Tortas saladas Tortas leudadas Torta glaseada Tortas de fruta Brioches Peso (Kg)
  • Страница 36 из 69
    ES Precauciones y consejos ! El aparato ha sido proyectado y fabricado en conformidad con las normas internacionales de seguridad. Estas advertencias se suministran por razones de seguridad y deben ser leídas atentamente. Seguridad general • El aparato ha sido fabricado para un uso de tipo no
  • Страница 37 из 69
    ES 3. (Con contrapuerta de vidrio) sujete la puerta de los costados externos y ciérrela lenta pero no completamente.Tire la puerta hacia sí mismo, extrayéndola de las bisagras (ver la figura). Vuelva a colocar la puerta siguiendo el mismo procedimiento pero en sentido contrario. Controlar las
  • Страница 38 из 69
    Instalação ! É importante guardar este folheto para poder consultá-lo a qualquer momento. No caso de venda, cessão ou mudança, assegure-se que o mesmo permanece com o aparelho para informar o novo proprietário sobre o funcionamento e sobre as respectivas advertências. ! Leia com atenção as
  • Страница 39 из 69
    Antes de efectuar a ligação, certifique-se que: • a tomada tenha uma ligação à terra e seja em conformidade com a legislação; • a tomada tenha a capacidade de suportar a carga máxima de potência da máquina, indicada na placa de identificação; • a tensão de alimentação seja entre os valores da placa
  • Страница 40 из 69
    PT Início e utilização Programas ATENÇÃO! O forno está equipado com um sistema de bloqueio das grelhas que permite retirá-las sem que estas ressaiam do forno (1).Para retirar completamente as grelhas, tal como indicado no desenho, basta levantá-las, segurando-as pela parte da frente, e puxá-las
  • Страница 41 из 69
    Tabela de cozedura Programas Forno Tradicional Forno Para Dolce Alimentos Pato Carne de vitela ou vaca assada Carne de porco assada Biscoitos (de massa tenra) Tortas doces Lasanha Cordeiro Cavala Plum cake Bignés Pão-de-ló Tortas salgadas Tortas levedadas Tortas doces Tortas de fruta Croissants
  • Страница 42 из 69
    PT Precauções e conselhos ! Este aparelho foi projectado e fabricado em conformidade com as normas internacionais de segurança. Estas advertências são fornecidas por razões de segurança e devem ser lidas com atenção. Segurança geral • Este aparelho foi concebido para utilização de tipo não
  • Страница 43 из 69
    PT 3. (Com contra-porta de vidro) segure a porta dos dois lados exteriores e feche-a novamente devagar mas não inteiramente; uxe a porta para a frente e retire-a das dobradiças (veja a figura). Vuelva a colocar la puerta siguiendo el mismo procedimiento pero en sentido contrario. Verificação das
  • Страница 44 из 69
    Installation ! Bewahren Sie diese Bedienungsanleitung bitte sorgfältig auf, damit Sie sie jederzeit zu Rate ziehen können. Sorgen Sie dafür, dass sie im Falle eines Verkaufs, eines Umzugs oder einer Übergabe an einen anderen Benutzer das Gerät stets begleitet, damit auch der Nachbesitzer die
  • Страница 45 из 69
    Vor dem Anschluss stellen Sie bitte sicher, dass: • die Steckdose geerdet ist und den gesetzlichen Bestimmungen entspricht; • die Netzsteckdose für die auf dem Typenschild angegebene maximale Leistungsaufnahme des Gerätes ausgelegt ist; • die Netzspannung im Bereich der auf dem Typenschild
  • Страница 46 из 69
    DE Inbetriebsetzung und Gebrauch Programme ACHTUNG! Der Ofen ist mit einem Arretierungssystem der Roste ausgestattet. Damit lassen diese sich ausziehen, ohne aus dem Ofen hervorzustehen (1).Um die Roste komplett auszuziehen, braucht man sie nur, wie auf der Zeichnung zu sehen, vorne zu greifen und
  • Страница 47 из 69
    Back-/Brattabelle Programme Speisen Ente Kalbs- oder Rinderbraten Schweinebraten Gebäck Mürbeteigkuchen Lasagne Standard Plus Lamm Makrelen Plum-cake Windbeutel Biskuitböden Quiche Hefekuchen Kuchen Mürbeteigkuchen Obstkuchen Backofen Brioches Oberhitze Grill Nachgaren von Speisen Seezungen und
  • Страница 48 из 69
    DE Vorsichtsmaßregeln und Hinweise ! Das Gerät wurde entsprechend den strengsten internationalen Sicherheitsvorschriften entworfen und gebaut. Nachstehende Hinweise werden aus Sicherheitsgründen geliefert und sollten aufmerksam gelesen werden. Allgemeine Sicherheit • Dieses Gerät ist für den nicht
  • Страница 49 из 69
    DE 3. (Mit Vollglasinnentür) fassen Sie die Tür an den beiden äußeren Seiten und schließen Sie sie langsam, jedoch nicht ganz. Ziehen die Tür zu sich hin aus den Scharnieren heraus (siehe Abbildung). In umgekehrter Reihenfolge wird die Backofentür wieder angebracht. Dichtungen prüfen Den Zustand
  • Страница 50 из 69
    Het installeren ! Bewaar dit boekje zorgvuldig voor eventuele verdere raadpleging. Wanneer u het product weggeeft, verkoopt, of wanneer u verhuist, dient u dit boekje bij het apparaat te bewaren zodat alle nodige informatie voorhanden blijft. Centreren en bevestigen Om het apparaat aan het
  • Страница 51 из 69
    Voor het aansluiten moet u controleren dat: • het stopcontact geaard is en voldoet aan de geldende normen; • het stopcontact in staat is het maximale vermogen van het apparaat te dragen, zoals aangegeven op het typeplaatje; • de spanning zich bevindt tussen de waarden die staan aangegeven op het
  • Страница 52 из 69
    NL Starten en gebruik Programma’s BELANGRIJK! De oven is uitgerust met een blokkeringssysteem voor de grill dat het mogelijk maakt om de gril naar buiten te trekken zonder dat deze buiten de oven komt (1). Om de grill volledig te verwijderen, de grill aan de voorkant optillen en naar buiten
  • Страница 53 из 69
    Kooktabel Programma's Traditionele oven GEBAK-OVEN Oven Boven Grill Gerechten Eend Braadstuk Varkensvlees Koekjes (kruimeldeeg) Jamtaart Lasagne Lamsvlees Makreel Plum-cake Beignets Pan di spagna Quiche Cake Jamtaart Vruchtentaart Brioches Gewicht (kg) 1 1 1 1 1 1 1 1 0.3 0.5 1.5 0,5 1 1 0,5 3 3 3
  • Страница 54 из 69
    NL Voorzorgsmaatregelen en advies ! Dit apparaat is ontworpen en vervaardigd volgens de geldende internationale veiligheidsvoorschriften. Deze aanwijzingen zijn geschreven voor uw veiligheid en u dient ze derhalve goed door te nemen. Algemene veiligheidsmaatregelen • Dit apparaat is vervaardigd
  • Страница 55 из 69
    NL 3. pak de deur aan de zijkanten beet en sluit hem langzaam, maar niet helemaal. Trek dan de deur naar u toe en haal hem uit zijn voegen (zie afbeelding). Zet de deur weer op zijn plaats door deze handelingen in omgekeerde volgorde uit te voeren. Het controleren van de afdichtingen Controleer
  • Страница 56 из 69
    Установка ! Важно сохранить данное руководство для его последующих консультации. В случае продажи, передачи изделия или при переезде на новое место жительства необходимо проверить, чтобы руководство оставалось вместе с изделием, для того чтобы его новыи владелец мог ознакомиться с правилами
  • Страница 57 из 69
    В случае прямого подключения к сети электропитания между изделием и сетью необходимо установить многополюсный выключатель с минимальным расстоянием между контактами 3 мм, расчитанный на данную нагрузку и соответствующий действующим нормативам (выключатель не должен размыкать провод заземления).
  • Страница 58 из 69
    RU Включение и эксплуатация Программы ВНИМАНИЕ! Духовой шкаф у к о м п л е к то ва н с и с те м о й блокировки решеток, позволяющей вынимать их из духовки не полностью (1).Для полного вынимания решеток достаточно поднять их, как показано на схеме, взяв их за передний край, и потянуть на ! Для всех
  • Страница 59 из 69
    Таблица приготовления Программы Традициональная духовка Одновременное приготовление Верхнии нагреватель Гриль Подрумянивание Вес (кг) Уровень 1 1 3 3 Время нагревания (мин.) 15 15 1 1 1 1 1 1+1 3 3 3 2и4 3 2 2и4 1 1 0.5 0.5 0.5 1 1.5 Доведение доготовности Камбала и каракатицы Кальмары и креветки
  • Страница 60 из 69
    RU Предосторожности и рекомендации ! Изделие спроектировано и изготовлено в соответствии с международными нормативами по безопасности. Необходимо внимательно прочитать настоящие предупреждения, составленные в целях вашеи безопасности. Общие требования к безопасности • Данное изделие предназначается
  • Страница 61 из 69
    • Съемные детали можно легко вымыть как любую другую посуду, также в посудомоечной машине за исключением выдвижных направляющих. RU ! Не используйте паровые чистящие агрегаты или агрегаты под высоким давлением для чистки изделия. Чистка дверцы Для чистки стекла дверцы используйте неабразивные губки
  • Страница 62 из 69
    Instalare ! Este importantă păstrarea acestui manual pentru a putea fi consultat în orice moment. În caz de vânzare, de închiriere sau de schimbare a locuinţei, acesta trebuie să fie înmânat împreună cu cuptorul, pentru a informa noul proprietar cu privire la funcţionare şi la respectivele
  • Страница 63 из 69
    Înainte de a efectua branşamentul, asiguraţi-vă că: • priza are împământare şi corespunde prevederilor legale în vigoare; • priza poate suporta sarcina maximă de putere a aparatului, indicată pe plăcuţa de caracteristici (vezi mai jos); • tensiunea de alimentare este cuprinsă în valorile indicate
  • Страница 64 из 69
    RO Pornire şi utilizare Programe ATENŢIE! Cuptorul este prevăzut cu un sistem de oprire a grătarelor care permite extragerea acestora fără ca ele să iasă din cuptor (1). Pentru a extrage complet grătarele este suficient, astfel cum se arată în desen, să le ridicaţi, prinzându-le din partea din faţă
  • Страница 65 из 69
    Tabel coacere Programe Tradiţional Cuptor Dulce Cuptor Deasupra Grill Greutate (Kg) Poziţia rafturilor Preîncă lzire (minute) Temperatura recomandată Durata coacerii (minute) Raţă Friptură de viţel sau vită Friptură de porc Biscuiţi (din aluat fraged) Tarte Lasagne Miel Scrumbie Pră jitură cu rpune
  • Страница 66 из 69
    RO Măsuri de precauţie şi recomandări ! Aparatul a fost proiectat şi construit în conformitate cu normele internaţionale de siguranţă. Recomandările sunt furnizate pentru siguranţa dvs. şi vă recomandăm să le citiţi cu atenţie. Siguranţă generală • Aparatul a fost creat pentru a fi destinat
  • Страница 67 из 69
    RO 3. apucaţi bine uşa de părţile laterale şi apropiaţi-o fără a o închide complet. Trageţi apoi uşa spre voi, extrăgând-o din balamale (vezi figura). Montaţi la loc uşa, urmând acelaşi procedeuîn sens invers. Controlarea garniturilor Controlaţi periodic garnitura din jurul uşii cuptorului. Dacă
  • Страница 68 из 69
    195114188.01 11/2013 - XEROX FABRIANO RO 68
  • Страница 69 из 69