Инструкция для HOTPOINT-ARISTON New Style FH G

(скачивание инструкции бесплатно)
Формат файла: PDF
Доступность: Бесплатно как и все руководства на сайте. Без регистрации и SMS.
Дополнительно: Чтение инструкции онлайн
background image

GB

21

Electrical connection

Ovens equipped with a three-pole power supply cable are designed to operate 

with alternating current at the voltage and frequency indicated on the data 

plate located on the appliance (see below).

Fitting the power supply cable

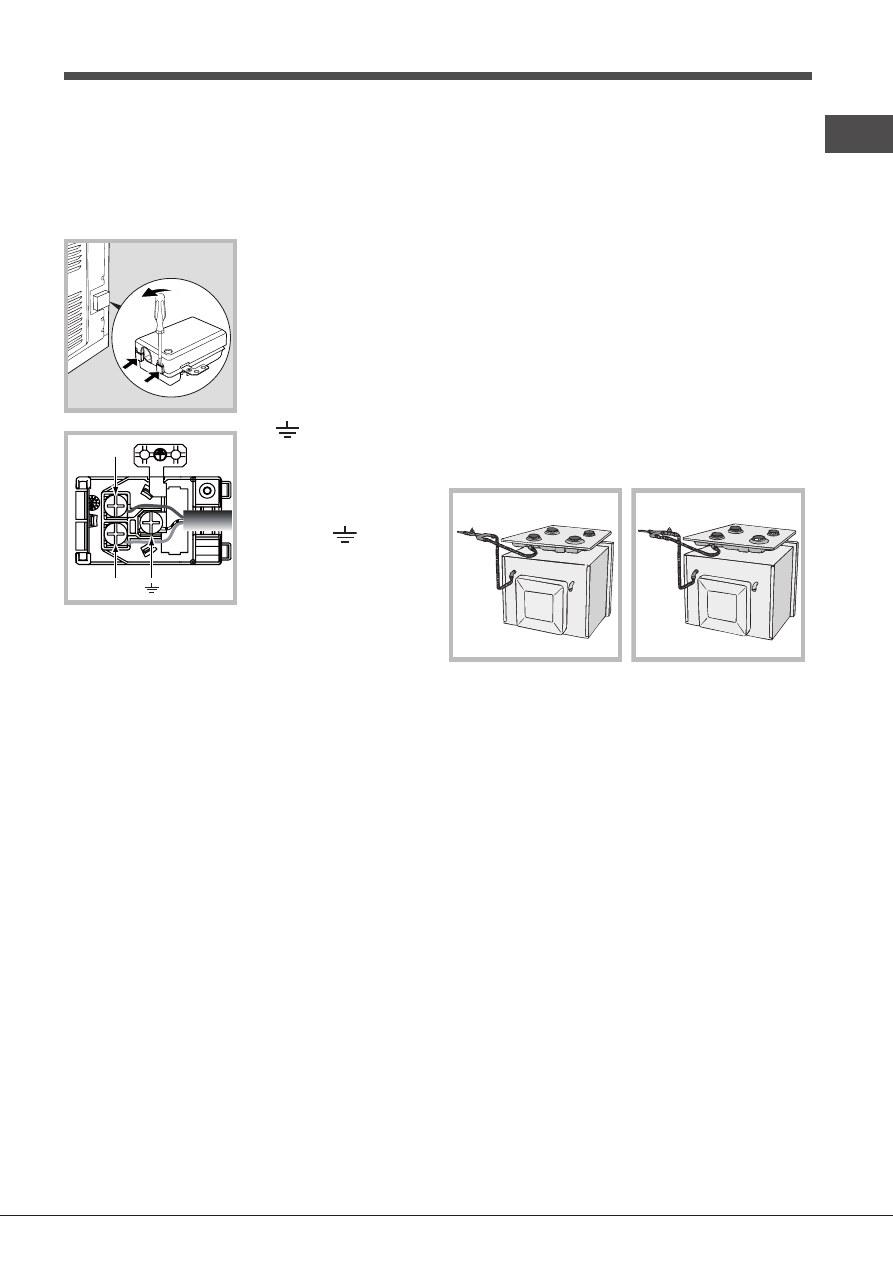
1. Open the terminal board by 

inserting a screwdriver into the side 

tabs of the cover. Use the screwdriver 

as a lever by pushing it down to open 

the cover (see diagram).

2. Install the power supply cable by 

loosening the cable clamp screw 

and the three wire contact screws  
L-N-

.

Connect the wires to the 

corresponding terminals: the Blue 

wire to the terminal marked (N), the 

Brown wire to the terminal marked 

(L) and the Yellow/Green wire to the 
terminal marked 

 (see diagram).

3. Secure the cable by fastening the 

clamp screw.

4. Close the cover of the terminal 

board.

Connecting the supply cable to the mains

Install a standardised plug corresponding to the load indicated on the data 

plate (see table). The appliance must be directly connected to the mains 

using an omnipolar switch with a minimum contact opening of 3 mm installed 

between the appliance and the mains.  The switch must be suitable for the 

charge indicated and must comply with current electrical regulations (the 

earthing wire must not be interrupted by the switch). The supply cable must 

be positioned so that it does not come into contact with temperatures higher 

than 50°C at any point (the back panel of the oven, for example).

!

 The installer must ensure that the correct electrical connection has been 

performed and that it is fully compliant with safety regulations.

Before connecting the appliance to the power supply, make sure that

•  The appliance is earthed and the plug is compliant with the law.

•  The socket can withstand the maximum power of the appliance, which is 

indicated on the data plate.

•  The voltage is in the range between the values indicated on the data plate.

•  The socket is compatible with the plug of the appliance. If the socket is 

incompatible with the plug, ask an authorised technician to replace it. Do 

not use extension cords or multiple sockets.

!

 Once the appliance has been installed, the power supply cable and the 

electrical socket must be easily accessible.

!

 The cable must not be bent or compressed.

!

 The cable must be checked regularly and replaced by authorised technicians 

only (see Assistance).

L

N

N

L

!


The manufacturer declines any liability should these safety measures 

not be observed.

Gas connection

The appliance should be connected to the main gas supply or to a gas 

cylinder in compliance with current National regulations. Before carrying 

out the connection, make sure the cooker is compatible with the gas supply 

you wish to use. If this is not the case, follow the instructions indicated in the 

paragraph “Adapting to different types of gas.”

When using liquid gas from a cylinder, install a pressure regulator that complies 

with current National regulations.

!

 Check that the pressure of the gas supply is consistent with the values 

indicated in Table 1 (“Burner and nozzle specifications”) since this will ensure 

the safe operation and longevity of your appliance while maintaining efficient 

energy consumption.

!

 Should you need to install a gas hob on top of a built-in gas oven, it is strictly 

forbidden to connect the two or to use a single cut-off tap. The two appliances 

should be connected separately, and each one should have its own stop tap in 

order to make them completely independent from one another (see figures).

NO


OK

Connection with a rigid pipe (copper or steel)

!

 Connection to the gas system must be carried out in such a way as not to 

place any strain of any kind on the appliance.

There is an adjustable 

L

-shaped pipe fitting on the appliance supply ramp 

and this is fitted with a seal in order to prevent leaks. The seal must always be 

replaced after rotating the pipe fitting (the seal is provided with the appliance). 

The gas supply pipe fitting is a threaded 1/2 gas cylindrical male attachment.

Connecting a flexible jointless stainless steel pipe to a threaded 

attachment

The gas supply pipe fitting is a threaded 1/2 gas cylindrical male attachment. 

These pipes must be installed so that they are never longer than 2000 mm 

when fully extended. Once connection has been carried out, make sure that 

the flexible metal pipe does not touch any moving parts and is not compressed.

!

 Only use pipes and seals that comply with current National regulations.

Checking the tightness of the connection

1
2
3
4
5
6
7
8
9
10
11
12
13
14
15
16
17
18
19
20
21
22
23
24
25
26
27
28
29
30
31
32
33
34
35
36
37
38
39
40
41
42
43
44
45
46
47
48
49
50
51
52
53
54
55
56
57
58
59
60
61
62
63
64
65
66
67
68
Оглавление инструкции
  • Страница 1 из 69
    FH G /HA Français Mode d’emploi FOUR Sommaire Mode d’emploi,1 Avertissements,4 Assistance,7 Description de l’appareil,9 Description de l’appareil,11 Installation,28 Mise en marche et utilisation,31 Programmes,33 Précautions et conseils,34 Nettoyage et entretien,35 Italiano Español Istruzioni per
  • Страница 2 из 69
    Русскии Руководство по эксплуатации ДУХОВОЙ ШКАФ Содержание Руководство по эксплуатации,2 Предупреждения,5 Сервисное обслуживание,8 Описание изделия,10 Описание изделия,11 Установка,52 Включение и эксплуатация,55 Программы,56 Предосторожности и рекомендации,59 Техническое обслуживание и уход,60
  • Страница 3 из 69
    Avvertenze Warnings ATTENZIONE: Questo apparecchio e le sue parti accessibili diventano molto caldi durante l’uso. Bisogna fare attenzione ed evitare di toccare gli elementi riscaldanti. Tenere lontani i bambini inferiori agli 8 anni se non continuamente sorvegliati. Il presente apparecchio può
  • Страница 4 из 69
    Avertissements Advertencias ATTENTION : Cet appareil ainsi que ses parties accessibles deviennent très chauds pendant leur fonctionnement. Il faut faire attention à ne pas toucher les éléments chauffants. Ne pas faire approcher les enfants de moins de 8 ans à moins qu’ils ne soient sous
  • Страница 5 из 69
    Advertências Предупреждения ATENÇÃO: Este aparelho e as suas partes acessíveis aquecem muito durante a utilização. É preciso ter atenção e evitar tocar os elementos que aquecem. Manter afastadas as crianças com menos de 8 anos, caso não estejam a ser vigiadas. O presente aparelho pode ser utilizado
  • Страница 6 из 69
    Avertizări ATENŢIE: Acest aparat şi părţile sale accesibile devin foarte calde în timpul folosirii. Trebuie să fiţi atenţi şi să nu atingeţi elementele de încălzire. Îndepărtaţi copiii sub 8 ani dacă nu sunt supravegheaţi continuu. Acest aparat poate fi utilizat de copiii de peste 8 ani şi de
  • Страница 7 из 69
    Assistenza Assistance ! Non ricorrere mai a tecnici non autorizzati. ! Never use the services of an unauthorised technician. Comunicare: • Il tipo di anomalia; • Il modello della macchina (Mod.) • Il numero di serie (S/N) Queste ultime informazioni si trovano sulla targhetta caratteristiche posta
  • Страница 8 из 69
    En el SAT encontrará recambios, accesorios y productos específicos para la limpieza y mantenimiento de su electrodoméstico a precios competitivos. ESTAMOS A SU SERVICIO Assistência ! Nunca recorra a técnicos não autorizados. Comunique: • o tipo de avaria; • o modelo da máquina (Mod.); • o número de
  • Страница 9 из 69
    Descrizione dell’apparecchio Descripción del aparato Vista d’insieme Vista en conjunto 1 2 3 4 5 6 7 8 9 1 2 3 4 5 6 7 8 9 POSIZIONE 1 POSIZIONE 2 POSIZIONE 3 POSIZIONE 4 POSIZIONE 5 GUIDE di scorrimento dei ripiani Ripiano LECCARDA Ripiano GRIGLIA Pannello di controllo POSICIÓN 1 POSICIÓN 2
  • Страница 10 из 69
    Descrição do aparelho Vista de conjunto 1 2 3 4 5 6 7 8 9 POSIÇÃO 1 POSIÇÃO 2 POSIÇÃO 3 POSIÇÃO 4 POSIÇÃO 5 GUIAS de escorrimento das prateleiras Prateleira BANDEJA PINGADEIRA Prateleira GRADE Painel de comandos Описание изделия Общии вид 1 2 3 4 5 6 7 8 9 ПОЛОЖЕНИЕ 1 ПОЛОЖЕНИЕ 2 ПОЛОЖЕНИЕ 3
  • Страница 11 из 69
    Descrizione dell’apparecchio Descrição do aparelho Pannello di controllo Painel de comandos 1 2 3 4 1 2 3 4 Manopola FORNO/GRILL Spia GRILL Pulsante LUCE DEL FORNO Manopola TIMER Botão HORNO/GRILL Indicador do GRILL Botão LUZ DO FORNO Selector dos TIMER Description of the appliance Описание изделия
  • Страница 12 из 69
    ! Gli imballaggi non sono giocattoli per bambini e vanno eliminati secondo le norme per la raccolta differenziata (vedi Precauzioni e consigli). ! L’installazione va effettuata secondo queste istruzioni e da personale professionalmente qualificato. Una errata installazione può causare danni a
  • Страница 13 из 69
    Centraggio e fissaggio Per fissare l’apparecchio al mobile: aprire la porta del forno e avvitare 4 viti a legno nei 4 fori posti sulla cornice perimetrale. Prima di effettuare l’allacciamento accertarsi che: • la presa abbia la messa a terra e sia a norma di legge; • la presa sia in grado di
  • Страница 14 из 69
    IT Allaccio con tubo flessibile in acciaio inossidabile a parete continua con attacchi filettati Il raccordo di entrata del gas all’apparecchio è filettato 1/2 gas maschio cilindrico. La messa in opera di tali tubi deve essere effettuata in modo che la loro lunghezza, in condizioni di massima
  • Страница 15 из 69
    Avvio e utilizzo ATTENZIONE! Il forno è dotato di un sistema di arresto griglie che consente di estrarle senza che queste fuoriescano dal forno. (1) Per estrarre completamente le griglie è sufficiente, come indicato sul disegno, alzarle, prendendole dalla parte anteriore e tirarle. (2) ! Alla prima
  • Страница 16 из 69
    IT Caratteristiche dei bruciatori ed ugelli Tabella 1 Bruciatore Gas liquido Potenza Termica kW (p.c.s.*) By-pass 1/100 Nominale Ridotta (mm) Forno 2,60 1,00 49 Pressioni di alimentazione Nominale (mbar) Minima (mbar) Massima (mbar) * ** *** Ugello 1/100 78 Gas naturale Portata* g/h Ugello 1/100
  • Страница 17 из 69
    Programmi Programmi di cottura griglia. • Si consiglia di impostare il livello di energia al massimo. Non allarmarsi se la resistenza superiore non resta costantemente accesa: il suo funzionamento è controllato da un termostato. Programma GRILL Si accende l’elemento riscaldante superiore. La
  • Страница 18 из 69
    IT Precauzioni e consigli ! L’apparecchio è stato progettato e costruito in conformità alle norme internazionali di sicurezza. Queste avvertenze sono fornite per ragioni di sicurezza e devono essere lette attentamente. Sicurezza generale • Questo apparecchio riguarda un apparecchio da incasso di
  • Страница 19 из 69
    Manutenzione e cura Sostituire la lampadina Per sostituire la lampadina di illuminazione del forno 1. Svitare il coperchio in vetro del portalampada. 2. Svitare la lampadina e sostituirla con una analoga: potenza 25 W, attacco E 14. 3. Rimontare il coperchio (vedi figura) Escludere la corrente
  • Страница 20 из 69
    ! Do not let children play with the packaging material; it should be disposed of in accordance with local separated waste collection standards (see Precautions and tips). ! The appliance must be installed by a qualified professional in accordance with the instructions provided. Incorrect
  • Страница 21 из 69
    Electrical connection Ovens equipped with a three-pole power supply cable are designed to operate with alternating current at the voltage and frequency indicated on the data plate located on the appliance (see below). Fitting the power supply cable 1. Open the terminal board by inserting a
  • Страница 22 из 69
    GB ! When installation has been completed, check the pipe fittings for leaks using a soapy solution. Never use a flame. 5. Make sure the burner does not switch off when you turn the knob from Max to Min quickly, or when you open and close the oven door quickly. Adapting to different types of gas In
  • Страница 23 из 69
    Start-up and use WARNING! The oven is provided with a stop system to extract the racks and prevent them from coming out of the oven (1). As shown in the drawing, to extract them completely, simply lift the racks, holding them on the front part, and pull (2). ! The first time you use your appliance,
  • Страница 24 из 69
    GB Burner and Nozzle specifications Table 1 Liquid gas Burner Thermal Power kW (gross heat value)* By-pass 1/100 Nominal Reduced (mm) Oven 2,60 1,00 49 Supply pressures Nominal (mbar) Minimum (mbar) Maximum (mbar) * ** *** Natural gas Nozzle 1/100 78 Flow* g/h Nozzle 1/100 *** ** (mm) 189 186 119
  • Страница 25 из 69
    Cooking modes Cooking modes GRILL mode The top heating element comes on. The extremely high and direct temperature of the grill makes it possible to brown the surface of meats and roasts while locking in the juices to keep them tender. The grill is also highly recommended for dishes that require a
  • Страница 26 из 69
    GB Precautions and tips ! This appliance has been designed and manufactured in compliance with international safety standards. The following warnings are provided for safety reasons and must be read carefully. General safety • This is a class 3 built-in appliance. • Gas appliances require regular
  • Страница 27 из 69
    Maintenance and care Switching the appliance off Disconnect your appliance from the electricity supply before carrying out any work on it. Cleaning the appliance • The stainless steel or enamel-coated external parts and the rubber seals may be cleaned using a sponge that has been soaked in lukewarm
  • Страница 28 из 69
    ! Les emballages ne sont pas des jouets pour enfants, il faut les mettre au rebut en respectant la réglementation sur le tri sélectif des déchets (voir Précautions et conseils). ! L’installation doit être effectuée par un professionnel du secteur conformément aux instructions du fabricant. Une
  • Страница 29 из 69
    • la prise est bien compatible avec la fiche de l’appareil. Si ce n’est pas le cas, remplacez la prise ou la fiche, n’utilisez ni rallonges ni prises multiples. ! Après installation de l’appareil, le câble électrique et la prise de courant doivent être facilement accessibles ! Le câble ne doit être
  • Страница 30 из 69
    FR ! N’utiliser que des tuyaux conformes et des joints d’étanchéité métalliques en aluminium ou des joints en caoutchouc conformes aux textes réglementaires applicables dans le pays. 5. vérifier si, en tournant rapidement le bouton, de la position Max à la position Min ou lors de brusques
  • Страница 31 из 69
    Mise en marche et utilisation ATTENTION! Le four est équipé d’un système d’arrêts de grilles qui permet de les retirer sans que ces dernières sortent entièrement du four (1). Pour sortir complètement les grilles il suffit, comme illustré, de les soulever en les saisissant par l’avant et de les
  • Страница 32 из 69
    FR Caractéristiques des brûleurs et des injecteurs Tableau 1 Brûleur Puissance thermique kW (p.c.s.*) Four Pressions d'alimentation * ** *** Gaz liquide Bipasse 1/100 injecteur 1/100 Gaz naturel débit* g/h injecteur 1/100 débit* l/h Nomin. Réduit. (mm) (mm) *** ** (mm) G20 G25 2,60 1,00 49 78 189
  • Страница 33 из 69
    Programmes Programmes de cuisson Programme GRIL L’élément chauffant supérieur est branché. La température élevée et directe du gril permet de saisir l’aliment en surface pour qu’il ne perde pas son jus et reste tendre à souhait. La cuisson au gril est particulièrement recommandée pour les plats qui
  • Страница 34 из 69
    FR Précautions et conseils ! Cet appareil a été conçu et fabriqué conformément aux normes internationales de sécurité. Ces conseils sont fournis pour des raisons de sécurité et doivent être lus attentivement. Sécurité générale • Ce mode d’emploi concerne un appareil à encastrer classe 3. • Pour
  • Страница 35 из 69
    Nettoyage et entretien Mise hors tension Avant toute opération de nettoyage ou d’entretien coupez l’alimentation électrique de l’appareil. Nettoyage de l’appareil • Nettoyer l’extérieur émaillé ou inox et les joints en caoutchouc à l’aide d’une éponge imbibée d’eau tiède additionnée de savon neutre
  • Страница 36 из 69
    ! Es importante conservar este manual para poder consultarlo en todo momento. En caso de venta, de cesión o de mudanza, verifique que permanezca junto al aparato para informar al nuevo propietario sobre su funcionamiento y sobre las advertencias correspondientes. ! Lea atentamente las
  • Страница 37 из 69
    • la toma sea compatible con el enchufe del aparato. Si no es así, sustituya la toma o el enchufe; no utilice prolongaciones ni conexiones múltiples. ! Una vez instalado el aparato, el cable eléctrico y la toma de corriente deben ser fácilmente accesibles. ! El cable no debe sufrir pliegues ni
  • Страница 38 из 69
    ES 5. luego, comprobar que al girar rápidamente el pomo de la posición Max a la posición de Mín o al abrir o cerrar rápidamente la puerta del horno no se produzcan apagados del quemador. Control de la estanqueidad ! Finalizada la instalación controlar la perfecta estanqueidad de todas las uniones
  • Страница 39 из 69
    Puesta en funcionamiento y uso ATENCIÓN! El horno está dotado de un sistema de bloqueo de las parrillas que permite quitarlas sin que sobresalgan del horno (1). Para quitar completamente las parrillas, como se indica en el dibujo, es suficiente levantarlas cogiéndolas de la parte delantera y tirar
  • Страница 40 из 69
    ES Características de los quemadores e inyectores Tabla 1 Gas líquido Quemador Potencia térmica kW By-pass (p.c.s.*) 1/100 Nominal Reducida (mm) 2,60 1,00 49 Horno Presiones de alimentación * ** *** Nominal (mbar) Mínima (mbar) Máxima (mbar) Pico 1/100 78 Gas natural Caudal* g/h Pico 1/100 *** **
  • Страница 41 из 69
    Programas Programas de cocción Programa GRILL Se enciende el elemento calentador superior. La temperatura muy elevada y directa del asador eléctrico permite el inmediato tostado superficial de los alimentos que, obstaculizando la salida de los líquidos, los mantiene más tiernos en su interior. La
  • Страница 42 из 69
    ES Precauciones y consejos ! El aparato ha sido proyectado y fabricado en conformidad con las normas internacionales de seguridad. Estas advertencias se suministran por razones de seguridad y deben ser leídas atentamente. Seguridad general • Este aparato se refiere a un aparato empotrable de clase
  • Страница 43 из 69
    Mantenimiento y cuidados Cortar la corriente eléctrica Antes de realizar cualquier operación, desconecte el aparato de la red de alimentación eléctrica. Limpiar el aparato • Las partes externas esmaltadas o de acero inoxidable y las juntas de goma se pueden limpiar con una esponja empapada en agua
  • Страница 44 из 69
    ! As embalagens não são brinquedos para as crianças e devem ser eliminadas em conformidade com as regras de colecta diferenciada (veja em Precauções e Conselhos). ! A instalação deve ser realizada segundo estas instruções e por pessoal profissional qualificado. Uma instalação errada pode causar
  • Страница 45 из 69
    • a tensão de alimentação seja entre os valores da placa de identificação; • a tomada seja compatível com a ficha do aparelho. Em caso contrário, substitua a tomada ou a ficha; não empregue extensões nem tomadas múltiplas. ! Depois de ter instalado o aparelho, o acesso ao cabo eléctrico e à tomada
  • Страница 46 из 69
    PT tubo metálico flexível não entre em contacto com as partes móveis ou fique amassado. ! Utilize exclusivamente tubos e guarnições de retenção em conformidade com as Normas Nacionais em vigor. Controle da vedação ! Ao terminar a instalação controle a vedação de todas as juntas utilizando uma
  • Страница 47 из 69
    Início e utilização ATENÇÃO! O forno está equipado com um sistema de bloqueio das grelhas que permite retirá-las sem que estas ressaiam do forno (1). Para retirar completamente as grelhas, tal como indicado no desenho, basta levantá-las, segurando-as pela parte da frente, e puxá-las (2). ! Quando o
  • Страница 48 из 69
    PT Características dos queimadores e bicos Tabela 1 Queimador Potência térmica kW (p.c.s.*) By-pass 1/100 Nominal Reduzida (mm) Forno 2,60 Pressões de alimentação Nominal (mbar) Mínima (mbar) Máxima (mbar) * ** *** Gás Natural Gás Líquido 1,00 Bico 1/100 49 78 Vazão* g/h Bico 1/100 *** ** (mm) 189
  • Страница 49 из 69
    Programas Programas de cozedura Programa de GRILL Acende-se o elemento aquecedor superior. A temperatura muito alta e directa do grill possibilita corar imediatamente a superfície dos alimentos que, como obstruem a saída dos líquidos, mantém o interior mais macio. A cozedura no grill é
  • Страница 50 из 69
    PT Precauções e conselhos ! Este aparelho foi projectado e fabricado em conformidade com as normas internacionais de segurança. Estas advertências são fornecidas por razões de segurança e devem ser lidas com atenção. Segurança geral • Este aparelho refere-se a um aparelho de encaixar de classe 3. •
  • Страница 51 из 69
    Manutenção e cuidados Desligar a corrente eléctrica Antes de realizar qualquer operação, desligue o aparelho da alimentação eléctrica. Limpeza do aparelho • As partes externas esmaltadas ou inoxidáveis e as guarnições de borracha podem ser limpas com uma esponja molhada com água morna e sabão
  • Страница 52 из 69
    ! Важно сохранить данное руководство для его последующих консультации. В случае продажи, передачи изделия или при переезде на новое место жительства необходимо проверить, чтобы руководство оставалось вместе с изделием, для того чтобы его новыи владелец мог ознакомиться с правилами эксплуатации и с
  • Страница 53 из 69
    Центровка и крепление Для крепления изделия к кухонному элементу: откройте дверцу духового шкафа и завинтите 4 шурупа для деревянных панелей в 4 отверстия в периметральной раме. ! Электромонтер несет ответственность за правильное подключение изделия к электрическои сети и за соблюдение правил
  • Страница 54 из 69
    RU Подсоединение при помощи жесткой трубы (медной или стальной) ! Подсоединение к газопроводу не должно оказывать каких-либо нагрузок на изделие. На патрубке подачи газа в изделия имеется вращающееся колено L с уплотнительной прокладкой. При необходимости повернуть колено обязательно замените
  • Страница 55 из 69
    ПАСПОРТНАЯ ТАБЛИЧКА Габаритные размеры ширина 43,5 см. высота 31 см. глубина 43,5 см. Объем 58 л Электропитание См. таблицу характеристик Включение и эксплуатация ВНИМАНИЕ! Духовой шкаф у к о м п л е к то ва н с и с те м о й блокировки решеток, позволяющей вынимать их из духовки не полностью (1).
  • Страница 56 из 69
    RU Зажигание духовки вручную В случае временного отключения электроэнергии можно включить горелку духовки вручную следующим образом: 1. откройте дверцу духовки 2. поднесите спичку или кухонную зажигалку, как показано на рисунке, нажмите до упора и поверните против часовой стрелки рукоятку ДУХОВКИ
  • Страница 57 из 69
    Характеристики горелок и форсунок RU Òàáëèöà 1 Сжиженный газ Горелка Теплотворная способность кВт Бай-пас 1/100 Номинальная Сокращенная (mm) Духовка 2,60 1,00 49 Давление подачи Номинальное (мбар Минимальное (мбар) Максимальное (мбар) * ** *** Природный газ Форсунка 1/100 78 Расход* гр/час Бай-пас
  • Страница 58 из 69
    RU Таблица приготовления 58
  • Страница 59 из 69
    Предосторожности и рекомендации ! Изделие спроектировано и изготовлено в соответствии с международными нормативами по безопасности. Необходимо внимательно прочитать настоящие предупреждения, составленные в целях вашеи безопасности. Общие требования к безопасности • Данное устройство является
  • Страница 60 из 69
    RU Техническое обслуживание и уход Отключение электропитания Перед началом какой-либо операции по обслуживанию или чистке отсоедините изделие от сети электропитания. Чистка изделия • Наружные эмалированные элементы или детали из нержавеющей стали, а также резиновые уплотнения можно протирать
  • Страница 61 из 69
    Instalare ! Este importantă păstrarea acestui manual pentru a putea fi consultat în orice moment. În caz de vânzare, de închiriere sau de schimbare a locuinţei, acesta trebuie să fie înmânat împreună cu cuptorul, pentru a informa noul proprietar cu privire la funcţionare şi la respectivele
  • Страница 62 из 69
    ! Toate componentele care asigură protecţia aparatului trebuie să fie fixate în aşa fel încât să nu poată fi scoase cu mâna liberă. ! Producătorul îşi declină orice responsabilitate în cazul nerespectării acestor norme. Branşamentul electric Racordarea la gaze Cuptoarele dotate cu un cablu de
  • Страница 63 из 69
    Adaptarea la diferite tipuri de gaz Pentru a adapta cuptorul la alte tipuri de gaz în afara celui prevăzut din fabrică (indicat pe etichetă), este necesar să procedaţi astfel: • Înlocuiţi duza arzătorului din cuptor: 1. deschideţi uşa cuptorului la maxim; 2. scoateţi fundul cuptorului (prin
  • Страница 64 из 69
    RO Pornire şi utilizare 3. După aprindere, închideţi uşa cuptorului. ATENŢIE! Cuptorul este prevăzut cu un sistem de oprire a grătarelor care permite extragerea acestora fără ca ele să iasă din cuptor (1). Pentru a extrage complet grătarele este suficient, astfel cum se arată în desen, să le
  • Страница 65 из 69
    Caracteristicile arzătoarelor şi duzelor RO Tabelul 1 Arzător Putere termică kW (p.c.s)* Cuptor Presiunea de alimentare * ** *** Gaze lichefiate By-pass 1/100 Nominal Redus (mm) 2,60 1,00 49 Debit* g/h Duză 1/100 78 Nominală (mbar) Minimă (mbar) Maximă (mbar) Gaz natural Debit* l/h Duză 1/100 ***
  • Страница 66 из 69
    RO Programe Programe cuptor Programul GRÃTAR Se aprinde elementul de încălzire din partea superioară. La temperaturi mari şi la flacără directă, grătarul asigură rumenirea superficială şi imediată a alimentelor şi împiedică eliminarea lichidelor, ceea ce menţine preparatele moi. Pregătirea
  • Страница 67 из 69
    Măsuri de precauţie şi recomandări ! Aparatul a fost proiectat şi construit în conformitate cu normele internaţionale de siguranţă. Recomandările sunt furnizate pentru siguranţa dvs. şi vă recomandăm să le citiţi cu atenţie. Siguranţă generală • Acest aparat este un aparat de încastrat în mobilier,
  • Страница 68 из 69
    195114083.01 01/2014 - XEROX FABRIANO RO Întreţinerea şi îngrijirea aparatului Debranşarea de la reţeaua electrică Înainte de orice operaţie, debranşaţi aparatul de la reţeaua de alimentare cu curent electric. Curăţarea aparatului • Părţile externe, smălţuite sau din inox, precum şi garniturile din
  • Страница 69 из 69