Доступность: Бесплатно как и все руководства на сайте. Без регистрации и SMS.
Дополнительно: Чтение инструкции онлайн
H-CDM8041
CD/MP3/WMA RECEIVER CD/MP3/WMA
Instruction manual
Страница: (1 из 50)
навигация
1
2
3
4
5
6
7
8
9
10
11
12
13
14
15
16
17
18
19
20
21
22
23
24
25
26
27
28
29
30
31
32
33
34
35
36
37
38
39
40
41
42
43
44
45
46
47
48
49
50
Оглавление инструкции
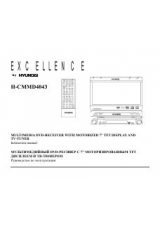
Страница 1 из 51 H-CDM8041 CD/MP3/WMA RECEIVER Instruction manual CD/MP3/WMA
Страница 2 из 51 Dear customer! Thank you for purchasing our product. For safety, it is strongly recommended to read this manual carefully before connecting, operating and/or adjusting the product and keep the manual for reference in the future. Table of contents Table of contents
Страница 3 из 51 Important safeguards Using the device at temperature below -10º may cause the breakage of the device. BEFORE USING PLEASE HEAT UP THE PASSENGER COMPARTMENT TO THE RECOMMENDED TEMPERATURE! Read carefully through this manual to familiarize yourself with this high-quality sound system. Disconnect the
Страница 4 из 51 Installation/ connection First complete the electrical connections, and then check them for correctness. Installation way It is an anti-theft installation way. The chassis wear a metal sliding housing. Please have the wiring connection of the power supply, speakers and antenna as for the
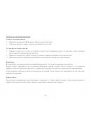
Страница 5 из 51 Detachable control panel Detaching the front panel 1. Press the OPEN button on the front panel. The panel will go down. 2. Push the panel to the left and then pull it towards you. Attaching the control panel 1. Insert the left side of the control panel into the main unit and press it. Note: the
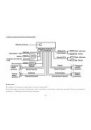
Страница 6 из 51 Electrical connection Notes: In spite of having any kinds of speaker system, must use 4 ohms impedance of speaker to reduce the distortion during high volume level. Prohibit to make the conductors of auto antenna and ground touch with each other. 6
Страница 7 из 51 Using the ISO Connector 1. If your car is equipped with the ISO connector, then connect the ISO connectors as illustrated. 2. For connections without the ISO connectors, check the wiring in the vehicle carefully before connecting, incorrect connection may cause serious damage to this unit. Cut the
Страница 8 из 51 Panel controls Front panel 1. A.P / SEL / B / buttons In Radio mode press the A.P button to scan the preset memorized stations. Press it and hold for 2 seconds to store the programs with the best reception into preset buttons automatically. Press the SEL button repeatedly to select the audio modes:
Страница 9 из 51 In Radio mode press the buttons to start automatic station search. In Radio mode press and hold for 2 seconds the buttons to enter the manual station search. During playback press the buttons to go to previous/next track. During playback press and hold for 2 seconds the buttons to change fast
Страница 10 из 51 11. RDM button Press to start random playback. 12. PRESET STATION [1-6] buttons 13. AF button Press it to enter the AF mode. Press and hold for 2 seconds to turn the EON function on/off. 14. TA button Press it to activate/ deactivate the TA function. Press and hold for 2 seconds to turn the LOUD
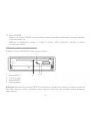
Страница 11 из 51 Back of the front panel Press the RELEASE button on the front panel to flip it down. 1 2 1. 2. 3. 4. 3 4 EJECT button Disc slot RESET button Anti-theft LED indicator Note: Pressing the RESET button will erase the clock setting and stored stations. Panel status indicator lights up when you slide the
Страница 12 из 51 General operations Reset the unit Operating the unit for the first time or after replacing the car battery, you must reset the unit. Press OPEN button on the panel to open the panel and press the RESET button with thin hard object to restore the unit to the original factory settings. Power button
Страница 13 из 51 Adjusting the system menu Press and hold for 2 seconds the DSP/M button, press it or the button repeatedly to select the system menu settings: STAND BY LCD => SCREEN SAVER => PTM => VOLUME PGM => LCD MODE => DATE SET => CLOCK => TIME FORMAT => LOCAL/DISYANT => AREA => AUTO SEEK => TA SEEK => TA
Страница 14 из 51 TA volume - the value define the minimum value of the TA Volume can be adjusted down. The adjustable range is 0~40. The default one is 18. Region - set the region code function ON or OFF. Note: during setting up press A.P button to exit. Turning the sound off Press the MUTE button to turn the sound
Страница 15 из 51 Digital tuner operations Note: RDS (Radio Data System) service availability varies with areas. Please understand if RDS service is not available in you area, the following service is not available, either. Band selection Press the MODE button to select RADIO. Press BAND once or more to select: FM1,
Страница 16 из 51 Preset scan Select a band. Press A.P button to scan all preset stations in the memories of the current band and stay on each memory stations for about 7 seconds. To stop preset scan, press the button again. Local/ Distant mode Press PTY button and hold for 2 seconds to turn the LOCAL function On or
Страница 17 из 51 AF (Alternative Frequencies) function Press the AF button on the panel to turn on or turn off the AF function. If the AF function is on the display will show AF . The RDS program will be automatically searched and received. After turning on, if the RDS signal is week or even no signal, the unit
Страница 18 из 51 CD operations Discs for playback This unit can play disc types: CD/CD-R/-RW. Compatible with formats: MP3/WMA/CDDA. Loading a disc 1. 2. 3. 4. Turn the power on. Press the OPEN button on the panel. Insert the disc with the printed side facing upward into the slot. Press EJECT button on the inner
Страница 19 из 51 Fast forward and backward playback Press and hold for 2 seconds the buttons to fast the playing in backward or forward direction. Release the button when the desired location is found. Scanning (intro) You can play the beginning of every track for 10 seconds in sequence. Press the INT button
Страница 20 из 51 6. Press SEL to start the selected file playback. Displaying the ID3 information Under MP3 mode press the A.P button repeatedly, the folder name, file name, title, artist and album information will be scrolling on the LCD display. As long as the current playing MP3 music contains relevant ID3 tag
Страница 21 из 51 MP3 overview Notes on MP3: MP3 is short for MPEG Audio Layer 3 and refers to an audio compression technology standard. This product allows playback of MP3 files on CD-ROM, CD-R or CD-RW discs. The unit can read MP3 files written in the format compliant with ISO 9660. However it does not support the
Страница 22 из 51 Make sure that when MP3 CD-R or CD-RW is burned that it is formatted as a data disc and NOT as an audio disc. You should not write non-MP3 files or unneeded folders along with MP3 files on the disc otherwise it takes a long time until the unit starts to play MP3 files. With some CD-R or CD-RW
Страница 23 из 51 Handling discs Dirty, scratched or warped discs may cause skip ping or noise. Handle the disc only by the edges. To keep clean do not touch its surface. Discs should be stored in their cases after use to avoid scratches. Do not expose discs to direct sunlight, high humidity, high temperature or
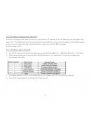
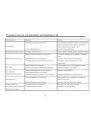
Страница 24 из 51 Troubleshooting guide Symptom Cause Solution General No power The car ignition is not on. The fuse is blown. If the power supply is properly connected to the car accessory switch the ignition key to ACC . Replace the fuse. Disc Disc cannot be loaded. Presence of disc inside the player. Remove the
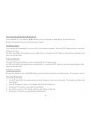
Страница 25 из 51 Specification General Power supply: Current consumption: Maximum power output: Dimensions (L x W x H): Working temperature range: 12 V DC max. 15 A 50 W x 4 channels 178 x 165 x 50 mm -10º - +60º FM Stereo Radio Frequency range: Usable sensitivity (S/N = 30 dB): Preset memory stations: 65 74 / 87.5
Страница 36 из 51 RESET ( ) OPEN. . . RESET, : , , . , . POWER, . 2 , . : , , . VOL+/-, TRE LE ( BAL ( / . SEL, ) => LOUD ( )/ FAD ( , : BAS ( ) => 3D GAIN ( / . 36 ) => MID => ) => ) => BEEP TONE.
Страница 37 из 51 : FADER, BAL/FAD , , BALANCE. 2 DSP/M, : STAND BY LCD => SCREEN SAVER => PTM => VOLUME PGM => LCD MODE => DATE SET => CLOCK => TIME FORMAT => LOCAL/DISTANT => AREA => AUTO SEEK => TA SEEK => TA VOLUME => REGION. , . Stand by LCD: , : DEMO, TIME ( ), PTM, OFF ( .). DEMO. Screen saver: , : DEMO, TIME