Доступность: Бесплатно как и все руководства на сайте. Без регистрации и SMS.
Дополнительно: Чтение инструкции онлайн
84
,
(
).
,
.
,
.
,
,
.
(
,
).
.
,
,
.
,
.
,
.
Страница: (84 из 88)
навигация
1
2
3
4
5
6
7
8
9
10
11
12
13
14
15
16
17
18
19
20
21
22
23
24
25
26
27
28
29
30
31
32
33
34
35
36
37
38
39
40
41
42
43
44
45
46
47
48
49
50
51
52
53
54
55
56
57
58
59
60
61
62
63
64
65
66
67
68
69
70
71
72
73
74
75
76
77
78
79
80
81
82
83
84
85
86
87
88
Оглавление инструкции
Страница 1 из 89 H-CMD7079 DVD RECEIVER WITH BLUETOOTH Instruction manual DVD- C BLUETOOTH
Страница 2 из 89 Dear customer! Thank you for purchasing our product. For safety, it is strongly recommended to read this manual carefully before connecting, operating and/or adjusting the product and keep the manual for reference in the future. Table of contents Table of
Страница 3 из 89 Important safeguards Using the device at temperature below -10º may cause the breakage of the device. Before using please heat up the passenger compartment to the recommended temperature! Read carefully through this manual to familiarize yourself with this high-quality system. Disconnect the
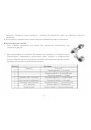
Страница 4 из 89 Accessories 1. Receiver 2. Remote controller 3. Carrying case 4. ISO connector 5. Mounting parts: Hexagon nut M5 T (3.5 mm) Mounting box (0.6 mm) Left key (1.0 mm) Right key (1.0 mm) Metal bar (0.8 mm) Plain washer (5 mm) Outer trim ring Spring washer (5 mm) Screw (5X5 mm) Screw (5X25 mm) Screw M5
Страница 5 из 89 Installation/Connections First complete the electrical connections, and then check them for correctness. If you are not confident working with electrical wiring, removing and reinstalling interior panels, carpeting, dashboards or other components of your vehicle, please call your dealer in order to
Страница 6 из 89 Installation method A WARNING: Disconnect negative battery terminal from battery before starting installation. Consult the vehicle’s owner’s manual for proper instructions. Remove two transport screws from the top of the unit before installation. 1. After removing the old unit and mounting sleeve,
Страница 7 из 89 Installation method B Note: Outer trim frame, hook, and mounting sleeve are not used for this installation. This is only intended as a general guide; contact the vehicle's manufacturer for specific instructions. This method of installation uses the screw holes at the sides of the unit and the holes
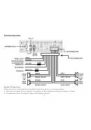
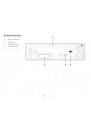
Страница 8 из 89 Electrical connections Speaker Wiring Notes Follow the above wiring diagram to install the head unit with new or existing speakers. This unit is designed for use with four (4) speakers with the impedance between 4 Ohms to 8 Ohms. An impedance load of less than 4 Ohms could damage the unit. 8
Страница 9 из 89 Never bridge or combine the speaker wire outputs. When not using four speakers, use electrical tape to tape the ends of the unused speaker outputs to prevent a short circuit. Never ground the negative speaker terminals to chassis ground. Using the ISO Connector 1. If your car is equipped with the
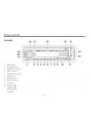
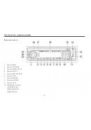
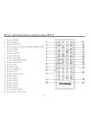
Страница 10 из 89 Panel controls Front panel 1. 2. 3. 4. 5. 6. 7. 8. 9. 10. REL button POWER button PREVIOUS button NEXT button BD/NP/SUB button APS button MODE button PHONE button AUX IN Numeric pad 1/LEFT/OSD 2/RIGHT/RPT 3/UP/INT 10
Страница 11 из 89 11. 12. 13. 14. 15. 16. 17. 18. 19. 20. 21. 4/DOWN/RDM 5/ENTER/STOP 6/SET/PAU 7/AF 8/TA 9/PTY * 0 MIC in USB slot Bluetooth operation indicator SD slot EJECT button LCD display Remote control sensor DISC slot ANSWER button VOL knob/SEL button END CALL button 11
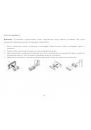
Страница 12 из 89 Back of the front panel 1. 2. 3. 4. Disc loading slot Connector RESET button LED indicator 12
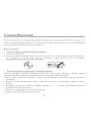
Страница 14 из 89 24. 25. 26. 27. AUDIO button Numeric pad DISP/END CALL button PHONE button Battery information of RC 1. Press the catch and at the same time pull out the battery tray. 2. Insert the 1 x lithium battery, type CR 2025 3V battery with the stamped (+) mark facing upward. Insert the battery tray into
Страница 15 из 89 General operations Reset the unit Operating the unit for the first time or after replacing the car battery, you must reset the unit. Press RESET button to restore the unit to the original factory settings. Power button Press POWER button to turn on the unit. Press POWER to switch the power off.
Страница 16 из 89 Keep pressing SEL button for 2 seconds to select the RDS function: TA SEEK/ALARM => RETUNE L/S => MASK DPI/ALL. TA (Traffic Announcement) mode To determine what action will the radio take if the newly tuned station does not receive TP (Transport Program) information for 5 seconds. Rotate the VOL
Страница 17 из 89 To mask both PI and strong signal non-RDS station. Mute Press MUTE button to activate the Mute function. Press it again or use the VOL knob on the panel or press VOL+/VOL- buttons on the RC to cancel. Adjusting clock 1. Press and hold DISP/END CALL button for more than 3 seconds to select the hour
Страница 18 из 89 Radio operations Note: RDS (Radio Data System) service availability varies with areas. Please understand if RDS service is not available in you area, the following service is not available, either. Choose Radio Band Press BND/SYS button on the RC or BD/NP/SUB button on the panel to select a band.
Страница 19 из 89 is being used. Save Your Preset Stations There are six numbered preset buttons, which can store and recall stations for each band. If while listening to a radio station you would like to save the station as a pre-set, press and hold one of the numeric buttons 1-6 until you hear a beep. The button
Страница 20 из 89 Press 7/AF numeric button on the panel so that the unit will choose the strongest FM signal for the selected station, so that you do not have to re-tune the stations when driving between different transmitter coverage areas. When AF is on, it means RDS information is received; when AF is flashing,
Страница 21 из 89 Glossary PBC (PlayBack Control) PlayBack Control is a menu recorded on the disc with SVCD or VCD2.0 format. For the discs contained PBC, it can playback interactive software with the menu displayed on TV. And if the disc contains still images, it can playback high definition of still image. Title
Страница 22 из 89 DVD operations Insert/Eject disc Insert a disc into disc slot with label side up. The disc will be automatically loaded into the unit, even when it is off or in radio mode. The word “LOAD” will show on the display and the disc will play automatically. Press EJECT button to eject the disc from the
Страница 23 из 89 Panel Numeric Pad functions The number 1-6 buttons contain dual functions during disc play. After pressing SETUP button on the RC or 6/SET/PAU button on the panel, the setup menu will be prompted. Then the number buttons are for navigating and confirming the commands. Button 1: Left/Display OSD
Страница 24 из 89 Button 5: ENTER/Stop Press 5/ENTER/STOP button on the panel as the ENTER button on the RC for confirming the commands on the setup menu. Press and hold the button for 3 seconds to stop the disc. The unit will be idle until further command is given. Press and hold the button 6 to play the disc
Страница 25 из 89 Slow Motion Press SLOW button on the RC to perform slow motion of the video play. Slow motion speed within 1/2 up to 1/8 will be shown, according to the slowness. Cycle back to normal playback of press PLAY/PAUSE button to resume. Multi-Angle View Press ANGLE button on the RC to perform multi-angle
Страница 26 из 89 Mixed-disc operations While you are playing mixed disc, which contains MP3, WMA, JPG or DivX formats, just insert the disc into the CD slot and the menu on the right hand side will be prompted. The unit will directly play the audio files. However, you can use the cursor buttons and ENTER button to
Страница 27 из 89 Button 1-6 The functions of button 1-6 also apply to the mixed-disc play (See “DVD Operations” above). Return to the menu If you would like to go back to the playlist menu to choose the other file to view/listen to, press and hold button 5 to stop the playback. Then the playlist menu will be
Страница 28 из 89 VCD/CD/MP3 operations Insert/Eject CD Insert a disc into CD slot with label side up. The disc will be automatically loaded into the unit, even when it is off or at radio mode. The word “LOAD” will show on the display and the disc will play automatically. Press EJECT button to eject the disc from
Страница 29 из 89 VCD: Press AUDIO button during playback. It is possible to switch the sound between mono and stereo sound. The sequence is as follows: Left Vocal --> Right Vocal --> Mono Left --> Mono Right --> Stereo CD: Press AUDIO during playback. It is possible to switch the sound between mono and stereo
Страница 30 из 89 MP3 overview Notes on MP3 and WMA MP3 is short for MPEG Audio Layer 3 and refers to an audio compression technology standard. This product allows playback of MP3 files on CD-ROM, CD-R or CD-RW discs. The unit can read MP3 files written in the format compliant with ISO 9660. However it does not
Страница 31 из 89 For ISO 9660 - compliant format, the maximum allowable depth of nested folders is 8, including the root directory (folder). When CD-R disc is used, playback is possible only for discs, which have been finalized. Make sure that when MP3 CD-R or CD-RW is burned that it is formatted as a data disc and
Страница 32 из 89 AUX in, RCA out, SUB out, Video out and USB/SD operations Auxiliary Input The Auxiliary input jack is on the front of unit. Use the stereo jack wire and connect to the stereo plug of the unit. Route the other end of the wire to the any external audio device. Press and hold the MODE button to choose
Страница 33 из 89 Menu operations (The screen on your player may have difference with the screen shown here). Press SETUP button on the RC or 6/SET/PAU button on the panel to display setup screen, use cursor LEFT/RIGHT and ENTER buttons to select the desired menu page: System, Language, Audio, Video, Digital. In the
Страница 34 из 89 16:9: For 16:9 wide screen TV. Password: Original password is 0000. Rating: The rating of the disc is from 1 to 8: (1) with the most limits when playing. (8) with the least limits when playing. Original setting: 8 Note: The rating can be selected only under the password unlocked status, and the
Страница 35 из 89 Audio setup Audio out: Select digital output format. SPDIF/OFF: There is no signal output from coaxial or optical output. SPDIF/RAW: When the unit is connected with the amplifier by coaxial or optical connecter, please select this mode. SPDIF/PCM: When the unit is connected with the two-channel
Страница 36 из 89 Digital setup Output mode: Select the output mode: LINE OUT: Compress the input signal. The volume is small. RF REMOD: The volume is large. Dynamic range: When you select the compressed mode as “line out”, select it to adjust the compression proportion and get the different compressed effect. When
Страница 37 из 89 Bluetooth operations Pairing First, make sure the bluetooth function in your headset is set to “ON”. Then press and hold PHONE button until “PAIRING” blinks on the display waiting for the bluetooth device to connect. At this time, please run the bluetooth search and connect function in your cell
Страница 38 из 89 Incoming Call Display Anytime when there is an incoming call, the LCD display will show the incoming number. Answering call on the front panel When there is an incoming call, press ANSWER button to receive a call in your unit. You can perform this function on the front panel or on the RC. Ending
Страница 39 из 89 A2DP Stereo Transfer The function is for the cellphone, which is built-in with A2DP stereo transfer functions. Play the music in the cellphone, and then choose the option of “play via bluetooth” in the cellphone. The music from cell phone will be transfered to BT PLAY mode automatically. You can
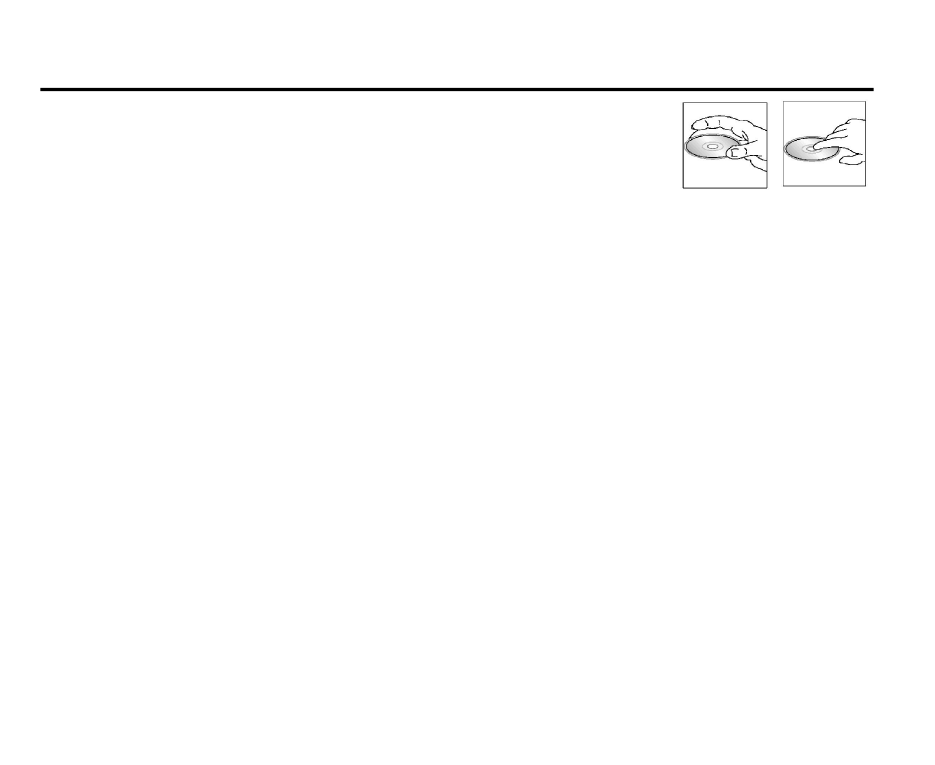
Страница 40 из 89 Handling discs Dirty, scratched or warped discs may cause skip ping or noise. Handle the disc only by the edges. To keep clean do not touch its surface. Discs should be stored in their cases after use to avoid scratches. Do not expose discs to direct sunlight, high humidity, high temperature or
Страница 41 из 89 Troubleshooting guide Symptom No power Cause The car ignition is not on. Disc cannot be loaded. The fuse is blown. Presence of disc inside the player. Disc cannot be read. Inserting the disc in upside down. Compact disc is extremely dirty or defective. Temperature inside the car is too high. No
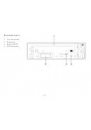
Страница 42 из 89 Specification General Power supply: Fuse: Maximum power output: Dimensions (W x H x D): ESP function FM stereo radio Frequency range: Sensitivity: Preset memory: MW (AM) section Frequency range: Preset memory: DVD deck specification Format: Disc types: Video system/Audio system: Video specification
Страница 43 из 89 S/N ratio (A-vtd)/Separation: Line out Output: Bluetooth Bluetooth compatibility 80dB/50dB 2 channels RCA line-out (2V) V 1.2/2.0 Specifications are subject to change without notice. Dimensions are approximate. 43