53
FX_EDGE3_8_Spa
ESP
AÑOL
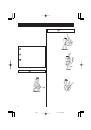
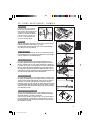
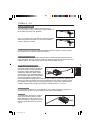
PUENTE HARDTAIL
Para cambiar las cuerdas, pase las nuevas cuerdas por los ojales
correspondientes situados en la parte posterior de la guitarra y llévelas
por encima de la silleta.
Puede ajustar la octavación girando el tornillo de octavación situado en la
parte posterior del puente con un destornillador Phillips para desplazar la
silleta adelante o atrás. La altura de la cuerda se regula subiendo o
bajando los pequeños tornillos Allen mediante una llave en cualquiera de
los lados de la silleta.
(B)
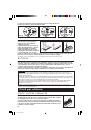
PUENTE ARQUEADO AJUSTABLE
La altura de cuerdas en un puente arqueado se puede ajustar girando los
tornillos moleteados situados a cada lado del puente. En el sentido de las
agujas del reloj se reduce la altura; en el sentido contrario al de las
agujas del reloj se aumenta la altura.
Dado que el puente no está fijado al cuerpo, la octavación se puede
ajustar aflojando las cuerdas y desplazando el puente hacia adelante o
atrás.
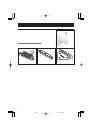
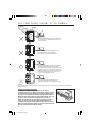
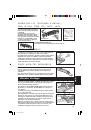
Vibrato Vintage
Para obtener resultados óptimos recomendamos cambiar las cuerdas una
a una. De este modo no se suprimirá la tensión de las cuerdas en el
mástil y se mantendrá la tensión en el vibrato.
Para cambiar las cuerdas de la VBX60 o VBS80, pase la cuerda nueva por
debajo de la barra de retenida delantera del cordal (A). La VBF70 no tiene
barra de retenida delantera.
El extremo con bola de la cuerda se debe pasar por encima y alrededor
de la barra de retenida trasera del cordal (B).
El orificio de la bola del extremo de la cuerda se introduce en el pasador
de la barra de retenida trasera del cordal y se debe tirar de la cuerda
hacia el clavijero. Si se afloja la tensión de la cuerda en el cordal la bola
puede salirse del pasador. Para solventar este problema se puede
mantener la tensión de la cuerda tirando de ella hacia el clavijero.
Lleve la cuerda al clavijero y, mientras mantiene la tensión, enróllela en la
clavija. Compruebe que la cuerda repose sobre la silleta correcta en el
puente. Cuando esté tensada, afine la cuerda. Repita la operación con el
resto de las cuerdas.
(A)
(B)
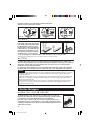
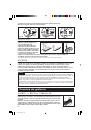
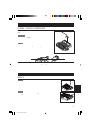
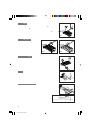
GIBRALTAR III (GUITARRA Y BAJO),
CB3 Y FULL TUNE III, ART1, ART2
La altura se puede ajustar girando el tornillo
de ajuste en cualquiera de los extremos (A)
con un destornillador plano (A).
Puede ajustar la octavación desplazando la
silleta hacia delante o hacia atrás; para ello,
gire el tornillo de ajuste (B)situado detrás
del puente. Puede utilizar un destornillador
Phillips (+), un destornillador plano (-) o la
llave hexagonal opcional.
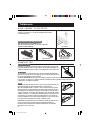
SUSTITUCIÓN DE LAS CUERDAS: CB3
Instale las cuerdas introduciéndolas desde la parte delantera del puente.
(A)
(B)
(A)
(B)
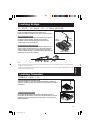
GIBRALTAR III, CB3
FULL TUNE II,
ART, ART2
VBX60
VBS80
VBF70