Инструкция для INDESIT K342 GB/R

(скачивание инструкции бесплатно)
Формат файла: PDF
Доступность: Бесплатно как и все руководства на сайте. Без регистрации и SMS.
Дополнительно: Чтение инструкции онлайн
background image

16

Installation

All instruction on the following pages must be carried out
by a competent person (corgi registered) in compliance
with gas safety (installation and use) regulation 1984.
Important: disconnect the cooker from the electrycity
and gas supply when any adjustment, etc.

Positioning your appliance
Your cooker is designed with a degree of protection against
overheating in class X; the appliance can therefore be
installed next to cabinets, provided the height does not
exceed that of the hob. The wall touching the back panel of
the cooker should be non-inflammable. Remember that
during use, the back panel of the cooker may reach a tem-
perature up to 50°C above that of the room temperature.
Important: this appliance may be installed and used only
in permanently ventilated rooms in compliance with current
directives. The following precautions should be taken:

a) The room must be provided with an external exhaust

system obtained with a hood or with an electric
ventilator that goes on automatically each time the unit
is switched on.

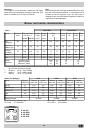
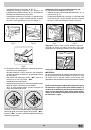
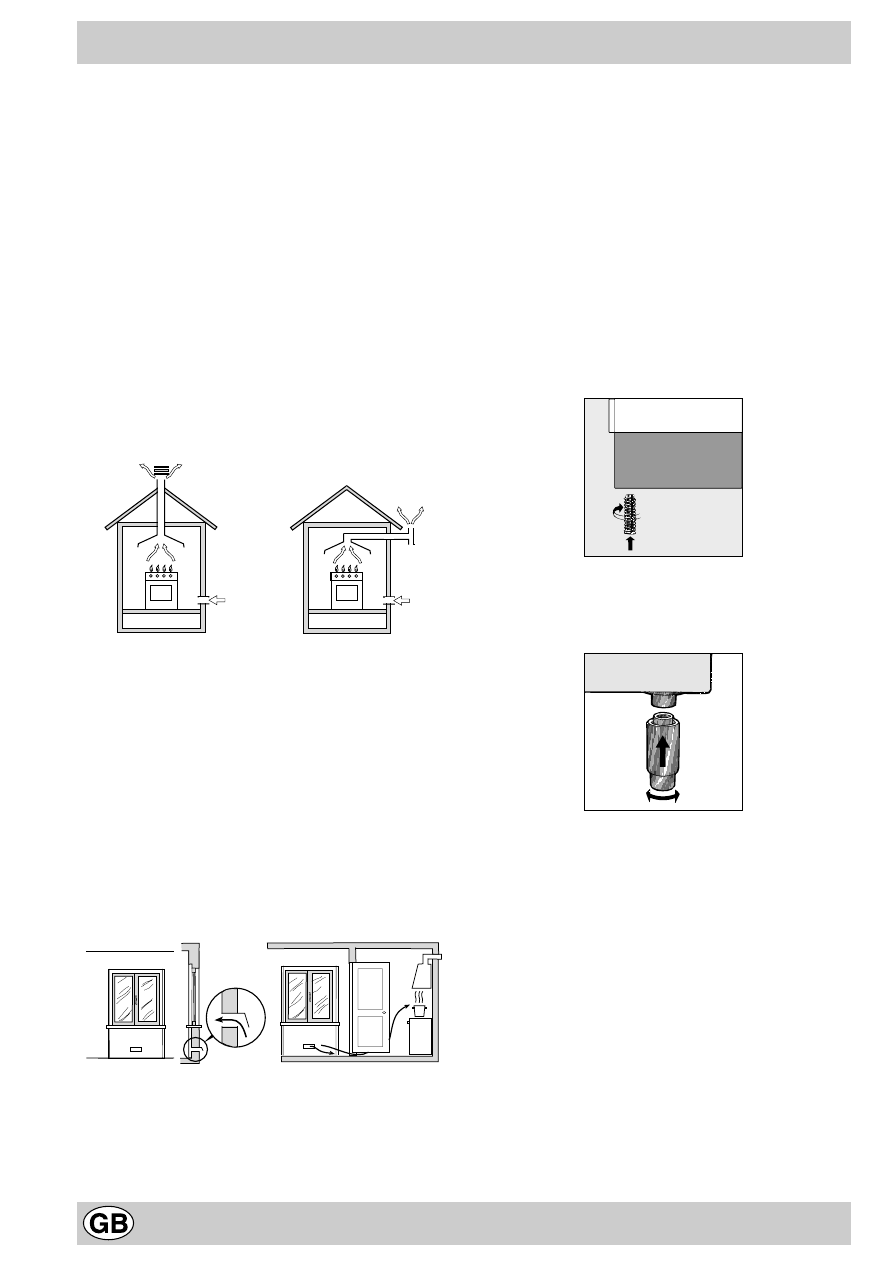
In the case of chimneys or flues

Directly to the

with branches (for cookers)

exterior

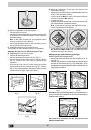
b) The room must be provided with a system for air inflow

which is necessary for a regular combustion. The air
flow necessary for the combustion should be at least 2
m

3

/h for kW of installed power. The system may be

realized by drawing the air directly from outside the
building through a pipe that has at least a 100 cm

2

useable section and which must not be accidently
obstructed (Fig. A). And further it may be realized
indirectly from other adjacent rooms which are provided
with a ventilation pipe for the expulsion of the fumes to
the outside of the building as foresaid, and which must
not be part of the building in common use or rooms
with risk of fire, or bedrooms (Fig. B).

Detail A

Adjacent

Room to

room

be ventilated

A

Fig. A

Fig. B

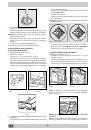
Examples of ventilation openings

Increased opening between

for the comburent air

the door and and floor

c) During prolonged use of the appliance you may

consider it necessary to open a window to the outside
to improve ventilation.

d) The liquefied petroleum gases, which are heavier than

air, stagnate towards the ground. Therefore, the rooms
containing LPG cans must have openings towards the
outside in order to allow the venting from the ground of
eventual gas leak. Thus, the LPG cans must not be
installed or settled in rooms that are below the ground
level, (cellar, etc.) whether the cans are empty or
partially full. It is advisable to keep in the room only the
can which is being used, and it must be placed away
from direct heat sources (ovens, fireplaces, stoves,
etc.) that could make the can reach temperatures
higher than 50°C.

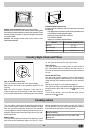
Levelling your appliance (only on a few models)
Your cooker is supplied with feet for levelling the appliance.
If necessary, these feet can be screwed into the housings
in the corners of the cooker base.

Mounting the legs (only on a few models)
Press-fit legs are supplied which fit under the base of your
cooker.

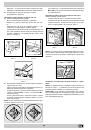
Installation of the cooker
The appliance can be installed next to furniture units which
are no taller than the top of the cooker hob. The wall in
direct contact with the back panel of the cooker must be
made of non-flammable material.  During operation the
back panel of the cooker could reach a temperature of
50°C above room temperature. For proper installation of
the cooker, the following precautions must be taken:
a) The appliance can be placed in a kitchen, dining room

or bedsit, but not in a bathroom.

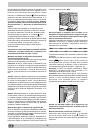
b) All furniture around the appliance must be placed at

least 200 mm from the top of the cooker, should the
surface of the appliance be higher than the worktop of
this furniture. Curtains should not be placed behind
the cooker or less than 200 mm away from the sides
of the appliance.

c) Any hoods must be installed according to the require-

ments in the installation manual for the hoods them-
selves.

d) If the cooker is installed beneath a wall cabinet, the

1
2
3
4
5
6
7
8
9
10
11
12
13
14
15
16
17
18
19
20
21
22
23
24
25
26
27
28
29
30
31
32
33
34
35
36
37
38
39
40
41
42
43
44
45
46
47
48
49
50
51
52
53
54
55
56
57
58
59
60
Оглавление инструкции
  • Страница 1 из 61
    Cucina Installazione e uso Cooker Installation and use Êóõoííaÿ ïëèòà Óñòàíîâêà è ïîëüçîâàíèå Aragaz Instalare ºi utilizare Konyhabútor Beépítés és használat K 342 G/R K 342 GB/R K 342 GS/R K 343 GS/R
  • Страница 2 из 61
    Cucina con forno gas e grill gas Istruzioni per l'installazione e l'uso 3 Cooker with gas oven and gas grill Instructions for installation and use 15 Ïëèòà ñ ãàçîâîé äóõîâêîé è ãàçîâûì ãðèëåì Èíñòðóêöèè ïî óñòàíîâêå è ýêñïëóàòàöèè 26 Aragaz cu cuptor pe gaz ºi grill pe gaz Instrucþiuni pentru
  • Страница 3 из 61
    Avvertenze Per garantire l’efficienza e la sicurezza di questo elettrodomestico: • rivolgetevi esclusivamente a centri di assistenza tecnica autorizzati • richiedete sempre l’utilizzo di parti di ricambio originali 1 Queste istruzioni sono valide solo per i paesi di destinazione i cui simboli
  • Страница 4 из 61
    Istruzioni per l’installazione cace aumentando la potenza di spirazione meccanica se essa esiste. d) I gas di petrolio liquefatti, più pesanti dell’aria, ristagnano verso il basso. Quindi i locali contenenti bidoni di GPL debbono prevedere delle aperture verso l’esterno così da permettere
  • Страница 5 из 61
    mità e fissarlo per mezzo di fascette di serraggio conformi alla UNI-CIG 7141. Qualora una o più di queste condizioni non possa essere rispettata, bisognerà ricorrere ai tubi metallici flessibili, conformi alla norma UNI-CIG 9891. Allorchè la cucina venga installata secondo le condizioni della
  • Страница 6 из 61
    • mm, e sostituirli con quelli adatti al nuovo tipo di gas (vedi tabella 1 “Caratteristiche dei bruciatori ed ugelli”). rimettere in posizione tutti i componenti seguendo le operazioni inverse rispetto alla sequenza di cui sopra. b) Regolazione del minimo del bruciatore forno gas termostatato (vedi
  • Страница 7 из 61
    Porre particolare attenzione ai cavi delle candele ed ai tubi delle termocoppie. Attenzione Al termine dell’operazione sostituire la vecchia etichetta di taratura con quella corrispondente al nuovo gas di utilizzo, reperibile presso i nostri Centri Assistenza Tecnica. Nota Qualora la pressione del
  • Страница 8 из 61
    Caratteristiche Tecniche Dimensioni utili del forno: larghezza cm 39 profondità cm 44 altezza cm 34 Questa apparecchiatura è conforme alle seguenti Direttive Comunitarie: - 73/23/CEE del 19/02/73 (Bassa Tensione) e successive modificazioni; - 89/336/CEE del 03/05/89 (Compatibilità Elettromagnetica)
  • Страница 9 из 61
    La cucina con forno gas C H A B E L P D M O N K L Q M O G N F Q M O N A Piano di contenimento eventuali trabocchi B Bruciatore a gas C Dispositivo di sicurezza (presente solo su alcuni modelli) D Griglia del piano di lavoro E Cruscotto F Piedini regolabili G Leccarda o piatto di cottura H
  • Страница 10 из 61
    Le diverse funzioni presenti nella cucina Attenzione: prima di utilizzare il forno per la prima volta, accendetelo, con il termostato al massimo, per circa mezz’ora con la porta aperta ed aerare il locale. L’odore che talvolta si avverte durante questa operazione è dovuto all’evaporazione delle
  • Страница 11 из 61
    la porta del forno semiaperta posizionando fra porta e cruscotto il deflettore “D” che impedisce il surriscaldamento delle manopole della cucina. desiderato facendo coincidere con il riferimento fisso del frontalino il numero corrispondente ai minuti prefissati. Attenzione Durante la cottura la
  • Страница 12 из 61
    Consigli pratici per la cottura Il forno mette a vostra disposizione una vasta gamma di possibilità che consentono di cuocere ogni cibo nella maniera migliore. Con il tempo potrete sfruttare al meglio questo versatile apparecchio di cottura, pertanto le note riportate di seguito sono solamente
  • Страница 13 из 61
    Manutenzione ordinaria e pulizia della cucina Prima di ogni operazione disinserire elettricamente la cucina. Per una lunga durata della cucina è indispensabile eseguire frequentemente una accurata pulizia generale, tenendo presente che: • le parti smaltate e i pannelli autopulenti, se presenti,
  • Страница 14 из 61
    Consigli pratici per la cottura al forno Cibo da cucinare Peso (Kg) Posizione cottura ripiani dal basso Temperatura (°C) Tempo di preriscaldamento (minuti) Tempo di cottura (minuti) Pasta Lasagne Cannelloni Paste gratinate 2.5 2.5 2.5 3 3 3 210 200 200 10 10 10 60-75 40-50 40-50 Carne Vitello Pollo
  • Страница 15 из 61
    Important safety warnings To maintain the EFFICIENCY and SAFETY of this appliance, we recommend: • call only the Service Centers authorized by the manufacturer • always use original Spare Parts 1 This appliance is intended for nonprofessional use within the home. 2 These instructions are only for
  • Страница 16 из 61
    Installation All instruction on the following pages must be carried out by a competent person (corgi registered) in compliance with gas safety (installation and use) regulation 1984. Important: disconnect the cooker from the electrycity and gas supply when any adjustment, etc. d) The liquefied
  • Страница 17 из 61
    latter must be situated at a minimum of 420 mm above the hob. The minimum distance between the worktop and kitchen units made of combustible material is 700 mm. e) The wall in direct contact with the back panel of the cooker must be made of non-flammable materials. Connecting a flexible jointless
  • Страница 18 из 61
    b) Minimum regulation of the gas oven burner with thermostat (see fig.): • light the burner as described in the paragraph “the oven knob” of the instruction booklet. • turn the knob to Max for about 10 minutes and then turn the knob to the Min setting; • remove the knob; • regulate the screw
  • Страница 19 из 61
    Important On completion of the operation, replace the old rating sticker with one indicating the new type of gas used. This sticker is available from our Service Centres. Note Should the pressure of the gas used be different (or vary) from the recommended pressure, it is necessary to fit a suitable
  • Страница 20 из 61
    Technical characteristics This appliance conforms with the following European Economic Community directives: Inner dimensions of the oven: Width: 39 cm Depth: 44 cm Height: 34 cm - 58 lt - - Inner Volume of the Oven: - Inner Dimensions of the Food Warmer: Width: 42 cm Depth: 44 cm Height: 17 cm
  • Страница 21 из 61
    The cooker with gas oven A Tray for Catching Overflows B Gas Burner C Flame Failure Device for Cooktop Burners (only a few models) D Top Grate E Control Panel F Adjustable Feet or Legs G Dripping Pan or Baking Sheet H Electronic Lighting Device (only a few models) K Oven Rack L Electronic Lighting
  • Страница 22 из 61
    and turning it counter-clockwise until it lights. For immediate lighting, first press the button and then turn the knob. Some models are equipped with an ignition button incorporated into the control knob. If this is the case, the ignitor (H) is present, The cooking temperature is selected by
  • Страница 23 из 61
    Practical advice for burner use In order to get the maximum yield it is important to remember the following: · Use appropriate cookware for each burner (see table) so as to avoid flames overshooting the edges. · At boiling point turn the knob to minimum. · Use cookware with lids. · Always use
  • Страница 24 из 61
    Pastry dropped The pastry sticks to the pan Use less liquid or lower the temperature by 10°C. Grease the pan well and sprinkle it with a dusting of flour or use greaseproof paper. Pastry is too dark on top Cooking fish and meat When cooking white meat, fowl and fish use low temperatures.
  • Страница 25 из 61
    Pratical advice for oven cooking Wt. (Kg) Cooking position of shelves from bottom Temperature (°C) Pre-heating time (min) Cooking time (min.) Pasta Lasagne Cannelloni Pasta bakes au gratin 2.5 2.5 2.5 3 3 3 210 200 200 10 10 10 60-75 40-50 40-50 Meat Veal Chicken Duck Rabbit Pork Lamb 1.7 1.5 1.8
  • Страница 26 из 61
    Áåçîïàñíîñòü — õîðîøàÿ ïðèâû÷êà 1. 2. 3. 4. 5. 6. 7. 8. 9. 10. 11. 12. 13. 14. Ýòî îáîðóäîâàíèå ðàçðàáîòàíî äëÿ èñïîëüçîâàíèÿ âíóòðè ïîìåùåíèé. Íè ïðè êàêèõ îáñòîÿòåëüñòâàõ íå èñïîëüçóéòå îáîðóäîâàíèå íà óëèöå. Ïëèòà äîëæíà èñïîëüçîâàòüñÿ â äîìàøíèõ óñëîâèÿõ äëÿ ïðèãîòîâëåíèÿ è ðàçîãðåâà ïèùè â
  • Страница 27 из 61
    Óñòàíîâêà Ýòîò ðàçäåë ïðåäíàçíà÷åí äëÿ êâàëèôèöèðîâàííûõ òåõíèêîâ è ñîäåðæèò èíñòðóêöèè ïî óñòàíîâêå è îáñëóæèâàíèþ ïëèòû â ñîîòâåòñòâèè ñ äåéñòâóþùèìè íîðìàìè áåçîïàñíîñòè. Âàæíî: ïåðåä ëþáûìè ðàáîòàìè ïî íàëàäêå, îáñëóæèâàíèþ è ò.ï. îòêëþ÷èòå ïëèòó îò ýëåêòðè÷åñêîé ñåòè. Âûðàâíèâàíèå ïëèòû
  • Страница 28 из 61
    ÏÎÄÊËÞ÷ÅÍÈÅ ÃÀÇÀ ãîëèíåéíûé âûêëþ÷àòåëü, ñîîòâåòñòâóþùèé íàãðóçêå îáîðóäîâàíèÿ, ñ ðàññòîÿíèåì ìåæäó ðàçâåäåííûìè êîíòàêòàìè íå ìåíåå 3 ìì, ïðè÷åì ëèíèÿ çàçåìëåíèÿ íå äîëæíà ðàçðûâàòüñÿ. Ïèòàþùèé êàáåëü ñëåäóåò ðàñïîëàãàòü òàê, ÷òîáû ïî âñåé äëèíå îí íèêîãäà íå íàãðåâàëñÿ äî òåìïåðàòóðû, ïðåâûøàþùåé
  • Страница 29 из 61
    · óáåäèòåñü, ÷òî ïðè áûñòðîì ïîâîðîòå ðóêîÿòêè îò ìàêñèìàëüíîãî ê ìèíèìàëüíîìó ïîëîæåíèþ ïëàìÿ íå ãàñíåò. · â) Ðåãóëèðîâêà ïîñòóïëåíèÿ âîçäóõà â ãîðåëêè: · ðåãóëèðîâêà íå òðåáóåòñÿ. óäîñòîâåðüòåñü, ÷òî ïðè áûñòðîì ïîâîðîòå ðóêîÿòêè îò Max ê Min è ïðè ðåçêîì îòêðûâàíèè è çàêðûâàíèè äâåðöû ïëàìÿ íå
  • Страница 30 из 61
    Õàðàêòåðèñòèêè ãîðåëîê è æèêëåðîâ Òàáëèöà 1 Ãîðåëêà Ñ æèæåííûé ãàç Äèàìåòð (mm) Òåïëîâàÿ ìîùíîñòü êÂò (p.c.s.*) ñòèå 1/100 Æèêëåð 1/100 Ïðèðîäíûé ãàç Ïîòîê* g/h Æèêëåð 1/100 íîìèí. óìåíüø. (ìì) (ìì) *** ** (ìì) Ïîòîê* l/h Æèêëåð 1/100 Ïîòîê* l/h (ìì) Áûñòðàÿ (áîëüøàÿ)(R) 1 00 3.00 0.7 41 86 21 8 21
  • Страница 31 из 61
    Êóõîííàÿ ïëèòà ñ ãàçîâîé äóõîâêîé (îïèñàíèå) A Ðàáî÷àÿ ïîâåðõíîñòü B Ãàçîâûå ãîðåëêè C Óñòðîéñòâî áåçîïàñíîñòè âåðõíèõ ãàçîâûõ ãîðåëîê (òîëüêî äëÿ íåêîòîðûõ ìîäåëåé) D Âåðõíÿÿ ðåøåòêà E Ïàíåëü óïðàâëåíèÿ F Ðåãóëèðóåìûå íîæêè èëè íàäñòàâíûå îïîðû G Ïîääîí äëÿ ñáîðà æèðà èëè ïðîòèâåíü H Óñòðîéñòâî
  • Страница 32 из 61
    ïðîñòî íàæìèòå íà êíîïêó L è äåðæèòå åå íàæàòîé, îäíîâðåìåííî íàæèìàÿ è ïîâîðà÷èâàÿ ðóêîÿòêó ãîðåëêè ïðîòèâ ÷àñîâîé ñòðåëêè, ïîêà îãîíü íå çàãîðèòñÿ. Íåêîòîðûå ìîäåëè èìåþò êíîïêó ýëåêòðîííîãî çàæèãàíèÿ, âìîíòèðîâàííóþ â ðóêîÿòêó óïðàâëåíèÿ.  ýòîì ñëó÷àå åñòü ýëåêòðîííîå çàæèãàíèå (H), íî
  • Страница 33 из 61
    Èñïîëüçîâàíèå ãàçîâûõ ãîðåëîê Äëÿ ïîëó÷åíèÿ íàèëó÷øèõ ðåçóëüòàòîâ ñëåäóéòå îñíîâíûì ïðàâèëàì: · èñïîëüçóéòå ïîñóäó, ïîäõîäÿùóþ ïî äèàìåòðó êàæäîìó òèïó ãîðåëêè: ïëàìÿ íå äîëæíî çàõîäèòü çà êðàÿ ïîñóäû; · ïðè çàêèïàíèè ïîâîðà÷èâàéòå ðóêîÿòêó ãîðåëêè â ìèíèìàëüíîå ïîëîæåíèå; · íàêðûâàéòå ïîñóäó
  • Страница 34 из 61
    Ïðèãîòîâëåíèå ðûáû è ìÿñà Åñëè ïîâåðõíîñòü ïèðîãà ñëèøêîì òåìíàÿ: ×òîáû èçáåæàòü ïåðåñóøèâàíèÿ, ãîòîâüòå ìÿñî êóñêàìè íå ìåíüøå 1 êèëîãðàììà. Êîãäà ãîòîâèòå áåëîå ìÿñî, ïòèöó èëè ðûáó, çàäàâàéòå íèçêóþ òåìïåðàòóðó (150–175°Ñ). Ïðè ïðèãîòîâëåíèè êðàñíîãî ìÿñà, êîòîðîå äîëæíî áûòü õîðîøî ïðîïå÷åííûì
  • Страница 35 из 61
    Ïðàêòè÷åñêèå ñîâåòû ïî ïðèãîòîâëåíèþ ïèùè â äóõîâêå Áëþäî Âåñ (êã) Óðîâåíü äóõîâêè ñíèçó Òåìïåðàòóðà (Ñ°) Âðåìÿ ïðåäâàðèòåëüíîãî ðàçîãðåâà äóõîâêè (ìèí) Âðåìÿ ïðèãîòîâëåíèÿ (ìèí) 2,5 2,5 2,5 3 3 3 210 200 200 10 10 10 60-75 40-50 40-50 1,7 1,5 1,8 2,0 2,1 1,8 3 3 3 3 3 3 200 220 200 200 200 200 10
  • Страница 36 из 61
    Avertismente Pentru a garanta eficienþa ºi siguranþa acestui produs electrocasnic vã sfãtuim sã urmaþi aceste indicaþii : - adresaþi-vã exclusiv centrelor de asistenþã tehnicã autorizate - solicitaþi întotdeauna piese de schimb originale 1 Acest aparat a fost conceput pentru folosirea
  • Страница 37 из 61
    Instalare Instrucþiunile ce urmeazã se adreseazã instalatorului calificat în vederea îndeplinirii operaþiilor de instalare, reglare ºi întreþinere tehnicã în modul cel mai corect ºi în concordanþã cu normele în vigoare. Important : orice intervenþie de reglare, întreþinere trebuie sã fie executatã
  • Страница 38 из 61
    Conexiunea la alimentarea cu gaz Braºamentul la conductã sau la butelia de gaz trebuie efectuat conform standardelor în vigoare în România la data achiziþionãrii aragazului, dar numai dupã ce a fost verificat tipul de gaz cu care va fi alimentat. În caz contrar, executaþi operaþiile indicate în
  • Страница 39 из 61
    - îndepãrtaþi sertarul de protecþie „A„ (fig. C) îndepãrtaþi arzãtorul cuptorului “ V ” dupã ce aþi îndepãrtat în prealabil ºuruburile (fig. D) ; operaþia este facilitatã prin înlãturarea uºii cuptorului scoateþi duza arzãtorului ºi înlocuiþi-o cu alta adecvatã noului tip de gaz.; pentru aceasta
  • Страница 40 из 61
    Caracteristici ale arzãtoarelor ºi duzelor Tabel 1 Tipul arzãtorului Diametru (mm) Gaz Lichid Furtun 1/100 Gaz natural Furtun Debit* 1/100 l/h Putere termicã kW By-Pass 1/100 Debit* g/h Nominalã Redusã (mm) (mm) *** ** (mm) Rapid (Mare)R 100 3.00 0.7 41 86 218 214 116 286 Semi Rapid (Medium) S 75
  • Страница 41 из 61
    Aragazul cu cuptor pe gaz A Plitã B Arzãtoare pe gaz C Dispozitiv de siguranþã împotriva accidentelor provocate de scurgerea gazului D Grãtare plitã E Panou frontal de control F Picioare reglabile G Tavã de coacere H Dispozitiv pentru aprindere electronicã J Dispozitiv de protecþie în cazul
  • Страница 42 из 61
    prin prezenþa unui dispozitiv special de aprindere (vezi detaliul identificat prin litera H). Acest dispozitiv intrã în funcþiune prin exercitarea unei mici presiuni asupra ceasornic pânã la poziþia „Max”. butonului „L” identificat prin simbolul . Pentru aprinderea arzãtorului ales este suficient
  • Страница 43 из 61
    Butonul de reglare a timpului de coacere (doar la anumite modele) Pentru a utiliza aceastã funcþie trebuie sã rãsuciþi butonul „P” pânã la capãt în sensul acelor de ceasornic. Dupã aceea, pentru a regla timpul de coacere dorit, întoarceþi acest buton în sens invers acelor de ceasornic pânã când
  • Страница 44 из 61
    Timer ºi ceas stil tradiþional Caracteristici ale timer-ului Timer-ul opereazã prin numãrarea înapoi o anumitã perioadã de timp. Totuºi, aceastã caracteristicã nici nu porneºte ºi nici nu opreºte funcþionarea cuptorului. Ea doar emite un semnal acustic de alarmã în momentul în care perioada setatã
  • Страница 45 из 61
    Întreþinerea ºi curãþarea aragazului Înlocuirea lãmpii cuptorului - Întrerupeþi alimentarea cu curent electric - Înlãturaþi capacul - Scoateþi lampa ºi înlocuiþi-o cu una rezistentã la temperaturã mare (300ºC) având aceste caracteristici: Tensiune: 230 V Putere: 25 W Tip E 14 - Remontaþi capacul ºi
  • Страница 46 из 61
    Pratical advice for oven cooking Alimentul de copt Paste Lasagna Cannelloni Paste gratinate Carne Viþel Pui Raþã Iepure Porc Miel Peºte Scrumbie Specie de peºte marin Pãstrãv Pizza Napoletana Prãjituri Biscuiþi Prãjiturã cu marmeladã Turtã de salatã Turte crescute Coacere cu grill Bistec de viþel
  • Страница 47 из 61
    Biztonsági utasítások A készülék teljesítõképességének és biztonságának megtartásának érdekében kérjük figyeljen a következõkre: · kizárólag a jótállási jegyen felsorolt szervizeinkhez forduljon! · ragaszkodjon eredeti alkatrészek beszereléséhez! 1 2 3 4 5 6 7 8 9 10 11 12 13 Ezt a készüléket csak
  • Страница 48 из 61
    Üzembe helyezés Ezek az utasítások szakképzett, engedélyezett mûszaki szerelõnek szólnak azért, hogy biztosítsa a beszerelés, beállítások és karbantartások helyes elvégzését a jelenleg érvényben lévõ elõírások betartásával. Fontos: minden beállítási vagy karbantartási munkálat elvégzése elõtt
  • Страница 49 из 61
    e) A tûzhely hátsó oldalával érintkezõ falnak tûzálló anyagból kell lennie. szereli be, csak az elõírásoknak megfelelõ flexibilis fémcsõ használható a csatlakoztatáshoz. Flexibilis, tagolatlan, rozsdamentes acélcsõ csatlakoztatása HOOD 420 mm. Min. Távolítsa el a tömlõtartót, amely a készülékre van
  • Страница 50 из 61
    fejezet utasításai szerint! · Forgassa el a gombot Max állásba kb. 10 percre és utána forgassa Min állásba! · Távolítsa el a gombot! · Szabályozza a termosztát tûn kívül lévõ csavart, amíg a láng kicsi, de állandó! Megjegyzés: Folyékony gáz esetén a szabályzó csavart teljesen be kell csavarni. c)
  • Страница 51 из 61
    szervíznél szerezhetõ be. Megjegyzés: Abban az esetben, ha a használt gáz nyomása az ajánlott nyomástól eltér (vagy változik) egy erre alkalmas nyomás szabályzó beszerelése szükséges a bevezetõ csõbe az ide vonatkozó érvényben lévõ elõírásoknak megfelelõen. Gázégõ és gázfúvóka jellemzõ adatai 1.
  • Страница 52 из 61
    Vevõtájékoztató adatlap, megfelelõségi nyilatkozat Gyártó: INDESIT Azonosító jel: K 342 G/R, K 342 GB/R és a K 342 GS/R többször módosított 22/1998.(IV.17)IKIM rendeletek alapján tanúsítja, hogy a fenti készülék megfelel a követelményeknek. Névleges feszültség: 230 V/50 Hz Érintésvédelmi osztály:
  • Страница 53 из 61
    A tûzhely leírása C A H B E D K L P M O N G L Q M O N Q M O N F K Sütõ rács L Elektromos gyújtó a fõzõlap égõkhöz (típustól függõen) M Sütõ és grill vezérlõ gomb N A tûzhely gázégõinek vezérlõ gombjai O Sütõ és forgónyárs világítás gomb (típustól függõen) P Idõmérõ gomb (típustól függõen) Q Country
  • Страница 54 из 61
    A készülék különbözõ funkciói és használata A tûzhely különbözõ funkciói a kapcsolótáblán található gombok használatával hozhatók mûködésbe. alumínium fólia stb.) mindig a sütõrácsra tegye, amely a készülék tartozéka, és amelyet a vezetõ sínekbe kell betolni! A tûzhely gázégõinek vezérlõ gombjai
  • Страница 55 из 61
    Sütõ világítás gomb (O) A sütõ alatt található rekesz (típustól függõen) A sütõ alatt található rekeszt sütõ edények és konyhai eszközök tárolására használhatja. Ezenkívül a sütõ mûködése közben az ételeket is melegen tarthatja itt. A nyitáshoz forgassa a tárolórekeszt lefelé! Figyelem: A tároló
  • Страница 56 из 61
    Sütési tanácsok A sütõ számos alternatívát kínál, hogy bármelyik ételt a lehetõ legjobban készíthesse el. Idõvel meg fogja tanulni, hogyan érheti el a legjobb eredményeket a sütõvel. A következõ tanácsok csak tájékoztató jellegûek, amelyek a személyes tapasztalatai és ízlése szerint eltérhetnek.
  • Страница 57 из 61
    Karbantartás, tisztítás A sütõ lámpa cseréje Mindenféle tisztítási és karbantartási munkálat elõtt válassza le a készüléket az elektromos hálózatról! A tûzhely hosszú élettartamának biztosítása érdekében gondosan tisztítsa meg rendszeresen a sütõt a következõk figyelembe vételével: · A zománcozott
  • Страница 58 из 61
    Sütési táblázat Az étel fajtája Tészták Lasagne Cannelloni Sült tészta Húsok Borjú Csirke Kacsa Nyúl Sertés Bárány Halak Makréla Fogas Pisztráng papírban sütve Pizza Nápolyi pizza Sütemények Keksz Gyümölcstorta Csokoládé torta Kelt tészta Grill sültek Borjú sült Hús szelet Hamburger Makréla
  • Страница 59 из 61
    59
  • Страница 60 из 61
    Merloni Elettrodomestici 01/2005 - 195029148.03 Viale Aristide Merloni 47 60044 Fabriano Italy Tel +39 0732 6611 Fax +39 0732 662501 www.merloni.com
  • Страница 61 из 61