14
Installation
The following instructions should be read by a qualified
technician to ensure that the appliance is installed, regu-
lated and serviced correctly in compliance with current
standards.
Important: Remember to unplug the appliance from
the mains before making adjustments or doing main-
tenance.
Positioning
Important: This unit may be installed and used only in
permanently ventilated rooms in compliance with current
National Regulations. The following requirements must
be observed:
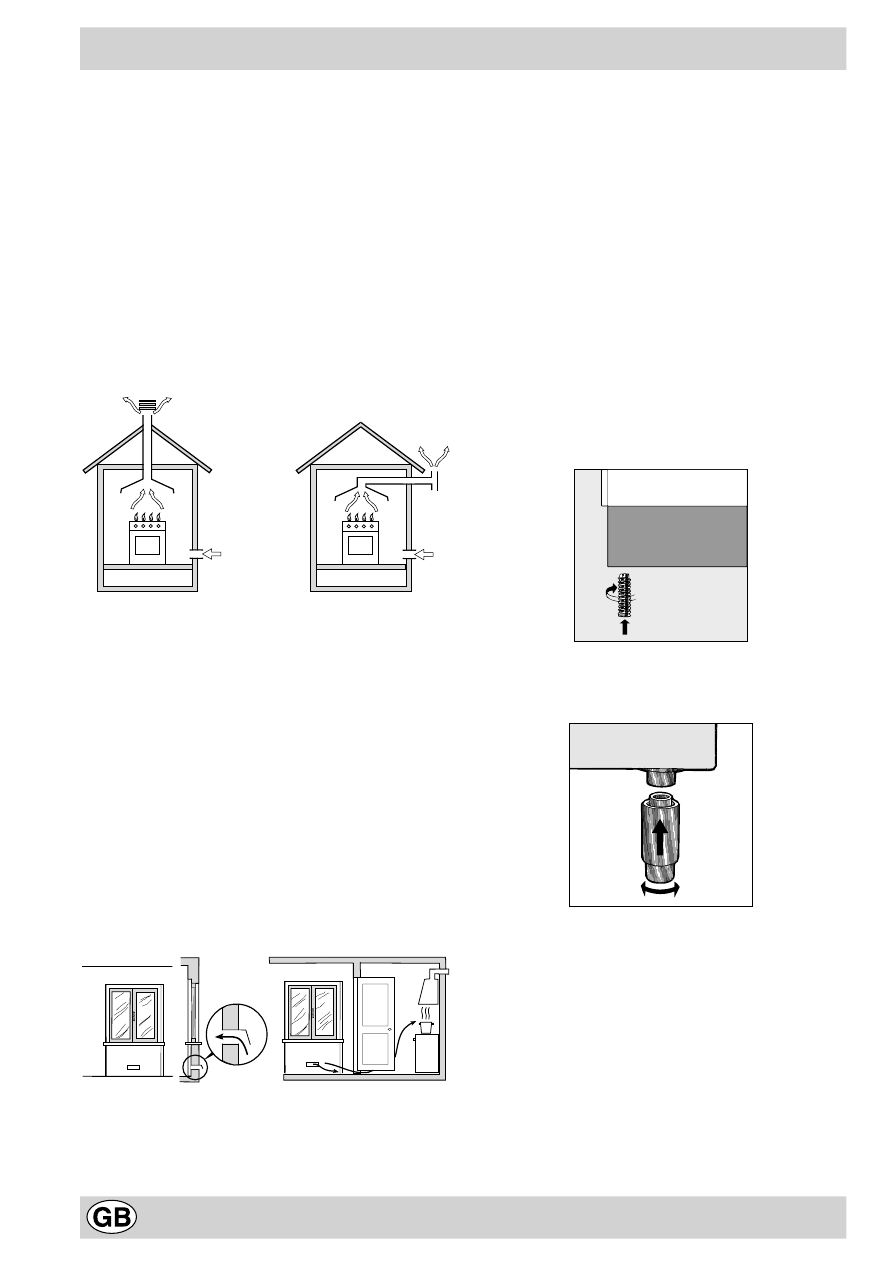
a) The room must be equipped with an exhaust system
that vents the combustion fumes to the outside. It may
consist of a hood or an electric fan that automatically
starts each time the appliance is turned on.
Flue or Branched Flue System
Directly to the Outside
(only for cooking appliances)
b) The room must also have a system to permit proper
air circulation, needed for combustion to occur nor-
mally. The flow of air needed for combustion must not
be less than 2 m
3
/h per kW of installed power. The air
circulation system may take air directly from the out-
side by means of a pipe with an inner cross section of
at least 100 cm
2
; the opening must not be able to be
accidentally blocked. For those appliances not
equipped with a safety device for accidental flame loss,
the ventilation apertures must be increased by 100%,
with the minimum being 200 cm
2
(Fig. A). The system
can also provide the air needed for combustion by in-
direct means, i.e. from adjacent rooms fitted with air
circulation tubes as described above. However, these
rooms must not be common rooms or bedrooms.
(Fig. B).
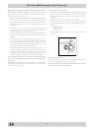
Detail A
Adjacent
Room to
Room
be Ventilated
A
Examples of Ventilation Openings
Increased Opening Between
Comburent Air
Door and Floor
Fig. A
Fig. B
c) Intensive and prolonged use of the appliance may re-
sult in the need for supplemental air circulation, e.g.
opening windows or increasing mechanical venting (if
present).
d) Liquified petroleum gas is heavier than the air and,
therefore, settles downwards. Thus, rooms containing
LPG cylinders must also be equipped with apertures
to the outside for ventilation of gas in the case of leaks.
LPG cylinders must not, therefore, be installed or stored
in rooms or storage areas that are below ground level
(cellars, etc.) whether they are partially or completely
full. It is a good idea to keep only the cylinder being
used in the room, positioned so that it is not subject to
heat produced by external sources (ovens, fireplaces,
stoves, etc. ) which are able to increase the tempera-
ture of the cylinder above 50°C.
Levelling Your Appliance (only on certain models)
4 support feet which are adjusted using screws are located
in the lower part of the cooker. These level off the oven
when necessary. It is essential that the cooker be standing
level.
Mounting the legs (only on certain models)
Press-fit legs are supplied which fit under the base of your
cooker.
Installing the Cooker
The appliance can be installed next to cabinets, provided
they are not taller than the hob. If the cooker is placed in
contact with walls or the sides of adjacent cabinets, they
must be capable of withstanding a rise in temperature of
50°C above room temperature. For proper installation of
the cooker, the following precautions must be taken:
a) Kitchen cabinets installed next to the cooker that are
higher than the top of the hob, must be at least 600
mm from the edge of the hob itself.
b) Hoods must be installed according to the requirements
in the installation manual for the hood and, in any case,
at a minimum height of 650 mm.