IT
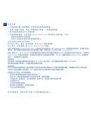
Procedure di installazione
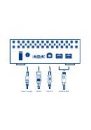
1. Collegare l'alimentatore alla presa elettrica a muro, quindi collegare il cavo di alimentazione
all’unità disco.
2. Connettere uno dei cavi di interfaccia al computer e all’unità disco.
3. Accendere l’unità premendo l’interruttore di alimentazione sul retro.
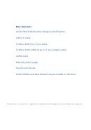
4. Prima di usare l'unità, usare il software LaCie Setup Assistant per formattarla. Questa applicazione
• ottimizza l'unità in base alle proprie esigenze
• copia la Guida per l'utente e le utility sull'unità
Per avviare LaCie Setup Assistant:
Utenti Windows: fare doppio clic sull'icona dell'unità LaCie in Risorse del computer.
Utenti Mac: fare doppio clic sull'icona “LaCie Setup Assistant” sul desktop.
NOTA: Se non viene lanciata l'applicazione LaCie Setup Assistant o se si esce dalla stessa dopo l'inizio della formattazione,
l'unità non potrà essere utilizzata e richiederà una formattazione manuale. In questo caso la Guida per l'utente e le utility
non saranno disponibili e dovranno essere scaricate dal sito Web di LaCie www.lacie.com
NOTA: LaCie Setup Assistant non impedisce agli utenti di utilizzare l'utility nativa del disco per formattare o suddividere in
partizioni l'unità disco LaCie. In questo caso, è sufficiente attendere che LaCie Setup Assistant sia terminato, quindi
riformattare l'unità con l'utility disco nativa del computer (Gestione disco in Windows o Disk Utility in Mac).
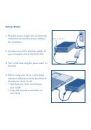
Precauzioni
Non impilare. Non esporre l'unità a temperature superiori a 35° C (95° F) o 30° C (86° F) quando impilate.
Fare attenzione a non bagnare. Utilizzare solo l'alimentatore fornito con l'unità.
Garanzia
LaCie garantisce che l'unità è esente da difetti di materiali e lavorazione, in condizioni di utilizzo normali, per il periodo
indicato di validità della garanzia. La garanzia ha inizio dalla data di spedizione. Qualora vengano notati difetti durante il
periodo di garanzia, LaCie provvederà, a sua discrezione, a riparare o sostituire il prodotto difettoso.
La garanzia non sarà valida qualora:
• il prodotto venga impiegato o immagazzinato in condizioni anomale o sottoposto a interventi di
manutenzioni impropri;
• vengano effettuate riparazioni, modifiche o alterazioni non espressamente autorizzate per iscritto da LaCie;
• il prodotto sia stato oggetto di utilizzo o conservazione impropri, guasti elettrici, confezionamento
inadeguato, incidenti o calamità naturali;
• il prodotto non sia stato installato correttamente;
• l'etichetta con il numero di serie del prodotto venga danneggiata o rimossa;
• il componente difettoso sia una parte di ricambio, come un cassetto, ecc;
• il sigillo di garanzia sulla confezione sia rotto.
Per ulteriori informazioni, vedere la Guida per l'utente (precaricata sull'unità).