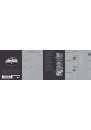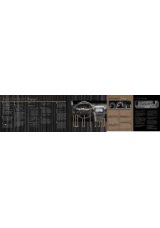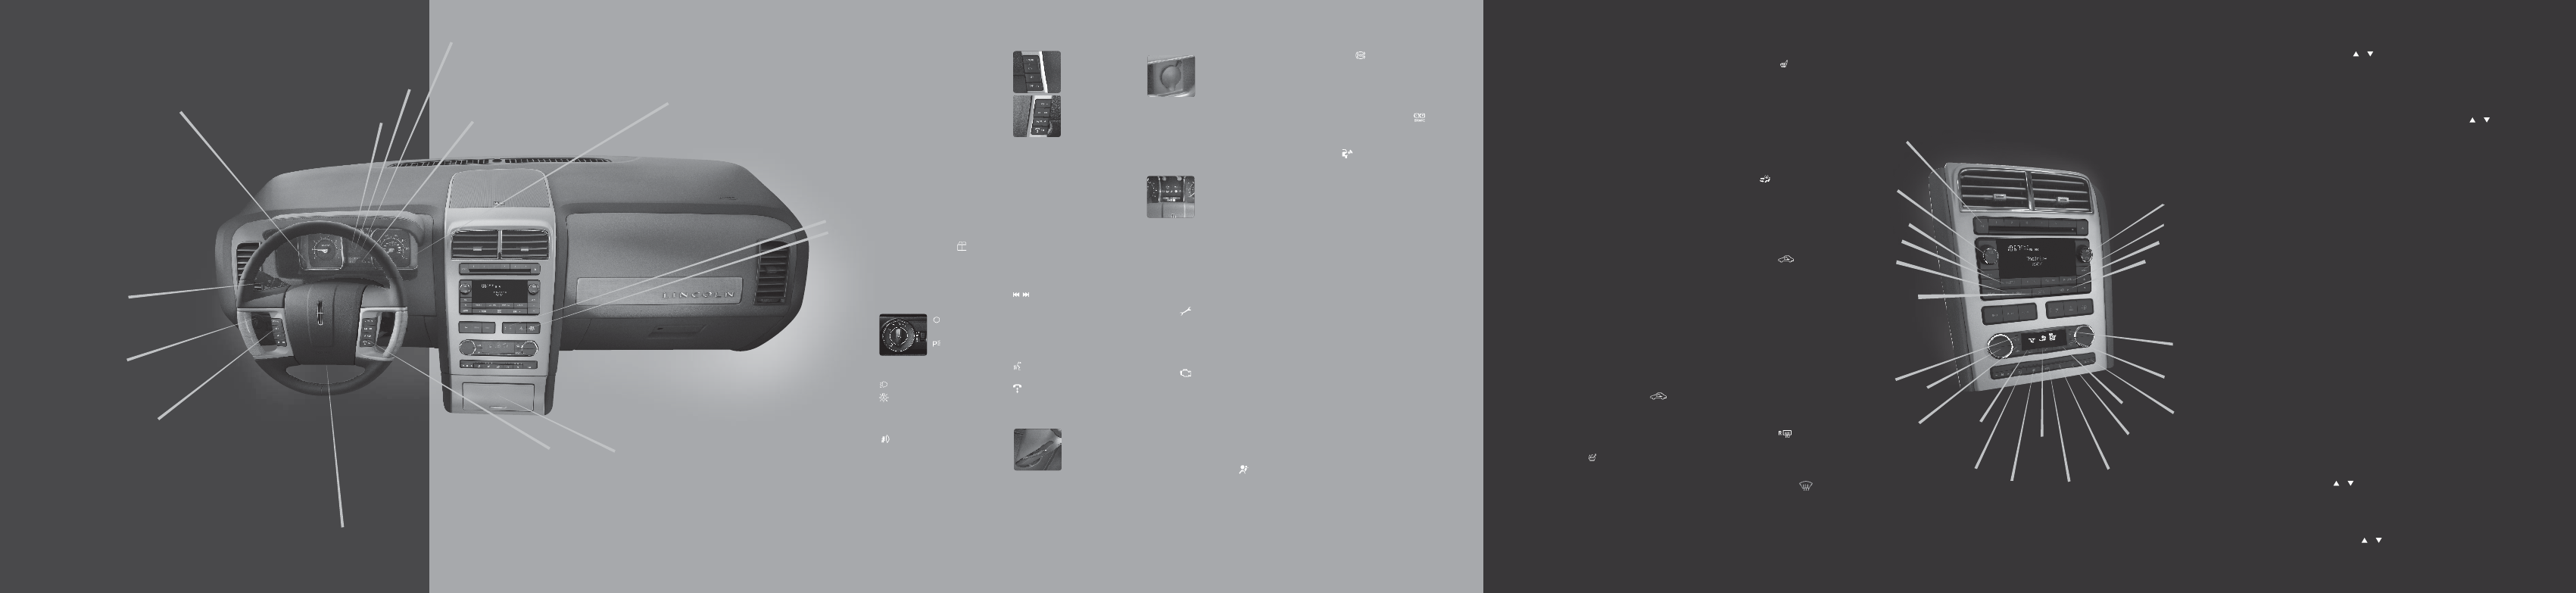
i n s T R u M e n T
PA n E l
c L i M AT e
S y S T E M
Dual Automatic Temperature Control
(DATC) System with Heated and Cooled Seats
AM/FM In-Dash Six CD/MP3 Satellite
Compatible Sound System
A u d i O
S y S T E M
THX® II (if equipped)
The THX® II certified
premium audio system
creates optimal
acoustic quality for all
seating positions and
road conditions.
The system offers an
advanced speaker system,
amplifiers, subwoofer
and equalization.
13
TEXT/SCAN
In radio mode, when
listening to a RBDS-
equipped station, press
and hold for a brief
sampling of radio stations.
In CD/MP3 mode, press
and release to view the
track title, artist name or
disc title. Press and hold
for a brief sampling of all
tracks on the current disc.
14
SEEK
Press to access the
previous/next strong
station or CD track.
15
SHUFFLE
Press to play all tracks on
the current CD/MP3 disc
in random order.
SATELLITE RADIO
CONTROLS (if equipped):
16
AUX
Press repeatedly to cycle
through SAT1, SAT2, SAT3
(satellite radio mode
if equipped), LINE IN
(auxiliary audio mode)
or SYNC®.
Press MENU when satellite
radio mode is active to
access SATELLITE RADIO
MENU. Press OK to enter
the satellite radio menu.
Press
/
to cycle
through the following
options: Category, Save
Song, Delete Song, Delete
All Songs and Enable
Alerts/Disable Alerts.
SIRIUS® Satellite Radio
is a subscription based
satellite radio service that
broadcasts music, sports,
news and entertainment
programming. For
more information and a
complete list of SIRIUS®
satellite radio channels,
visit www.sirius.com
in the United States,
www.sirius-canada.ca in
Canada, or call SIRIUS® at
1–888–539–7474.
17
ON/OFF/VOLUME
Press to turn on/off.
Turn to increase/
decrease volume.
18
LOAD
Press Load and a memory
preset to load a specific
slot. Press and hold to auto
load up to six CD/MP3s.
19
PLAY/PAUSE
In CD/MP3 mode, press to
pause the playing media.
Press again to return to
the playing media.
20
MENU
The following is a list
of some of the Menu
features. Press repeatedly
to cycle through:
Setting the clock
– Press
MENU until SET HOURS,
SET MINUTES and SET
AM/FM is displayed. Press
/
to adjust.
Autoset
– Allows you to
set the strongest local
radio stations without
losing your original stored
stations in AM/FM1/FM2.
Use the
/
buttons
to turn on/off. When the
six strongest stations are
filled, the station stored in
preset 1 will begin playing.
If there are less than six
strong stations, the system
will store the last one in
the remaining presets.
Occupancy mode
–
Use the
/
buttons to
select and optimize sound
for ALL SEATS, DRIVERS
SEAT or REAR SEATS.
Speed sensitive
volume
– Radio volume
automatically changes
slightly with vehicle
speed to compensate
for road and wind noise.
Recommended level
is 1-3. Level 7 is the
maximum setting.
21
TUNE
Turn to go up/down
the frequency band in
individual increments, or
to advance to the next/
previous MP3 folder or
satellite radio channel
(if equipped).
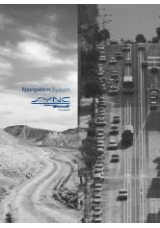
Navigation System
(if equipped)
Your vehicle may be
equipped with a Mobile
Media Navigation system
which allows you to record
CDs, listen to your saved
music and play DVDs in
addition to navigating
the vehicle. SIRIUS®
Travel Link
TM
is an extra
subscription feature,
which, if activated, allows
you to locate the best
gas prices, find movie
listings, get current traffic
alerts, access the current
weather map, get accurate
ski conditions and access
scores to current sports
games.
Note:
Some
features are unavailable
while driving. Refer to your
Navigation supplement for
more information.
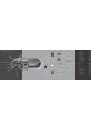
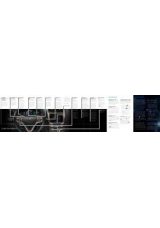
1
Multi-function Lever
Rotate the end of the control up/
down to increase/decrease the
speed of the wipers. Push the end
of the stalk:
• quickly for a single swipe
without fluid.
• and hold briefly for three
swipes with washer fluid.
• and hold for a longer
wash cycle.
Speed Dependent Wipers:
When
the wiper control is on, the speed
of the wipers will automatically
adjust with the vehicle speed.
To operate your rear window
wiper, turn the rear wiper control
to 1 (intermittent speed), 2 (normal
speed) or O (off). For a rear wash
cycle, rotate and hold the rear
wiper control to either position.
Note:
For optimal wiper
performance, clean your blades
and glass regularly. Refer to
your Owner’s Guide for
more information.
2
Headlamp Controls
: Turns the
headlamps off.
: Turns on
parking,
instrument panel, license
plate and tail lamps.
: Turns on low beam headlamps.
: Autolamps: Automatically
turns the exterior lamps
on/off based on
available daylight.
: Turns on fog lamps by pulling
the control towards you.
Panel Dimmer
- Move to adjust
the level of brightness on the
instrument panel during parking
lamp and headlamp operation.
Move the control to the full
upright position to turn on the
interior lamps. Move the control
to the full downward position to
turn off the interior lights.
3
Steering Wheel Controls
To set the speed:
1. Press ON.
2. Accelerate to the
desired speed.
3. Press SET + or
SET - and take
your foot off
the accelerator.
• To set a higher speed, press
and hold SET + or press SET +
repeatedly until the desired
speed is reached.
• To set a lower speed, press
and hold SET – or press SET –
repeatedly until the desired
speed is reached.
• To return to a previously set
speed, press RESUME.
• To turn off, depress the brake
pedal or press OFF.
VOL +/- : Press to increase/
decrease volume levels.
: Press to access the previous/
next radio station, CD track
or preset satellite radio
channel, if equipped.
MEDIA: Press repeatedly to
access all possible
media sources.
: Press to access
voice recognition.
: Press to access SYNC®
phone features.
4
Tilt/Telescopic
Steering Wheel Lever
Pull the lever
down to unlock
the steering
column. Move the
steering wheel
to the desired position. While
holding the steering wheel in
place, pull the lever up to lock
the steering column.
5
Auxiliary Power Points
Your vehicle is
equipped with four
auxiliary power
points. One on the
instrument panel,
one in the center
console utility compartment, one
on the back of the center console
and a rear auxiliary power point
located on the left rear quarter
panel. Do not use power points
over the capacity of 12VDC/180W.
6
Message Center
The message
center displays
important vehicle
information
through a constant
monitoring of vehicle systems.
The system will also notify you
of potential vehicle problems
with a display of system warnings
followed by long indicator chime.
Refer to your Owner’s Guide for
more information.
7
Powertrain Malfunction/
Reduced Power Light
This light
illuminates when a
powertrain or an AWD malfunction
has been detected. Contact an
authorized dealer as soon
as possible.
8
Service Engine Soon Light
This light
illuminates briefly
when the ignition is turned on. If
it remains on or is blinking after
the engine is started, the On Board
Diagnostics System (OBD-II) has
detected a malfunction. Drive in
a moderate fashion and contact
your authorized dealer as soon
as possible.
9
Airbag Readiness Light
The airbag readiness light
illuminates briefly when the
ignition is turned on. If this light
fails to illuminate, remains on
or continues to flash after the
engine is started, contact your
authorized dealer as soon as
possible. A chime will also sound
if a malfunction in the indicator
light has been detected.
10
ABS Warning Light
The ABS light illuminates briefly
when the ignition is turned on. If the
ABS light remains on or continues
to flash, a malfunction has been
detected. Contact your authorized
dealer as soon as possible. Normal
braking (less ABS) is still functional
unless the brake warning light
is
also illuminated.
11
Check Fuel Cap Light
This light
illuminates when
the fuel cap may not be properly
installed. When you are able, check
to ensure that the cap is properly
closed. If you continue to drive with
this light illuminated, it may cause
the service engine soon light to
illuminate also.
12
AdvanceTrac® with Roll
Stability Control™ Stability
Enhancement System
Helps you maintain stability and
steerability of your vehicle during
a variety of road conditions. If your
vehicle becomes stuck, try turning off
the AdvanceTrac® system (by pressing
the control) to allow wheel spin and
help increase momentum to help dig
the vehicle out. The system defaults
to on and the control will illuminate
when turned off. Refer to your
Owner’s Guide for more information.
13
Hazard Flasher
Press to activate the front and rear
direction signals when your vehicle
is disabled and is creating a safety
hazard for other motorists. Press
again to turn off. The hazard flashers
will operate when the ignition is in
any position or when the ignition is
turned off.
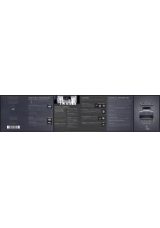
1
Auto
Press to activate automatic
temperature control. The system
will automatically determine
fan speed, airflow location,
A/C (on or off) and outside or
recirculated air based on your
temperature selection.
2
Driver/Passenger
Temperature Controls
Press to increase or decrease
the temperature on the
driver or passenger side of
the vehicle. Pressing the
passenger side control will
activate dual zone where the
driver and passenger are able
to select their own individual
settings. If the passenger side
controls are not activated,
the driver side controls will
determine the temperature
setting for the entire vehicle
(single zone).
3
OFF
Outside air is shut out and the
fan will not operate.
4
A/C
Press to activate/deactivate
air conditioning. For a MAX
A/C setting, press A/C,
and set the temperature to
60ºF (16ºC) and the highest
blower setting.
5
Driver/Passenger
Cooled Seats
Press to activate. Press once
for full cool (three lights),
twice for medium cool (two
lights) and a third time (one
light) for low cool. Press again
to deactivate (no lights).
6
Driver/Passenger
Heated Seats
Press
to activate. Press
once for full heat (three lights),
twice for medium heat (two
lights) and a third time (one
light) for low heat. Press again
to deactivate (no lights).
7
EXT
Press to display the outside air
temperature. Press again to
return to interior temperature.
8
Manual Override Controls
Allows you to manually
determine where airflow
is directed (floor vents,
instrument panel vents,
rear seat floor vents or a
combination). To return to fully
automatic control, press AUTO.
9
Recirculation Control
Press
to recirculate cabin
air. Recirculated air may reduce
the amount of time to cool
down the interior of the vehicle
and may also help reduce
undesired odors from reaching
the interior of the vehicle.
10
Dual
Press to activate dual zone
mode where the driver and
passenger have control of
their individual temperature
settings. Press again to
return to single zone where
the driver’s settings will
determine the temperature
for the entire vehicle.
11
Rear Window Defroster
Press
to clear the rear
window of thin ice and fog.
Press again to deactivate.
The defroster will turn off
automatically after 10 minutes.
12
Defrost
Distributes outside air through
the windshield defroster and
vents to clear fog or thin ice
from the windshield.
Use extreme caution when using any device or feature that may take your
attention off the road. Your primary responsibility is the safe operation of the
vehicle. Only use non-essential features and devices when it is safe to do so.
2
1
2
3
4
5
6
7
8
9
13
14
15
16
17
3
4
3
5
6
7
10
9
8
11
5
6
10
11
12
18
21
19
14
20
1
12
13