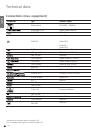
- 24
english
Network
selection
Settings
Encrypted
stations
Search
method
Start
frequency
Network ID
Symbol rate
QAM
modulation
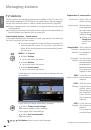
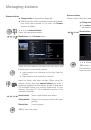
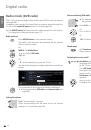
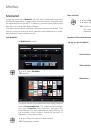
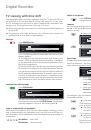
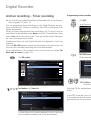
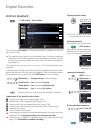
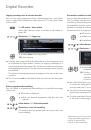
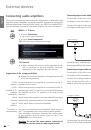
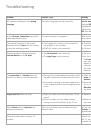
Setting options for DVB-C reception:
If you have not selected a DVB-C antenna in the antenna selection: Con-
tinue with
Setting options for DVB-S reception
(see right hand column).
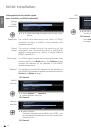
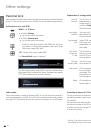
If several networks are available over DVB-C, you can
decide which network you want to receive your channels
from. The normal DVB-C settings are derived from the
selection of the location or network and do not need to
be changed. Exactly which of the following settings are
present is dependent on which network is selected.
Select network,
OK
Proceed
.
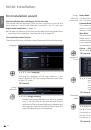
Select and adapt settings for DVB-C reception.
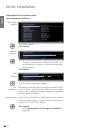
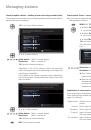
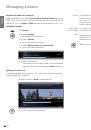
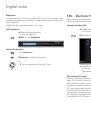
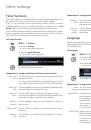
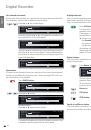
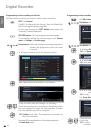
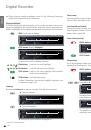
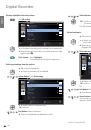
You can state whether coded stations are to be searched
for in the search/update.
Select
yes
to save all found
scrambled stations. However, these stations can only be
received in connection with a CA module and the appro-
priate Smart Card.
Handling of the CA module is described
on page 65.
If a CA module with a SmartCard is already plugged in for
the station search, all the stations which this module can
descramble are also saved when
no
is preset.
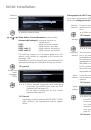
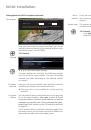
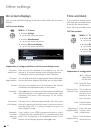
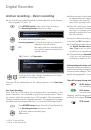
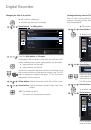
If you want to run the station search independently of
the channel grid, select
frequency search
for the search
method.
The DVB stations are only searched for in the frequency
range above the start frequency.
Only change these defaults if you are familiar with other
symbol rates and types of modulation or if you have to
specify the network ID for your cable network. In the
case of small cable networks fed directly from the satel-
lite, the rate of 6900 might have to be replaced by 6111.
Your cable provider has the information you need.
OK
Proceed
.
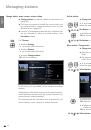
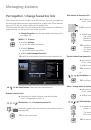
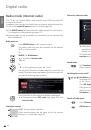
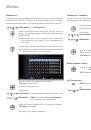
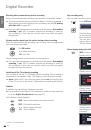
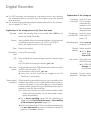
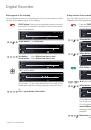
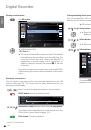
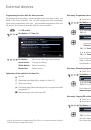
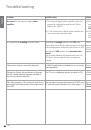
Setting options for DVB-S reception:
If you have not selected a DVB-S antenna in the antenna selection:
Continue with
Setting options for all types of reception
on page 30.
The normal DVB-S settings are derived from the selection
of the location and do not need to be changed in most
cases.
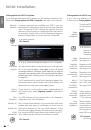
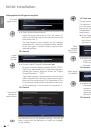
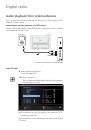
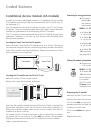
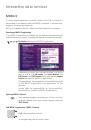
Selecting the satellite system.
Specify how you receive which satellite(s) (single
satellite or type of satellite system). Ask your dealer
if required.
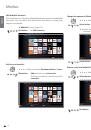
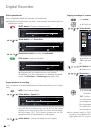
Reception of a single satellite via a connected LNC (LNB).
See page 25 for settings.
Reception of two different satellites with two LNCs (LNBs)
which are connected to the TV set by a 22 kHz switchbox.
See page 25 for settings.
Reception of two different satellites with two LNCs (LNBs)
which are connected to the TV set by a toneburst switch.
See page 25 for settings.
The TV set controls a DiSEqC multiswitch to which up to
four LNCs (LNBs) for different satellites are connected.
See page 26 for settings.
Select setting if the TV set is connected to a DiSEqC
single-cable system (according to EN 50494). Several Sat
receivers can be connected to one Sat cable. See page
27 for settings.
Select setting if the TV set is connected to a single-cable
system (without DiSEqC). Several Sat receivers can be
connected to one Sat cable. Unlike a DiSEqC single-cable
system there are restrictions in the range of certain recep-
tion frequencies in single-cable community systems. See
page 28 for settings.
OK
Proceed
(to the appropriate page of the satellite system).
OK
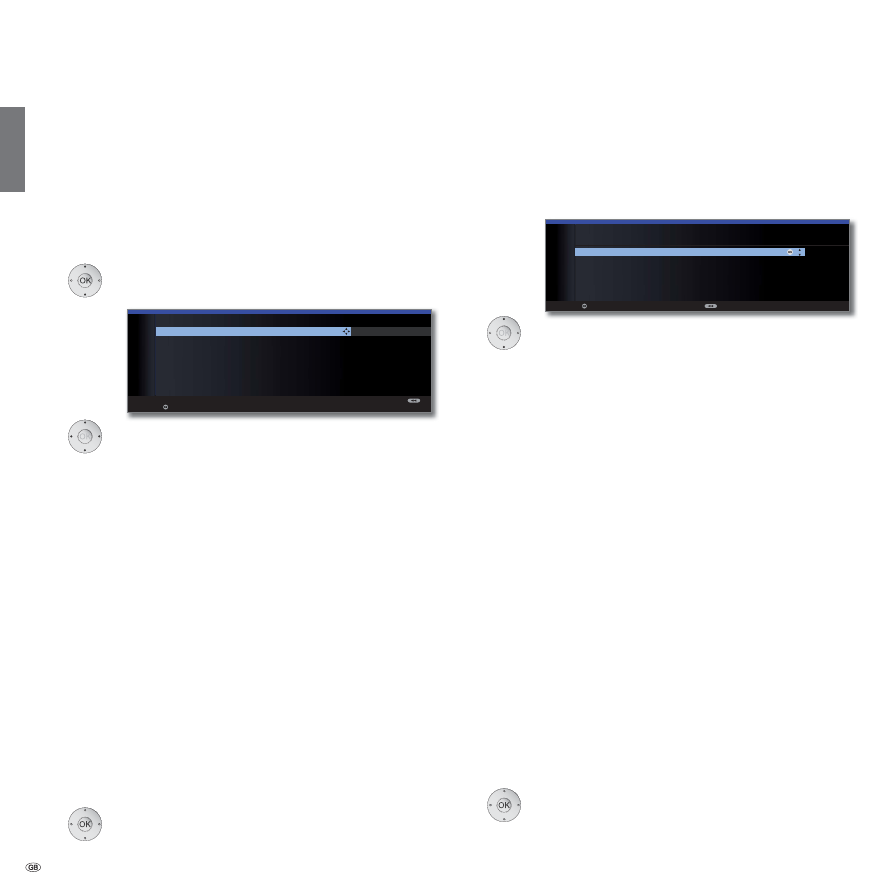
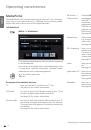
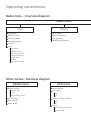
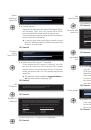
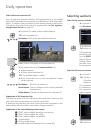
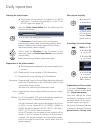
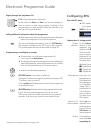
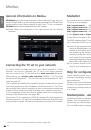
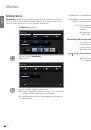
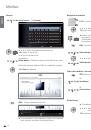
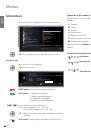
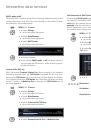
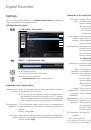
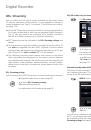
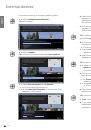
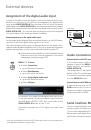
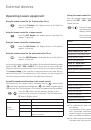
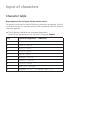
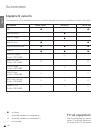
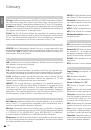
INITIAL INSTALLATION (DVB-C)
Scrambled
stations
no
yes
Search
method
Channel
search
Start
frequency
047.0
MHz
Network
ID
none
Symbol rate 1 (DVB-C) 6875
Symbol rate 2 (DVB-C) 6900
QAM modulation 1 64
QAM modulation 2 256
Proceed
OK
OK
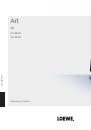
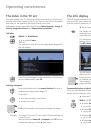
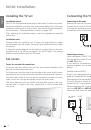
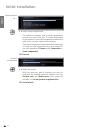
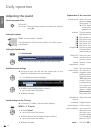
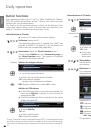
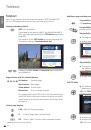
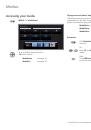
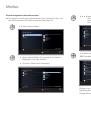
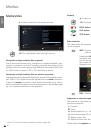
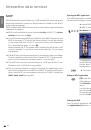
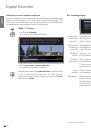
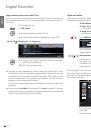
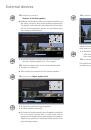
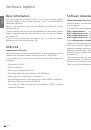
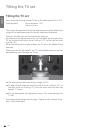
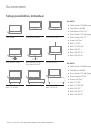
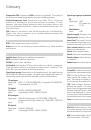
INITIAL INSTALLATION (DVB-S)
Select satellite installation
Single satellite
2 satellites on 22 kHz switchbox
2 satellites on toneburst switch
Max. 4 satellites on DiSEqC multiswitch
DiSEqC one cable communal system
other communal installation
Proceed Back
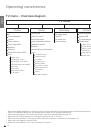
Select
satellite
installation
Single
satellite
2 satellites
on 22 kHz
switchbox
2 satellites
on toneburst
switch
Max. 4
satellites
on DiSEqC
multiswitch
DiSEqC
one cable
communal
system
other
communal
installation
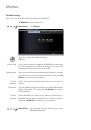
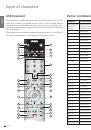
Initial installation
 1
1
 2
2
 3
3
 4
4
 5
5
 6
6
 7
7
 8
8
 9
9
 10
10
 11
11
 12
12
 13
13
 14
14
 15
15
 16
16
 17
17
 18
18
 19
19
 20
20
 21
21
 22
22
 23
23
 24
24
 25
25
 26
26
 27
27
 28
28
 29
29
 30
30
 31
31
 32
32
 33
33
 34
34
 35
35
 36
36
 37
37
 38
38
 39
39
 40
40
 41
41
 42
42
 43
43
 44
44
 45
45
 46
46
 47
47
 48
48
 49
49
 50
50
 51
51
 52
52
 53
53
 54
54
 55
55
 56
56
 57
57
 58
58
 59
59
 60
60
 61
61
 62
62
 63
63
 64
64
 65
65
 66
66
 67
67
 68
68
 69
69
 70
70
 71
71
 72
72
 73
73
 74
74
 75
75
 76
76
 77
77
 78
78
 79
79
 80
80
 81
81
 82
82
 83
83
 84
84
 85
85
 86
86
 87
87
 88
88
 89
89
 90
90
 91
91
 92
92
 93
93
 94
94
 95
95
 96
96
 97
97
 98
98
 99
99
 100
100
 101
101
 102
102
 103
103
 104
104
 105
105
 106
106
 107
107
 108
108
 109
109
 110
110
 111
111
 112
112
 113
113
 114
114
 115
115
 116
116
 117
117
 118
118
 119
119
 120
120
 121
121
 122
122
 123
123
 124
124
 125
125
 126
126
 127
127
 128
128
 129
129
 130
130
 131
131
 132
132
 133
133
 134
134
 135
135
 136
136
 137
137
 138
138
 139
139
 140
140
 141
141
 142
142
 143
143
 144
144
 145
145
 146
146
 147
147
 148
148
 149
149
 150
150
 151
151
 152
152
 153
153
 154
154
 155
155
 156
156
 157
157
 158
158
 159
159
 160
160
 161
161
 162
162
 163
163
 164
164