Инструкция для M-AUDIO BX8

(скачивание инструкции бесплатно)
Формат файла: PDF
Доступность: Бесплатно как и все руководства на сайте. Без регистрации и SMS.
Дополнительно: Чтение инструкции онлайн
background image

Correct Power Operation: Since the BX8 contains its own amplifier, it must
be connected to a power outlet using the detachable AC cable provided. Before
connecting power, please make sure that the Voltage-Select Switch, located on
the the speakers rear panel is set to the appropriate position, as described in the
rear-panel features list appearing earlier in this manual.

WARNING! - Use of improper voltage/selector-switch combinations may
result in hazardous conditions and/or damage to speaker components not
covered by speaker warranty.

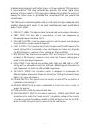
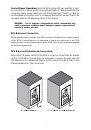
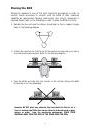
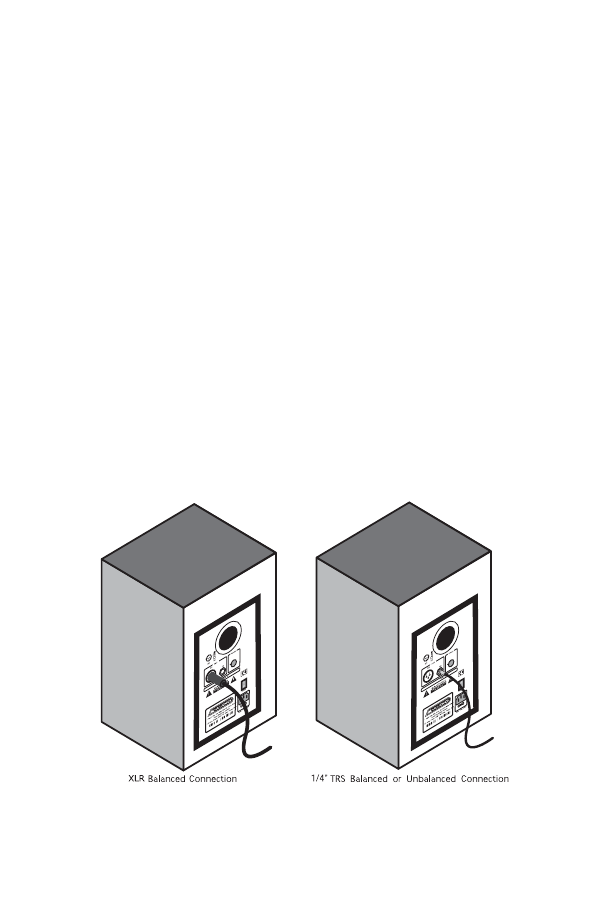
XLR Balanced Connection

Assure that the power switch of the BX8 is turned off and that the volume control
of the BX8 is turned down to a minimum. Connect the male end of an XLR
balanced cable to the balanced input of the BX8 (refer to the following diagram
for balanced connection).

TRS Balanced/Unbalanced Connection

Assure that the power switch of the BX8 is turned to off and that the volume
control of the BX8 is turned down to a minimum. Connect the male end of a
TRS balanced or TS unbalanced cable to the TRS input of the BX8 (refer to the
following diagram for TRS connection).

7

1
2
3
4
5
6
7
8
9
10
11
12
13
14
15
Оглавление инструкции
  • Страница 1 из 16
    Studiophile BX8 version: BX8-050103 Studiophile BX8 Users Manual Introduction . . . . . . . . . . . . . . . . . . . . . . . . . . . . . . . . . . . . . . . . . . . . . . .2 What’s in the Box? . . . . . . . . . . . . . . . . . . . . . . . . . . . . . . . . . . . . . . . . . .2 Studiophile BX8
  • Страница 2 из 16
    Introduction Thank you for choosing the BX8 Studiophile Series bi-amplified powered studio reference monitor speakers. M-Audio is well known for digital audio interface technology, digital converters, audio pre amps and mixers. Now, after long research and development, the Studiophile BX8 is born
  • Страница 3 из 16
    2. Tweeter By employing a specially developed 1" silk dome with magnetic shielding, the tweeter can deliver distortion-free original sound and offer extremely natural response. It minimizes reaction time by using fabric silk for excellent delivery, and also minimizes resonance by adapting a unique
  • Страница 4 из 16
    Front and Rear Panel Features Rear Panel 1. XLR INPUT: This jack accepts XLR input connections with either balanced or unbalanced wiring. The signal of the XLR INPUT is summed together with the TRS INPUT through a balanced input amplifier, allowing both inputs to be used simultaneously. Input
  • Страница 5 из 16
    Unbalanced wiring works with either a two- or three-conductor TRS connector. A two-conductor TRS plug automatically grounds the minus signal input, whereas a three-conductor TRS plug wired unbalanced provides the option of leaving the minus open or grounded. We recommend that you ground the unused
  • Страница 6 из 16
    Front Panel The front panel houses the Power LED which indicates whether the speakers (amplifier) power is on or off. Installation For optimal performance of the BX8, please read the following thoroughly and carefully prior to installation. Precautions Handling: Please do not grab the speaker
  • Страница 7 из 16
    Correct Power Operation: Since the BX8 contains its own amplifier, it must be connected to a power outlet using the detachable AC cable provided. Before connecting power, please make sure that the Voltage-Select Switch, located on the the speakers rear panel is set to the appropriate position, as
  • Страница 8 из 16
    Connecting to Preamp, Computer or Game Console Outputs Before connecting, make sure the output devices’ power is has been turned off. Plug the XLR balanced, TRS balanced or TS unbalanced cable to the corresponding output connectors of a pre-amplifier, computer or game console. Setting the EQ
  • Страница 9 из 16
    Mid-Range : This 2 –position switch selects between “Flat” and “Presence.” Flat is for normal monitoring conditions. Presence will move the sound stage toward your listening position. High-Freq : This 3-position switch selects High Frequency compensation with 0dB, -2dB or –4dB. 0dB (Normal
  • Страница 10 из 16
    Setting the Acoustic Space Switch The Acoustic Space switch is a 3-position switch used to select the "Acoustic Space" in which the speaker is placed—Half Space (speakers against wall, 0dB position), Three-Quarter Space (speakers in corners or close to wall, -2dB position), or Full Space (speakers
  • Страница 11 из 16
    Placing the BX8 Placing the speakers is one of the most important procedures in order to monitor sound accurately. To monitor with the BX8s at their maximum capability, an appropriate listening environment and correct placement is required. Please, refer to the following in order to place the BX8s
  • Страница 12 из 16
    Appendix A - Technical Specifications Type: Two-way studio reference LF Driver: 8-inch magnetically-shield mineral-filled polypropylene curved cone with high temperature voice coil and damped rubber surround HF Driver: 1-inch magnetically-shield natural silk dome Frequency Response: 37Hz - 20kHz
  • Страница 13 из 16
    Appendix B - Block Diagram 13
  • Страница 14 из 16
    Technical Support & Contact Information For additonal help, contact M-Audio Technical Support by telephone (626-445-8495, 9-5 PST M-F), by fax (626-445-7564) or by e-mail (support@m-audio.com). If you have any questions, comments or suggestions about this product, or any M-Audio product, we invite
  • Страница 15 из 16
    Your BX8 Warranty M-AUDIO warrants that this product is free of defects in materials and workmanship under normal use for a period of One (1) year from purchase date, so long as the product is: owned by the original purchaser; the original purchaser has proof of purchase from an authorized M-AUDIO
  • Страница 16 из 16