3
English
Introduction
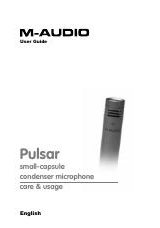
Thank you for purchasing the Pulsar microphone from M-Audio. Please take a few moments to familiarize
yourself with your new microphone by reading this guide.
Features
<
Top-address cardioid instrument microphone
<
3/4” diameter 6-micron evaporated-gold diaphragm
<
Solid brass body and capsule
<
20Hz-20kHz frequency response
<
Class A FET electronics
<
3-pin XLR (phantom-powered)
<
Includes soft case, pop filter, and hard mount
Important:
Please fill out and mail your warranty card for the Pulsar so that we may provide you with support
for your microphone.
Unpacking
The container for your microphone was carefully constructed for protection during shipping. Please save this
packaging for storage or traveling with your Pulsar microphone. If your box does not include the following items,
please contact your dealer immediately:
<
(1) M-Audio Pulsar microphone
<
(1) hard mount
<
(1) soft case
<
(1) pop filter
Connections and Phantom Power
The M-Audio Pulsar microphone outputs a balanced low-impedance signal. It is designed to be connected to the
mic-level inputs of a mixer channel or a dedicated high-quality preamp such as M-Audio’s DMP3 or TAMPA.
As with all condenser microphones, your Pulsar requires power in order to operate.
You will need to connect
the Pulsar via XLR connection to a preamp or mixer channel input that supplies +48V phantom power. (Phantom
power shares the same XLR cable as the audio from the microphone). In order to avoid pops and surges that can
damage components like speakers and microphones, always perform the following steps (in the order listed)
when connecting the mic and/or cable:
1.
Turn the volume/gain on your preamp and/or mixer all the way down.
2. Make sure that phantom power is turned off.
3. Connect the microphone via a high-quality XLR cable.
4. Turn on phantom power.
5. Slowly turn up the gain on your preamp and/or mixer.
Before disconnecting the mic and/or cable, repeat steps 1 and 2 (in the order listed).
Applications
The Pulsar’s clean electronics combine with an all-brass capsule to produce a smooth tone that makes it a great
instrument-recording microphone. Use it on acoustic instruments, wind instruments, as an overhead drum mic
or room ambience recording mic. When you’re ready to add more pro-quality microphones to your mic locker,
be sure to check out the increased vocal punch of the M-Audio Luna and the multi-pattern recording features of
the M-Audio Solaris microphone.
Cardioid Pattern
Cardioid is the most commonly used polar pattern engineered into microphones.
This design causes the back of the microphone to reject incoming sound, allowing the engineer to isolate the
signal source from other performance elements or background noise by just pointing the mic at the sound
source. The logo side of the microphone is the “live” side.
Pulsar Small-Capsule Condenser Microphone Care and Usage •
English