Страница 6 из 66 Introduction Thank you for choosing the StudioPro 4 professional desktop multimedia audio monitors. Top recording engineers and producers in studios around the world use MAudio monitors. Now, with the StudioPro 4s, you can enjoy the same professional standard of audio quality right on your desktop.
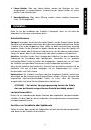
Страница 7 из 66 Sub-Frequency Port E N G L I S H The hole in the rear panel is called a Sub-Frequency Port and is designed to discharge extreme low frequencies. Mid-Boost Control The back panel Mid-Boost control on the StudioPro 4s allows compensation for room EQ. Offering a great deal of control over the
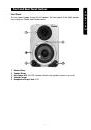
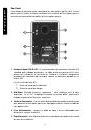
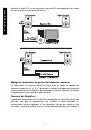
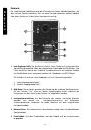
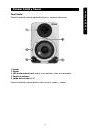
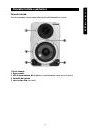
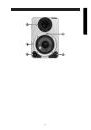
Страница 8 из 66 Front and Rear Panel Features Front Panel This front panel image shows the Left Speaker. The front panel of the Right Speaker houses only the Woofer and Tweeter drivers. 1. 2. 3. 4. 5. Woofer Driver Tweeter Driver Blue Power LED: This LED indicates whether the speakers power is on or off Volume
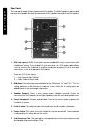
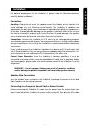
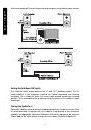
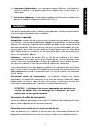
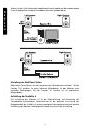
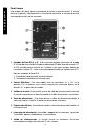
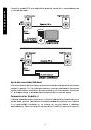
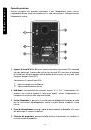
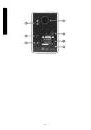
Страница 9 из 66 Rear Panel E N G L I S H This rear panel image shows the powered Left Speaker. The Right Speaker is passive and has only one Speaker terminal for connection to the Speaker Terminal of the Left Speaker. 1. RCA Line Inputs (L & R): These jacks accept standard RCA input connections with unbalanced
Страница 10 из 66 Installation For optimal performance of the StudioPro 4, please read the following directions carefully before installation. Precautions Handling: Please do not touch the speaker cones (the Woofer or the Tweeter); this could damage the unit, affecting sound quality. The StudioPro 4 speakers are
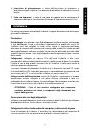
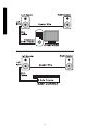
Страница 11 из 66 to the corresponding RCA output connectors of a computer sound card or game console. E N G L I S H Setting the Mid-Boost EQ Switch This 2-position switch selects between the “In” and “Out” Mid-Boost modes. The Out mode produces a flat midrange response for normal monitoring and listening
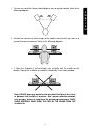
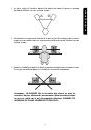
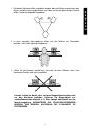
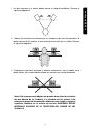
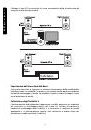
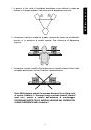
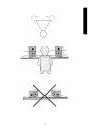
Страница 12 из 66 1. The two units and the listener should align to form a regular triangle. Refer to the following diagram. 2. Position the monitors so that the tops of the woofers are level with your ears in a normal listening environment. Refer to the following diagram. 3. 3. Place the StudioPro 4 Left and Right
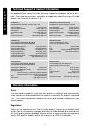
Страница 13 из 66 Technical Support & Contact Information E N G L I S H For additional help, contact M-Audio Technical Support by telephone, by fax or by email. If you have any questions, comments or suggestions about this or any M-Audio product, we invite you to contact us at: M-AUDIO U.S. M-AUDIO Deutschland
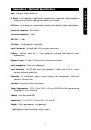
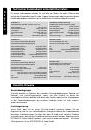
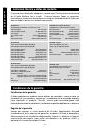
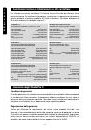
Страница 14 из 66 Appendix A - Technical Specifications Type: Two-way studio reference LF Driver: 4-inch diameter, magnetically-shielded with curved cone, high temperature voice coil and Cellulose-impregnated fabric roll surround HF Driver: 1-inch diameter, magnetically shielded with specially shaped Mylar dome
Страница 16 из 66 Introduction Merci d'avoir choisi les enceintes audio multimédia professionnelles StudioPro 4. Les enceintes M-Audio sont utilisés par les ingénieurs du son et producteurs en studio, à travers le monde entier. Avec les enceintes StudioPro 4, vous pouvez maintenant bénéficier du même niveau
Страница 17 из 66 Port de sous-fréquences F R A N Ç A I S L'orifice situé sur la face arrière est appelé port de sous-fréquences et est conçu pour émettre des fréquences extrêmement basses. Contrôle des fréquences moyennes Le contrôle des fréquences moyennes sur le panneau arrière des StudioPro 4 compense les
Страница 18 из 66 Description des panneaux avant et arrière Face avant Le panneau avant du haut-parleur gauche comprend les éléments suivants : 1. Tweeter 2. Woofer 3. Diode bleue d'alimentation (indique si les haut-parleurs sont ou non sous tension) 4. Commande de volume 5. Sortie stéréo de casque (mini-jack) 17 F
Страница 19 из 66 Rear Panel F R A N Ç A I S Cette image de panneau arrière correspond au haut-parleur gauche actif. Le haut parleur droit est passif et dispose seulement d'un terminal de haut-parleur pour le connecter au terminal de haut-parleur du haut-parleur gauche. 1. Entrées de ligne RCA (D et G) : Ces jacks
Страница 20 из 66 6. Interrupteur d'alimentation : cet interrupteur permet d'allumer et d'éteindre le système StudioPro 4. La position allumé est indiquée par un point blanc sur l'interrupteur. 7. Port de sous-fréquences : ce port aide à reproduire les fréquences très basses en prenant en charge les fréquences
Страница 21 из 66 F R A N Ç A I S Branchez le câble RCA sur les connecteurs de sortie RCA correspondants de la carte son de l'ordinateur ou de la console de jeu. Réglage du commutateur de gestion des fréquences moyennes Ce commutateur à 2 positions permet de choisir entre les modes de contrôle des fréquences
Страница 22 из 66 1. Les deux unités et l'auditeur doivent être placés de façon à former un triangle équilatéral. Référez-vous au schéma suivant : 2. Positionnez les enceintes de manière à ce que le haut des woofers soit au même niveau que vos oreilles dans un environnement d'écoute normal. Référez-vous au schéma
Страница 23 из 66 F R A N Ç A I S Assistance technique et informations de contact Si vous avez besoin d'aide, contactez l'assistance technique de M-Audio par téléphone, par fax ou par e-mail. Si vous avez des questions ou si vous souhaitez faire des commentaires ou des suggestions à propos de ce produit ou de tout
Страница 24 из 66 Annexe A : Caractéristiques techniques Type: moniteur de studio deux voies Woofer : cône blindé de 10 cm de diamètre incurvé avec blindage magnétique, bobine mobile à haute température et entourage rouleau de tissu imprégné de cellulose Tweeter : dôme 2,5 cm de diamètre, blindage magnétique avec
Страница 26 из 66 Einführung Vielen Dank, dass Sie sich für die professionellen Multimedia/Audio-Desktop-Monitore der Serie Studio Pro 4 entschieden haben! M-Audio-Monitore kommen bei Aufnahmetechnikern und Produzenten der Spitzenklasse in Studios der ganzen Welt zum Einsatz. Mit den StudioPro 4 können auch Sie von
Страница 27 из 66 D E U T S C H Dämpfungstechnologie werden gleichzeitig unerwünschte Resonanzen reduziert. Zusätzlich garantiert die innovative OptImage Wave-Guide-Technologie eine verbesserte Stereowiedergabe. Bassreflexöffnung In das Monitorgehäuse der StudioPro 4 wurde eine rückseitige Öffnung eingearbeitet,
Страница 28 из 66 Bedienelemente der Vorder- und Rückseite Frontseite An der Vorderseite des linken Monitors befinden sich folgende Komponenten: 1. Tweeter 2. Woofer 3. Blaue Power-LED: Die blaue LED leuchtet auf, sobald die Monitore eingeschaltet sind. 4. Lautstärkeregler 5. Kopfhörer-Ausgang (Miniklinke) 27 D E U
Страница 29 из 66 Rückseite D E U T S C H Die nachstehende Abbildung zeigt die Rückseite des linken Aktivlautsprechers. Bei dem rechten Monitor handelt es sich um einen Passivlautsprecher, welcher lediglich über einen Anschluss für den linken Lautsprecher verfügt. 1. Line-Eingänge (L&R): Die Anschlüsse sind für
Страница 30 из 66 6. Power-Schalter: Über den Power-Schalter werden die Monitore ein- bzw. ausgeschaltet. Im eingeschalteten Zustand wird der Power-Schalter mit einem weißen Punkt hinterleuchtet. 7. Bassreflexöffnung: Über diese Öffnung werden extrem niedrige Frequenzen (unter 70 Hz) abgestrahlt. Installation Bevor
Страница 31 из 66 D E U T S C H Stecken Sie den Cinch-Stecker des mitgelieferten Anschusskabels an die entsprechenden Cinch-Ausgänge Ihrer Computer-Soundkarte bzw. Ihrer Spielkonsole an. Einstellung des Mid-Boost-Tasters Über diesen Taster können Sie die Frequenzen des Mittenbereichs anheben. Mit der Position "Out"
Страница 32 из 66 1. Die beiden Monitore sollten so platziert werden, dass die Entfernung zwischen den Boxen und die Entfernung der Boxen zum Hörer in etwa ein gleichseitiges Dreieck bildet. (Siehe das folgende Diagramm.) 2. In einer normalen Hörumgebung sollten sich die Tieftöner auf Ohrenhöhe befinden. (Siehe das
Страница 33 из 66 Technischer Kundendienst & Kontaktinformation D E U T S C H Für weitere Informationen wenden Sie sich bitte per Telefon, Fax oder E-Mail an den technischen Kundendienst von M-Audio. Fragen, Bemerkungen oder Hinweise zu diesem Produkt oder anderen Produkten von M-Audio richten Sie bitte an folgende
Страница 34 из 66 Anhang A – Technische Daten Typ: 2-Wege-Studio-Monitore Tieftöner (10 cm Durchmesser): magnetische Abschirmung, gekrümmtes Horn, hochtemperaturfeste Schwingspule und Beschichtung aus Zellschaumstoff Hochtöner (2,5 cm Durchmesser): magnetische Abschirmung und speziell geformte Mylar-Membran
Страница 36 из 66 Introducción Gracias por haber elegido el sistema profesional de monitores de audio multimedia StudioPro 4. Los monitores de M-Audio son utilizados por los ingenieros y productores más prestigiosos de todo el mundo. Ahora, con los StudioPro 4, podrá disfrutar de la misma calidad de audio
Страница 37 из 66 E S P A N˜ O L contribuye a minimizar el tiempo de reacción y ofrece un rendimiento excelente, al mismo tiempo que reduce la resonancia gracias a la implementación de una exclusiva tecnología de amortiguación interna. El tweeter incorpora asimismo la tecnología "wave guide" OptImage para una imagen
Страница 38 из 66 Paneles frontal y trasero Panel frontal El panel frontal del monitor izquierdo incluye los siguientes elementos: 1. Tweeter 2. Woofer 3. LED de alimentación azul (indicar si los monitores están o no activados) 4. Control de volumen 5. Salida de auriculares (1/8”) El panel frontal del monitor
Страница 39 из 66 Panel trasero E S P A N˜ O L Esta imagen del panel trasero corresponde al monitor izquierdo (activo). El monitor derecho es pasivo y sólo dispone de un terminal de monitor que se conecta al terminal correspondiente del monitor izquierdo. 1. Entradas de línea RCA (L y R): Estos conectores aceptan
Страница 40 из 66 Instalación Por favor, antes de instalar los StudioPro y con el fin de obtener el máximo rendimiento de sus nuevos monitores, lea atentamente las siguientes instrucciones. Precauciones Manipulación de los monitores: No sujete los monitores por los conos (woofers o tweeters) ya que ello podría
Страница 41 из 66 E S P A N˜ O L Conecte la entrada RCA a la salida de la tarjeta de sonido de su computadora o de su consola de juegos. Ajuste del conmutador Mid-Boost Este conmutador de dos posiciones selecciona el modo de enfatización de frecuencias medias. En posición 'Out', los monitores producen una respuesta
Страница 42 из 66 1. Los dos monitores y el oyente deben formar un triángulo equilátero. Observe el siguiente diagrama. 2. Coloque los monitores de manera que, en condiciones de escucha normales, la parte superior de los woofers se encuentre al mismo nivel que sus oídos. Observe el siguiente diagrama. 3. Disponga
Страница 43 из 66 Asistencia técnica y datos de contacto E S P A N˜ O L Si necesita más información, póngase en contacto con el Servicio de asistencia técnica de M-Audio (teléfono, fax o e-mail.) Si desea hacernos llegar sus preguntas, comentarios o sugerencias acerca de este o cualquier otro producto de M-Audio,
Страница 44 из 66 Apéndice A - Características técnicas Tipo: Monitores de referencia de dos vías Woofer: Cono de polipropileno de 4" protegido magnéticamente, con bobina móvil de alta temperatura y amortiguación de espuma de celda cerrada Tweeter: 1", protegido magnéticamente, con cono de mylar especialmente
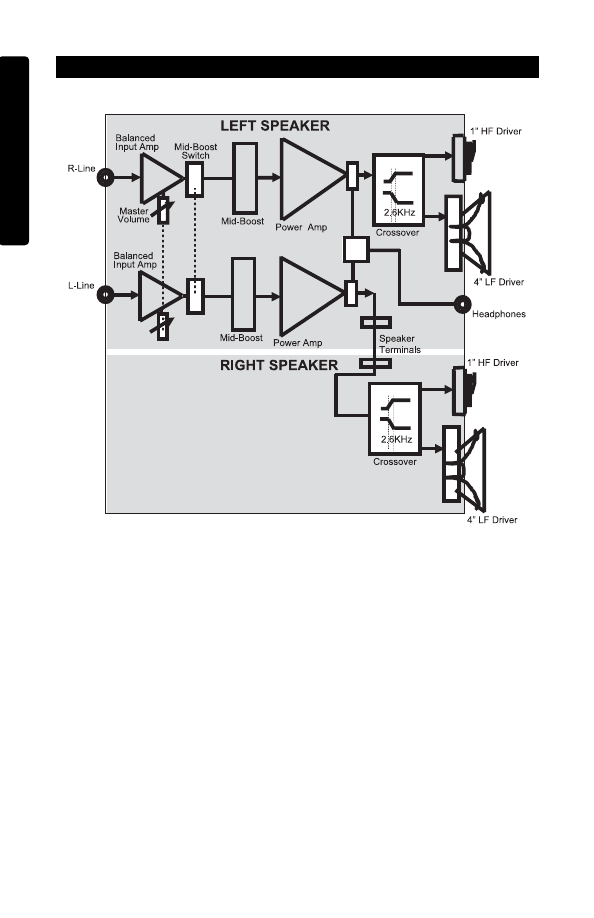
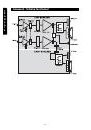
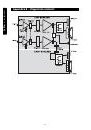
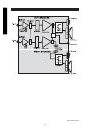
Страница 45 из 66 Apéndice B - Diagrama de bloques E S P A N˜ O L 44
Страница 46 из 66 Introduzione Grazie per aver scelto il sistema di monitoraggio professionale desktop StudioPro 4. I monitor prodotti da M-Audio vengono utilizzati dai migliori tecnici e produttori negli studi di tutto il mondo. Con gli Studio pro 4, è possibile avere lo stesso standard professionale di qualità
Страница 47 из 66 I T A L I A N O tecnologia di smorzamento interno veramente unica. Inoltre, nel tweeter è incorporata la tecnologia wave guide OptImage che migliora l'immagine stereo. Porta per sub-frequenze Il foro presente nel pannello posteriore viene denominato porta per sub-frequenze ed è stato progettato per
Страница 48 из 66 Pannello frontale e posteriore Pannello frontale Questa immagine mostra il pannello frontale dell'altoparlante sinistro. 1. Driver tweeter 2. Driver woofer 3. LED di alimentazione blu (indicano se gli altoparlanti sono accesi o spenti) 4. Controllo del volume 5. Jack uscita cuffia (mini jack) 47 I
Страница 49 из 66 Pannello posteriore I T A L I A N O Questa immagine del pannello posteriore è per l'altoparlante attivo sinistro. L'altoparlante destro è passivo e dispone di un solo morsetto per il collegamento con l'altoparlante sinistro. 1. Ingressi di linea RCA (L e R): questi ingressi accettano connessioni
Страница 50 из 66 6. Interruttore di alimentazione: si tratta dell’interruttore di attivazione e disattivazione degli StudioPro 4. La posizione di attivazione è indicata da un punto bianco. 7. Porta sub frequenza: si tratta di una porta di supporto per la riproduzione di frequenze molto basse, consentendo di
Страница 51 из 66 I T A L I A N O Collegare il cavo RCA ai connettori di uscita corrispondenti della scheda audio del computer o della console di gioco. Impostazione dell’interruttore Mid-Boost Con questo interruttore a 2 posizioni si seleziona l'impostazione della modalità delle frequenze medie. La modalità Out
Страница 52 из 66 1. In genere, le due unità e l’ascoltatore dovrebbero essere allineati in modo da formare un triangolo regolare. Fare riferimento al diagramma seguente. 2. Posizionare i monitor in modo che la parte superiore dei woofer sia a livello delle orecchie in un ambiente di ascolto normale. Fare
Страница 53 из 66 I T A L I A N O Assistenza tecnica e informazioni su chi contattare Per ulteriore assistenza, contattare l’Assistenza Tecnica M-Audio per telefono, fax o posta elettronica. Per qualsiasi informazione, commento o suggerimento riguardante questo prodotto o qualsiasi prodotto M-Audio o Midiman,
Страница 54 из 66 Appendice A – Specifiche Tecniche Tipo: Monitor da studio a due vie Driver LF: cono curvo da 4” schermato magneticamente e munito di una bobina mobile di alta temperatura e smorzamento interno in schiuma a cellula chiusa. Driver HF: cupola da 1” in mylar, schermato magneticamente Risposta in
Страница 55 из 66 I T A L I A N O Appendice B – Diagramma a blocchi 54