Доступность: Бесплатно как и все руководства на сайте. Без регистрации и SMS.
Дополнительно: Чтение инструкции онлайн
Страница: (5 из 36)
навигация
1
2
3
4
5
6
7
8
9
10
11
12
13
14
15
16
17
18
19
20
21
22
23
24
25
26
27
28
29
30
31
32
33
34
35
36
Оглавление инструкции
Страница 1 из 37 PDF 文件使用 "pdfFactory Pro" 试用版本创建 Áwww.fineprint.com.cn
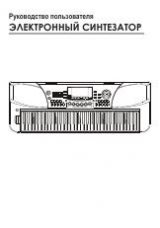
Страница 2 из 37 Congratulations Congratulation on your purchase of the professional digital piano. This piano is an easy-to-use digital piano. Inside the slim cabinet, it has so many professional and modernized preset styles and songs, easy but powerful functions, and features that enhance your performance. Enjoy
Страница 3 из 37 Important Notes Please read the following carefully before use: Do not expose the piano to high temperature, direct sunlight and excessively dusty places. Do not place the piano too close to other electrical appliances such as television and radio. It may cause interference. Do not place the piano
Страница 4 из 37 Main Features ● Keyboard: 88-keys touch response keyboard with 3 touch levels. ● Display: Multi-function LCD display. ● Operation: Friendly user-interface, using dial or add/sub button to select styles, songs and voices. ● Voices: 210 voices. 16 voices can be selected by direct select button. ●
Страница 5 из 37 Contents Set-up Guide 6-8 General Guide 9-10 The Connectors 11-12 Mixer Memory 25 26-27 - Memory Bank 26 - Store/Load Parameter 26 - Memory Data 26 - Clear Memory Data 27 - Using the AC power jack 11 - Using headphones jack 11 - Using AUX.OUT jack 11 - Using the foot pedals 12 One Touch Setting 27
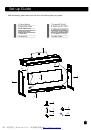
Страница 6 из 37 Set-up Guide Before assembly, please make sure that all of the following items are present. 1.Piano Cabinet 2.Right Side Panel 3.Left Side panel 4.Big Rear Panel 5.Pedal Box 7.ScrewΦ6X30(X4) 8. Screw Φ4 X15 (X5) 9. Adhesive Clamp(X2) 10.Power Supply Cable 11.Screw Φ6 X12(X2) 12.Pedal Cable
Страница 7 из 37 Set-up Guide Side Panel and Pedal Box assembly Place the pedal box on the two side panels and then use screws to fasten the side panels. 7.Screws Φ6X30(X4) 4PCS NOTE: Please use the screws that be supplied, do not use the other screws. Rear Panel assembly Fix the rear panel to the side panels with
Страница 8 из 37 Set-up Guide Attach the Piano Cabinet Place the piano cabinet on the stand, fix it using four screws. 6.Screws (X4) Hook B ( 2X 2PCS) HookB HookA HookA (2X 2PCS) Fix the cables Attach 2 adhesive clamps on right and the left side panels to fix the cables. Insert the DIN plug of pedal cable into the
Страница 9 из 37 General Guide Plane 1 3 2 Control Panel Headphones Jack 4 Music Stand Piano Keyboard Rear Panel 7 5 Pedal Jack Power Supply Cable 6 USB Jack AUX. OUT Jack Front Panel 9 10 11 Soft Pedal Sostenuto Pedal 9 PDF 文件使用 "pdfFactory Pro" 试用版本创建 ÿwww.fineprint.com.cn Sustain Pedal 8
Страница 10 из 37 General Guide Control Panel V OLUME 2 POW ER 3 001 8 Beat 034 Rock 062 Swing 087 Tango 096 March 102 S.Waltz 008 Pop16Bt1 044 Disco 083 Rhumba 091 Samba 099 Polka 112 Dandut2 5 ACC. VOL MIXER 1 ON START/ STOP S YNC INT RO /ENDING FIL L A F ILL B FUNCTI ON 7 A.B.C. 8 TEMPO OFF 9 4 MELODY OFF 6 METRO
Страница 11 из 37 The Connectors Using the AC power jack VOLUME 1、Ensure the piano is turned off when connecting and disconnectiong the power. POWER ON OFF 2、Turn the volume switch anti-clockwise to reach the minimum volume level. Turn off 3、Plug the power cable into an AC power outlet. Set to minimum 4、 If you have
Страница 12 из 37 The connectors Using the foot pedals Connect the plug of the foot pedal unit to the pedal jack on the rear panel. You will experience the sustain/soft/sostenuto effect. NOTE: When the sustain pedal is pressed, notes continue to play after their keys have been released. Releasing the pedal will
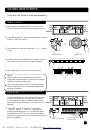
Страница 13 из 37 Basic Operation Power Switch and Master Volume 1、First, make sure the correct connections. POWER STYLE SONG FILE ON 2、Turn the [POWER] switch on. The LCD display lights up. 3、Use the [VOLUME] control switch to adjust the volume to your desired level. TEMPO VEL MEASURE BEAT MEMORY TICK O.TS. card
Страница 14 из 37 Voices and Effects There are 210 voices in total (see appendix). Select a Voice A.B.C. 1、When power on, the default VOICE R1 is No.001, the VOICE R1 flag lit up and the voice name appears on LCD. FILLA DUAL SPLIT STYLE SONG FILE TEMPO VEL FILL B MEASURE BEAT MEMORY TICK O.TS. TOUCH card DSP MELODY
Страница 15 из 37 Voices and Effect 2、Press [+] / [-] button , or turn the dial to select the dual voice number. The default dual voice number is No. 50 Strings2. Select the dual voice number A.B.C. FILL A DUAL SPLIT STYLE SONG FILE TEMPO VEL FILL B MEASURE BEAT MEMORY TICK O.TS. TOUCH card DSP MELODY OFF RECORD
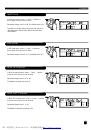
Страница 16 из 37 Auto Accompaniment Select a Style There are 120 styles in total, from 001 to 120 (see appendix). 1、When power on, the default style number is 001. Press [STYLE] button or style direct select button to enter the style mode, the STYLE flag is lit up and the name of style appears on LCD. A.B.C. FILL A
Страница 17 из 37 Auto Accompaniment Start the Style 1、Start immediately: Press [START/STOP] button to start the style(only drum). Start the style immediately A.B.C. FILL A DUAL SPLIT STYLE SONG FILE TE MPO VE L FILL B MEASURE BEAT MEMOR Y TICK O.TS. TOUCH card DSP MELODY OFF 2、A.B.C. Mode: The default setting of
Страница 18 из 37 Auto Accompaniment FILL A/B 1、In NORMAL mode, press [FILL A] button to insert 1 measure fill and LCD flashes 'FILL A'. After one measure is over, it will smoothly lead to NORMAL style. 2、In NORMAL mode, press [FILL B] button to insert 1 measure fill and LCD flashes 'FILL B'. After one measure is
Страница 19 из 37 Auto Accompaniment Accomp Volume 1、You can change the general volume of style through Accompaniment volume adjustment. STYLE SONG FILE TEMPO VE L MEASURE BEAT MEMO RY TICK O.TS. ca rd DSP 2、Press the [ACCOMP+] / [ACCOMP-] button to adjust the volume. 3、When you press [ACCOMP+] and [ACCOMP-]
Страница 20 из 37 Auto Accompaniment Chord Recognize "A.B.C." is disabled during the default setting. Press [A.B.C./MELODY OFF] button to turn on this "auto bass chord" function; the A.B.C. flag on the LCD is lightened. The left section of the keyboard is known as the "chord area", while playing the chord, both the
Страница 21 из 37 Auto Accompaniment Chord Basics Three or more notes played together constitute a "chord". The most basic chord type is the "triad" consisting three notes: the root, third, and fifth degrees of the corresponding scale. A "C major triad", for example, is made up of the notes C (the root), E(the third
Страница 22 из 37 Auto Accompaniment METRONOME 1、Press [METRO] button to turn on metronome and the metronome sound will be played. STYLE SONG FI LE TEMP O VEL MEASURE BEAT MEMORY TICK O.TS. card D SP 2、In the Function menu, you can adjust the beat with dial, [+]/[-]. The range is 0, 2~9.(See Function Operation).
Страница 23 из 37 Function Transpose SYNC. STOP In TRANSPOSE menu, the value of transpose appears on the LCD. STYLE SONG FILE T EMP O V EL MEA SU RE BEAT MEMORY TICK O.TS. card DSP You can press [+] / [-] button or dial to adjust the value from -12 to 12 semitones. Press[+] and [-] together to set the transpose
Страница 24 из 37 Function Split Point In split point menu, press [+] and [-] button or dial or press the key to set its value. Parameter Range: from 1 to 88, the default value is 34. STYLE SONG FILE TEMPO VEL MEAS URE BE AT MEMORY TICK O.TS. card DSP The keys on the right side to the point that you set is right
Страница 25 из 37 MIXER Press [MIXER] button to enter the menu of MIXER. The default option of the menu is Drum volume. When you enter this menu next time, you will find the option is the same as last time. STYLE SONG FILE TEMP O V EL MEA SURE BEAT MEMORY TICK O.TS. card DSP Press [MIXER] button to select the option
Страница 26 из 37 Memory Memory can be used to memorize 16 complete control- panel setups (4 banks with 4 presets each) that you can recall whenever needed. Memory Bank A.B.C. FILL A DUAL TEMPO VEL FILL B 1、There are 4 banks in total, each bank has 4 memories (M1-M4). SPLIT STYLE SONG FILE MEASURE BEAT MEMO RY TICK
Страница 27 из 37 Memory Clear Memory Data POWER ON 1、Press [STORE] and [M1] together, then turn on the piano, the default data will be loaded to the piano. OFF Press together Turn on POWER 2、Press [+] and [-] together, then turn on the piano, the default data will be loaded to the piano, and the record song will be
Страница 28 из 37 Record Record Waiting 1、Press [RECORD] to enter record waiting mode, the REC f lag lit up on LCD, the beat starts flashing. A.B.C. FILL A DUAL TEMPO VEL FILL B 1、In the record waiting mode, press [START/STOP] or press any key on the keyboard to start recording. MEASURE BEAT MEMO RY TICK O.T S.
Страница 29 из 37 Song The piano has 60 songs with MELODY OFF function, which allows you to listen to the Song playback without the melody ,useful for you to play with the song. 1、Press [SONG] to enter song mode, the flag of song lit up on the LCD. TEMPO VEL MEASURE BEAT MEMO RY TICK O.T S. card DSP Enter song mode
Страница 31 из 37 Appendix 1- Voice List NO 1 2 3 4 5 6 7 8 9 10 11 12 13 14 15 16 17 18 19 20 21 22 23 24 25 26 27 28 29 30 31 32 33 34 35 36 37 38 NAME Acoustic Gran d Piano Bright Acoustic Piano Electric Grand Piano Honky - Tonk P iano Electric P iano 1 Electric P iano 2 Harpsichord Clavi Celesta Glockenspiel
Страница 32 из 37 Appendix 1- Voice List NO 123 124 125 126 127 128 NAME S eashore Bird Tw eet Telephone Ring Helicopte r Applaus e Gun shot Ke ybord 129 130 131 132 133 134 135 136 137 138 139 140 141 142 143 144 145 146 147 148 149 150 151 152 153 154 155 Pianostr Modern Electric Piano S olo Piano Polar Grand
Страница 33 из 37 Appendix 2-Style List NO 015 016 017 018 019 020 021 022 023 NAME 8 BEAT & 16 BEAT 8 Beat Guitar Pop 1 8 Beat Disco 8 Beat Dance 60’s 8 Beat Pop Funk 16 Beat Ballad Pop 16 Beat 1 Pop 16 Beat 2 16 Beat Modern Modern 16 Beat 16 Beat Bossa Nova 16 Beat Funk Cool Beat POP Guitar Pop 2 Pop beat Soft
Страница 34 из 37 附录六: 歌曲(3-Song Appendix SONG)中英文对照表 List NO NO NAME PIANO 1 For Alice 2 Habanera 3 Four Little Swans 4 Moseta Dance 5 Germanic Dance 6 Turkish March 7 March 8 Away In A Manger 9 Chopsticks 10 2-Part Invention # 13 In A Minor.B.W. Iii FOLK & COUNTRY 11 Country 12 Jambalaya 13 Susanna 14 Bridge 15
Страница 35 из 37 Appendix 5-Chord List C Madd9 35 PDF 文件使用 "pdfFactory Pro" 试用版本创建 ÿwww.fineprint.com.cn
Страница 36 из 37 Appendix 6-MIDI Implementation Chart Function Transmitted Re cog ni zed B asic Channel Default Changed M ode Default Messages Altered × × *********** 3 × × Tr ue voice 9-120 *********** 0- 127 0- 127 〇 9nH,V=1- 127 〇 9nH,V=1- 127 × × × × × × 〇 〇 Note Number : Velocity: Note on Note off After Keys