Инструкция для Medeli SP3000

(скачивание инструкции бесплатно)
Формат файла: PDF
Доступность: Бесплатно как и все руководства на сайте. Без регистрации и SMS.
Дополнительно: Чтение инструкции онлайн
background image

3. 

Play the style.

     Press the [START/STOP] button and it’s relevant LED indicators are 
     flashing in red and green. As soon as you play the keyboard with 
     your left-hand, the auto accompaniment (piano style) starts.

Note: 

If you press key(s) marked STYLE 0-9 to select the desired style, 
please press and hold the [shift] button, then tapping 2 consecutive 
digits. For example, tapping 0,8 in sequence to select the 08 style.

Playing Songs

This instrument features 60 preset songs, please refer to the Song list.

1. 

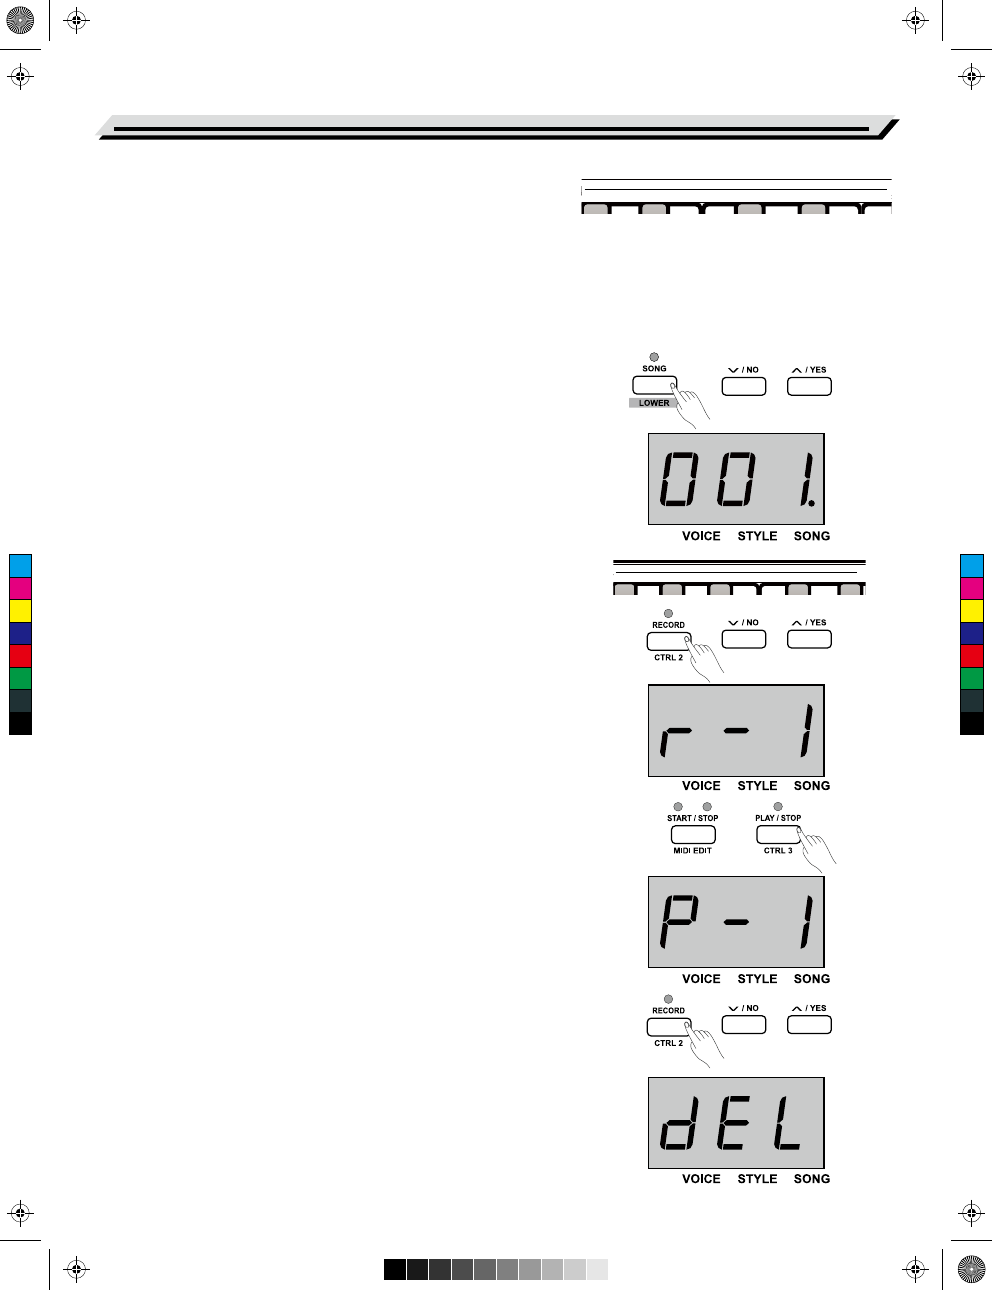
Press the [SONG] button.

     Enter the song selection mode. The nixie tube displays the current 
     song number, and it will play all songs circularly.

2. 

Select a song.

     Press the [+/ YES]/[-/ NO] button to select a song you want to play.    
     You can also press and hold the [SHIFT] button, then press the 
     song keys marked SONG 0-9 to select the desired song.

3. 

Play the song.

     Press the [START/ STOP] button to play the selected song in a 
     continuous loop. 

4. 

When the selected song has finished, press [VOICE] / [STYLE] 

     button can exit the song mode.

Note:

If you press key(s) marked SONG 0-9 to select the desired song, 
please press and hold the [shift] button, then tapping 2 consecutive 
digits. For example, tapping 0,8 in sequence to select the 08 song.

Record 

This stage piano allows up to 5 user songs to be recorded.

1. 

Press the [RECORD] button to enter user song memory selection,  

     the nixie tube displays current user song number. Press the 
     [+/ YES]/[-/ NO] button to select desired user song memory to be 
     saved.

2.

 Press the [RECORD] button again, enter recording standby mode, 

     the LED indicator of [START/ STOP] button will be flashing. Then 
     you can select desired voice, style or other parameters to prepare 
     recording.

3. 

Press the [START/STOP] button or play a key on the keyboard to 

     start recording. Meanwhile, the LED indicator of [RECORD] button 
     lights up.

4. 

Press the [RECORD] button again to exit the record mode. The LED 

     indicator of [RECORD] button will turn off.

5. 

If you want to play back the user song, you can press the 

     [PLAY/STOP] button to enter the selection interface. And press the 
     [+/ YES]/[-/ NO] button to select the user song. Then press the 
     [PLAY/STOP] button again to play back user song.

6. 

While playing back recorded songs, you can press the 

     [PLAY/STOP] button to exit.

7. 

In the user song selection interface, press the [RECORD] button, 

     the nixie tube displays “dEL”, which means enter the delete 
     interface. Then press [+/ YES] to confirm delete the user song, or 
     press [-/ NO] to cancel this operation and go back to the selection 
     interface.

Quick Start

10

1

2

3

4

5

6

7

8

0

9

SONG

1

2

3

4

5

6

7

8

0

9

STYLE

1
2
3
4
5
6
7
8
9
10
11
12
13
14
15
16
17
18
19
20
21
22
23
24
25
26
27
28
29
30
31
32
Оглавление инструкции
  • Страница 1 из 33
    STAGE PIANO Owner’s Manual METRONOME 01 GrandPno 03 E.Piano 05 E.Piano 3 07 Clavi 09 PercOrgn 02 GrandPn 2 04 E.Piano 2 06 Harpsi 08 Vibra 10 DrawOrgn 11 ChurOrgn 13 RockOrgn 15 Harmnic 17 CleanGtr 19 Strings 12 ReedOrgn 14 Acordion 16 NylonGtr 18 FngrBass 20 SynStrs VOLUME MIN BEEP PEDAL RESONANCE
  • Страница 2 из 33
    INFORMATION FOR YOUR SAFETY! THE FCC REGULATION WARNING (for USA) This equipment has been tested and found to comply with the limits for a Class B digital device, pursuant to Part 15 of the FCC Rules. These limits are designed to provide reasonable protection against harmful interference in a
  • Страница 3 из 33
    Contents Panel Description Listening to the songs Front Panel..................................................................4 Rear Panel...................................................................5 Playing Songs............................................................17 Stop Playing
  • Страница 4 из 33
    Panel Description Front Panel METRONOME 01 GrandPno 02 GrandPn 2 03 E.Piano 05 E.Piano 3 07 Clavi 09 PercOrgn 04 E.Piano 2 06 Harpsi 08 Vibra 10 DrawOrgn 11 ChurOrgn 13 RockOrgn 15 Harmnic 17 CleanGtr 19 Strings 12 ReedOrgn 14 Acordion 16 NylonGtr 18 FngrBass 20 SynStrs VOLUME MIN BEEP PEDAL
  • Страница 5 из 33
    Panel Description 30 CHORUS EQ 31 32 33 DUET 34 HARMONY ON/OFF OFF MELODY OFF L 35 36 METRONOME VOCAL R ACCOMP METRONOME 01 GrandPno 03 E.Piano 05 E.Piano 3 07 Clavi 09 DeDraOrg VOLUME MIN BEEP PEDAL RESONANCE TOUCH TUNE OCTAVE REVERB SCALE TYPE ROOT ON/OFF CHORUS EQ DUET ON/OFF HARMONY OFF MELODY
  • Страница 6 из 33
    Setup This section contains information about setting up your instrument and preparing to play. Please go through this section carefully before turning the power on. Setting a Music Stand Follow the images on the right, and install the music stand correctly. A music stand is supplied with the
  • Страница 7 из 33
    Connections Connecting a pair of Headphones A standard pair of stereo headphones can be plugged in here for private practice or late-night playing. Jack1: When a pair of headphones is plugged into the jack 1, the sound can be heard from both headphones and speakers of the instrument. Jack2: When a
  • Страница 8 из 33
    Connections Connecting a Footswitch An optional footswitch can be plugged into the sustain jack and be used to switch sustain on or off. Simply by pressing a sustain footswitch, you will have a natural sustain as you play. Note: 1. This instrument supports not only the foot switch we supply, but
  • Страница 9 из 33
    Quick Start Power Switch and Master Volume Turn the Power On/Off 1. First, please ensure the correct connection has been made based on the previous instruction. 2. Press POWER switch, the nixie tube screen lights up, and displays “0.01”, it indicates the instrument is power on. Note: Press the
  • Страница 10 из 33
    Quick Start 3. Play the style. Press the [START/STOP] button and it’s relevant LED indicators are flashing in red and green. As soon as you play the keyboard with your left-hand, the auto accompaniment (piano style) starts. STYLE 0 1 2 4 3 5 6 7 8 9 Note: If you press key(s) marked STYLE 0-9 to
  • Страница 11 из 33
    Advanced Use Playing Voices This instrument features 20 exceptionally realistic voices. Please refer to the Voice List for details. The default upper voice number is 001. Select and play Upper Voice 1. Press the [VOICE] button or voice direct button to select a voice you 2. 3. 01 GrandPno 03
  • Страница 12 из 33
    Advanced Use Split Point The point on the keyboard that separates UPPER or DUAL voice and LOWER voice is called “split point”. The default split point is: F#3 34 . 1. Press and hold the [LOWER] button, then press any key to set split point. 2. Release the [LOWER] button, and automatically exit the
  • Страница 13 из 33
    Advanced Use Tune The overall tuning of the instrument can be shifted up or down by a maximum of 100 cents in 1-cent increments (100 cents = 1 semitone). Operation 1. Press and hold the [SHIFT] button, then press the key marked TUNE +/- to set the tune value. The nixie tube currently displays tune
  • Страница 14 из 33
    Playing Accompaniment This stage piano features 50 piano accompaniments. Please refer to the style list for details. The default style number is: “00.1” Selecting a Style 1. Press [STYLE] button to enter style mode. The nixie tube displays the current style number, such as “00.1”. 2. Press the
  • Страница 15 из 33
    Playing Accompaniment Tempo Each style, song, metronome, and duet of this instrument has been programmed with a default tempo. However, this can be changed by the tempo button. Adjustable range: 30~280. Operation: 1. Press the [TEMPO +]/ [TEMPO -] button to adjust the desired tempo value, the nixie
  • Страница 16 из 33
    DSP Effect The DSP effect is the sound localization technology for simulating the sounds in the real environment. With DSP effect, you can add ambience and depth to your music in a variety of ways. There are 5 reverb effects, 5 chorus effects, 5 EQ effects built into this instrument. Reverb Press
  • Страница 17 из 33
    Listening to the songs Playing Songs This instrument has 60 preset piano songs for appreciating. Please refer to the Song List for details. Playing songs in large cycle Press the [SONG] button to enter the song playing mode, the system will play all preset songs in large cycle. Meanwhile, the nixie
  • Страница 18 из 33
    Record With the easy-to-use song recording features, you can record your own keyboard performances as a user song. This piano allows up to 5 user songs to be recorded, stored in internal memory. Prepare Recording 1. Before recording, firstly selecting a user song to save the recording song. Press
  • Страница 19 из 33
    Record Delete the User Song 1. Pressing and holding [RECORD] and [PLAY/ STOP] button together and turn power on simultaneously, all user songs will be erased. 2. Press the [PLAY/ STOP] button to enter the status of selecting user song, then press the [RECORD] button to delete the selected user
  • Страница 20 из 33
    Harmony Operation: 1. 2. HARMONY Parameter 1 2 3 Harmony Type 1+5 Octave 1 Octave 2 Scale The equal temperament (has only one tuning method, and is suitable for keyboard instrument) is commonly used in modern music, based on this temperament method to make your own composition and performance.
  • Страница 21 из 33
    Scale For example You select the “Minor” scale and set its root note “C#”. 1. Press and hold [SHIFT] button, then press the [SCALE] button to enter the scale mode. 2. Press and hold the [SHIFT] button, then press the key marked SCALE TYPE +/- to select “3: Minor” scale, and the nixie tube currently
  • Страница 22 из 33
    Beep Tone This function is used to turn on or turn off the prompt tone. The default setting is turn on. Operation: Press and hold the [SHIFT] button, then press the key marked BEEP key to turn the beep tone on or off. MIDI Function What’s MIDI? MIDI (short for Musical Instrument Digital Interface)
  • Страница 23 из 33
    MIDI Function 2. Enter controller edit mode Press the [MIDI EDIT] button to enter the controller edit mode, the relevant MIDI EDIT indicator will light up. 3. Controller select In the controller edit mode, press one of the [CTRL 1]-[CTRL 3] buttons to individually edit the selected controller. For
  • Страница 24 из 33
    MIDI Function You can refer to above procedures 3-6 to complete parameter settings of controller 1/2/3. Press [MIDI EDIT] button to exit MIDI controller edit mode, and the relevant indicator will go out. Note: 1) The command value will be the DATA 1 of Bn if it is within the range of 0-127 you set,
  • Страница 25 из 33
    Troubleshooting Problem The speakers produce a “pop” sound when the power is turned ON or OFF. Possible Cause and Solution This is normal and no cause for alarm. The instrument is turned on, however no sound is produced when the keys are played. 1 Make sure the volume is set to an appropriate
  • Страница 26 из 33
    Voice List NO. Piano 1 2 3 4 5 6 Name Grand Piano Grand Piano 2 Ele. Piano Ele. Piano 2 Ele. Piano 3 Harpsichord Chromatic Percussion 7 Clavi 8 Vibraphone Organ 9 Percussive Organ 10 Drawbar Organ 11 Church Organ 12 Reed Organ 13 Rock Organ 14 Accordion 15 Harmonica Guitar 16 Acoustic Guitar
  • Страница 27 из 33
    Style List NO. English Name 1 2 3 4 5 6 7 8 9 10 11 12 13 14 15 16 17 18 19 20 21 22 23 24 25 26 27 28 29 30 31 32 33 34 35 36 37 38 39 40 41 42 43 44 45 46 47 48 49 50 27
  • Страница 28 из 33
    Song List NO. 1 2 3 4 5 6 7 8 9 10 11 12 13 14 15 16 17 18 19 20 21 22 23 24 25 26 27 28 29 30 31 32 33 34 35 36 37 38 39 40 41 42 43 44 45 46 47 48 49 50 51 52 53 54 55 56 57 58 59 60 28 English Name Waltz For Piano In g-Sharp Minor The Happy Farmer Etude Dance Of The Four Swans From "Swan Lake"
  • Страница 29 из 33
    Demo List No. English Name 1 2 Fantasia Chpn_op25_no1 29
  • Страница 30 из 33
    MIDI Implementation Chart 30
  • Страница 31 из 33
    Scale Tuning System A tuning system is the system used to define which tones, or pitches, to use when playing music. In other words, it is the choice of number and spacing of frequency values used. The equal temperament (has only one tuning method, and is suitable for keyboard) is the common
  • Страница 32 из 33
    SP3000_G05
  • Страница 33 из 33