Инструкция для NEC MultiSync X552S PG (Protective Glass)

(скачивание инструкции бесплатно)
Формат файла: PDF
Доступность: Бесплатно как и все руководства на сайте. Без регистрации и SMS.
Дополнительно: Чтение инструкции онлайн
background image

How to fix the protective glass for X401S

PARTS LIST

Location

Part No

Q'ty

GLS-1

1

BRK-1

2

BRK-2

2

CUS-1

CUSHION

CUS-2

CUSHION

CUS-3

CUSHION

X401S HOLDER GLASS A
X401S HOLDER GLASS B

2

2

DOUBLE SIDE TAPE CUSHION

DOUBLE SIDE TAPE CUSHION

Spec

PROTECTION GLASS X401S

Description

909.4±1.0mm X 521±0.7mm X 4.0±0.3mm

454.2mm X 8mm X 0.8mm

832.6mm X 8mm X 0.8mm

BRACKET LED TAPE CUSHION

1

DOUBLE SIDE TAPE

98mm X 8mm X 0.65mm

DOUBLE SIDE TAPE

DOUBLE SIDE TAPE

Cushion 

0.

65
 

DOUBLE SIDE 

98 

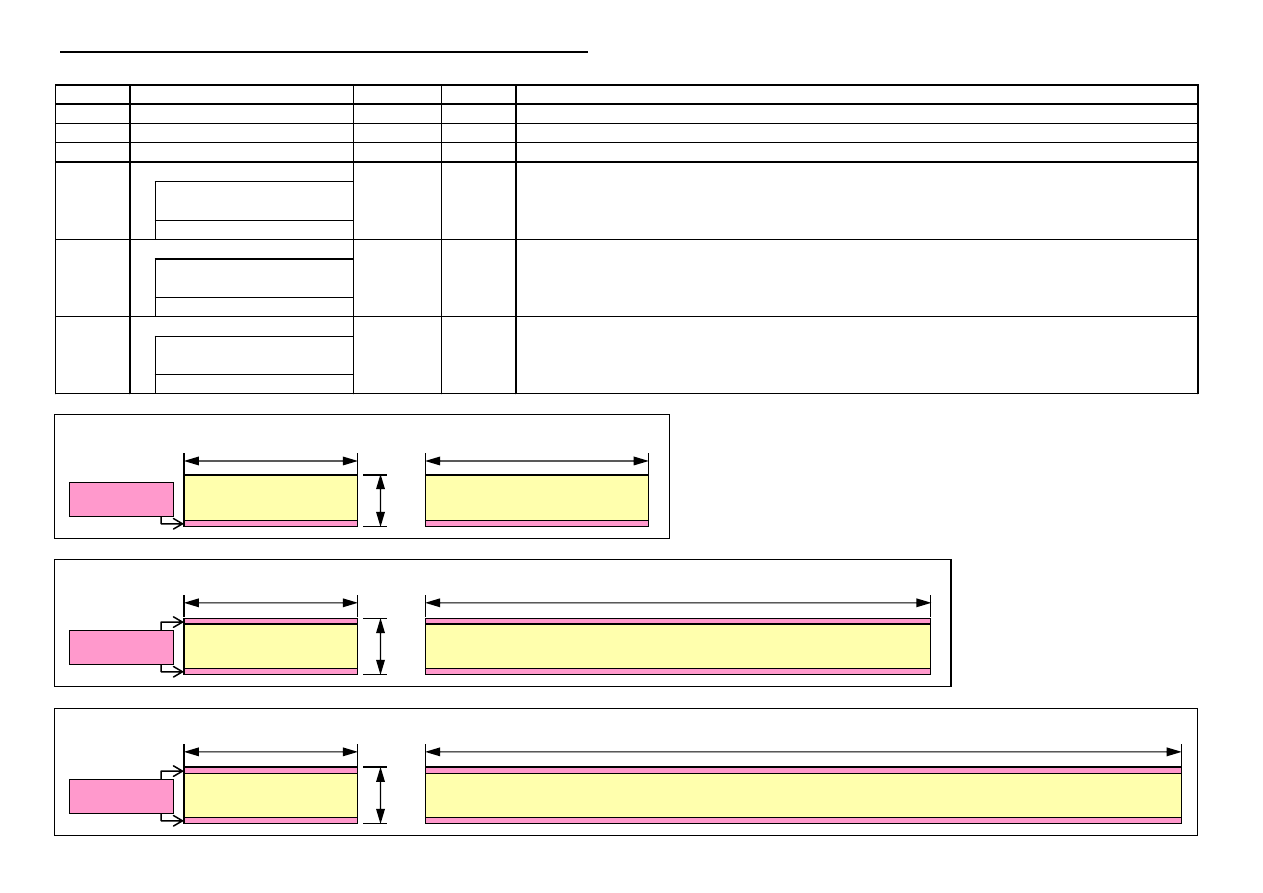
[CUS-1] BRACKET LED TAPE CUSHION:98 X 8 X 0.65 

Cushion 

Cushion 

0.

8


454.2 

[CUS-2] DOUBLE SIDE TAPE CUSHION:454.2 X 8 X 0.8 

Cushion 

Cushion 

0.

8


832.6 

[CUS-3] DOUBLE SIDE TAPE CUSHION:832.6 X 8 X 0.8 

Cushion 

DOUBLE SIDE 

DOUBLE SIDE 

Parts_list

1
2
3
4
5
6
7
8
Оглавление инструкции
  • Страница 1 из 9
    How to fix the protective glass for X401S PARTS LIST Description Location Part No GLS-1 PROTECTION GLASS X401S ― BRK-1 X401S HOLDER GLASS A BRK-2 X401S HOLDER GLASS B CUS-1 BRACKET LED TAPE CUSHION CUSHION Q'ty 1 2 2 Spec 909.4±1.0mm X 521±0.7mm X 4.0±0.3mm ― 1 98mm X 8mm X 0.65mm ― 2 454.2mm X 8mm
  • Страница 2 из 9
    How to fix the protective glass for X401S 1. Remove BEZEL and BRACKET PWB IR. (Amount of the screws that fix BEZEL is 8 pieces. ) Remove 8 SCREWS. Remove the BEZEL ATTENTION Remove catching of a hook. (4 places ) REMOVE BRACKET PWB IR Page-1
  • Страница 3 из 9
    2. Paste CUS-2 and CUS-3 (DOUBLE SIDE TAPE CUSHION) and peel off separator. Refer to SPEC of PARTS LIST for the specification of CUS-2 and CUS-3. ATTENTION Don't paste CUS-2 and CUS-3 on PANEL'S ACTIVE AREA. Paste CUS-2 and CUS-3 832.6mm CUS-3 ATTENTION Criterion which pastes CUS-2 and CUS-3 is the
  • Страница 4 из 9
    3. Assemble GLS-1(PROTECTION GLASS X401S). Before assembling, check if there's no dust or fingerprint and so on. If find it, remove by cleaning cloth. 1.6mm ATTENTION Before assembling PROTECTION GLASS to PANEL, remove dust from PROTECTION GLASS and PANEL-front surface. Assemble GLS-1 Peel off
  • Страница 5 из 9
    4. Assemble BRK-1 and BRK-2 (X401S HOLDER GLASS A/B). Assemble BRK-1 and BRK-2 BRK-1 BRK-2 BRK-2 BRK-1 ATTENTION Insert BRK-1 and BKT-2 between PANEL and BACK COVER. Page-4
  • Страница 6 из 9
    5. Paste CUS-1 (BRACKET LED TAPE CUSHION). Refer to SPEC of PARTS LIST for the specification of CUS-1. Assemble BRACKET PWB IR again. Assemble BRACKET PWB IR again. Paste CUS-1 CUS-1 ATTENTION Insert the positioning of BRACKET PWB IR in the hole of a picture. Paste the tape of 50mm. Page-5
  • Страница 7 из 9
    6. Rotate and install HOLE CAP. Remove HOLE CAP Push Rotate HOLE CAP Remove Rotate Install HOLE CAP Insert Page-6
  • Страница 8 из 9
    7. Assemble BEZEL again. Push Assemble BEZEL again. ATTENTION Check that the hook is catching firmly. (4 places ) Install 8 SCREWS. 2 FIXING SEQUENCE : 1 → 2 2 ATTENTION Fix screw in a specified hole. 2 1 1 2 2 T=4±1kgf.cm ATTENTION Fix screw by the specified torque. 2 Page-7
  • Страница 9 из 9