Installation/
åÓÌÚ‡Ê/
설치
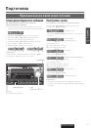
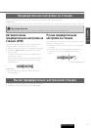
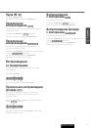
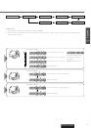
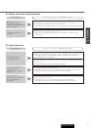
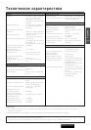
0 – 30
°
112 mm
182 mm
4.5 mm – 6.0 mm
Dual DIN CD/Cassette Receiver with DSP
2-DIN CD/͇ÒÒÂÚÌ˚È ÂÒË‚Â Ò DSP ÔÓˆÂÒÒÓÓÏ
DSP의 듀얼 DIN 사이즈 CD/카세트 리시버
Model:
CQ-CK2303W
●Please read these instructions carefully before using this product and keep this manual for future reference.
●è‰ ̇˜‡ÎÓÏ ˝ÍÒÔÎÛ‡Ú‡ˆËË ÔÓÒËÏ ÔÓ˜ËÚ‡Ú¸ ̇ÒÚÓfl˘Û˛ ËÌÒÚÛÍˆË˛ ‚ÌËχÚÂθÌÓ Ë ı‡ÌËÚ¸  ̇ ÔÓθÁÓ‚‡ÌË ̇ ·Û‰Û˘ÂÂ.
●
YEFM294212 NT0506-0 Printed in China
Matsushita Electric Industrial Co., Ltd.
Web Site : http://panasonic.net
Consult a professional for installation.
●
Verify the radio using the antenna and speakers before installation.
This unit is not applicable to the installation with the mounting
collar and trim plate.
èÓ ‚ÓÔÓÒÛ ÏÓÌڇʇ ÒΉÛÂÚ Ó·‡˘‡Ú¸Òfl Í ÒÔˆˇÎËÒÚÛ.
●
è‰ ÏÓÌÚ‡ÊÓÏ ÔÓ‚Âfl˛Ú ‡‰ËÓÔËÂÏÌËÍ Ò ÔÓÏÓ˘¸˛
‡ÌÚÂÌÌ˚ Ë „ÓÏÍÓ„Ó‚ÓËÚÂÎÂÈ.
èË ÏÓÌڇʠ‰‡ÌÌÓ„Ó ‡ÔÔ‡‡Ú‡ Ì ÔËÏÂÌfl˛Ú ÏÓÌÚ‡ÊÌÛ˛ ‡ÏÛ Ë
Ó·‡ÏÎÂÌËÂ.
설치에 관해서는 전문가에게 상담해 주십시오.
●
설치하기 전에 안테나 및 스피커를 사용하여 라디오를 확인해 주십시오.
본 장치는 장착 컬러와 트림 플레이트를 사용한 설치에는
적절하지 않습니다.
●
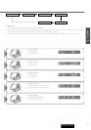
Mounting angle side to side : horizontal
front to rear : 0 – 30
°
●
ì„ÓÎ ÏÓÌڇʇ ‚ ÔÓÔ˜ÌÓÈ ÔÎÓÒÍÓÒÚË : ÉÓËÁÓÌڇθ
‚ ÔÓ‰ÓθÌÓÈ ÔÎÓÒÍÓÒÚË : 0 – 30°
●
장착 각도 좌우 각도: 수평
전후 각도: 0 - 30
°
●
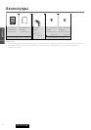
Mounting space
●
èÎÓ˘‡‰¸ ÔÓ‰ ÏÓÌÚ‡Ê
●
장착 장소
Before Installation/
è‰ ÏÓÌÚ‡ÊÓÏ/
설치하시기 전에
Before Wiring/
è‰ ÏÓÌÚ‡ÊÓÏ ˝ÎÂÍÚÓÔÓ‚Ó‰ÓÍ/
배선을 하기 전에
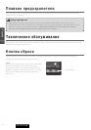
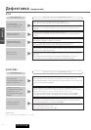
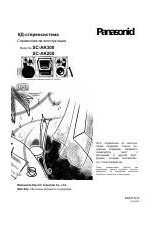
Supplied Hardware/
ÑÂÚ‡ÎË, ‚ıÓ‰fl˘Ë ‚ ÍÓÏÔÎÂÍÚ‡ˆË˛ ÔÓÒÚ‡‚ÍË/
부속품의 하드웨어
6
6
1
Round-head Screw (5 mmø X 8 mm)
ÇËÌÚ Ò ÔÓÎÛÍÛ„ÎÓÈ „ÓÎÓ‚ÍÓÈ
(5 mmø X 8 mm)
둥근머리나사 (5 mmø X 8 mm)
Flat-head Screw (5 mmø X 8 mm)
ÇËÌÚ Ò ÔÓÚ‡ÈÌÓÈ „ÓÎÓ‚ÍÓÈ
(5 mmø X 8 mm)
접시머리나사 (5 mmø X 8 mm)
Exclusively operated with 12 V battery with
negative (–) ground.
Connect the power lead (red) very last.
Connect the battery lead (yellow) to the positive (+) terminal of
the battery or fuse block terminal (BAT).
Strip about 5 mm of the lead ends for connection.
Apply insulating tape to bare leads.
Secure loosened leads.
ꇷÓÚ‡ÂÚ ÚÓθÍÓ Ò ÔËÚ‡ÌËÂÏ ÓÚ 12 V {B} ·‡Ú‡ÂË
Ò ÓÚˈ‡ÚÂθÌÓÈ (–) ÁÂÏÎÂÈ.
èÓ‰ÒÓ‰ËÌfl˛Ú ÒËÎÓ‚ÓÈ ‚˚‚Ó‰ÌÓÈ ÔÓ‚Ó‰ (͇ÒÌ˚È) ÔÓÒΉÌËÏ.
èÓ‰ÒÓ‰ËÌfl˛Ú ‚˚‚Ó‰ÌÓÈ ÔÓ‚Ó‰ (ÊÂÎÚ˚È) Í ÔÓÎÓÊËÚÂθÌÓÏÛ (+) ‚˚‚Ó‰Û
·‡Ú‡ÂË ËÎË ÍÎÂÏÏ ·ÎÓ͇ Ô·‚ÍËı Ô‰Óı‡ÌËÚÂÎÂÈ (BAT).
ë ÍÓ̈ӂ ‚˚‚Ó‰Ì˚ı ÔÓ‚Ó‰Ó‚ ÒÌËχ˛Ú ËÁÓÎflˆË˛ ̇ ‰ÎËÌ ÓÍÓÎÓ 5
mm {ÏÏ} ‰Îfl ÒÓ‰ËÌÂÌËfl.
ç‡ Ó·Ì‡ÊÂÌÌ˚ ‚˚‚Ó‰Ì˚ ÔÓ‚Ó‰‡
̇Í·‰˚‚‡˛Ú ËÁÓÎflˆËÓÌÌÛ˛ ÎÂÌÚÛ.
îËÍÒËÛ˛Ú ÓÒ··ÎÂÌÌ˚ ‚˚‚Ó‰Ì˚ ÔÓ‚Ó‰‡.
음극 (–) 접지의 12볼트 배터리로만 작동됩니다.
전원 리드선 (적색) 을 마지막으로 접속합니다.
배터리 리드선 (황색)을 배터리의 양극(+) 단자 또는휴즈 블록 단자
(BAT) 에 접속합니다.
접속시에는 리드선 끝부분을 약5 mm 벗겨냅니다.
드러난 리드선에는 절연 테이프를 감아 주십시오.
느슨한 리드선을 고정합니다.
English
êÛÒÒÍËÈ
Power Connector
ëËÎÓ‚ÓÈ ‡Á˙ÂÏ
전원 커넥터
YGAJ021011
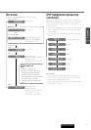
Diagram
Q'ty
Item
Diagram
Q'ty
Item
No.
No.
한국어
TEXT
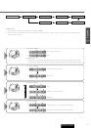
q and w consist of a set. (YEP0BS1214)
q Ë w ÒÓÒÚÓflÚ ËÁ ÍÓÏÔÎÂÍÚ‡. (YEP0BS1214)
세트는
q 및 w 로 구성됩니다. (YEP0BS1214)
Use the appended screws
q or w to install the brackets on this unit.
●
If a special kit (option) is necessary for a certain year’s, model or grade of car, please consult your dealer.
ÑÎfl ÏÓÌڇʇ ÍÓ̯ÚÂÈÌÓ‚ ̇ ÔË·Ó ÒΉÛÂÚ ËÒÔÓθÁÓ‚‡Ú¸ ÔËÎÓÊÂÌÌ˚ ‚ËÌÚ˚ q ËÎË w.
●
ÖÒÎË ÒÔˆˇθÌ˚È Ì‡·Ó (ÓÔˆËfl) Ú·ÛÂÚÒfl ̇ ÓÔ‰ÂÎÂÌÌÓ ˜ËÒÎÓ ÎÂÚ, ÏÓ‰Âθ ËÎË Í·ÒÒ ‡‚ÚÓÏÓ·ËÎfl, ÚÓ ÒΉÛÂÚ Ó·‡˘‡Ú¸Òfl Í ‰ËÎÂÛ.
부속 나사
q
또는
w
를 사용하여 장치에 브래킷을 장착합니다.
●
l 자동차의 특정 연도, 모델 또는 그레이드의 스페셜 킷트 (옵션) 가 필요한 경우에는 대리점에 상담해 주십시오.
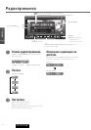
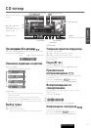
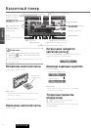
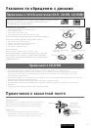
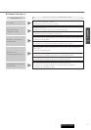
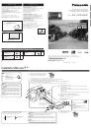
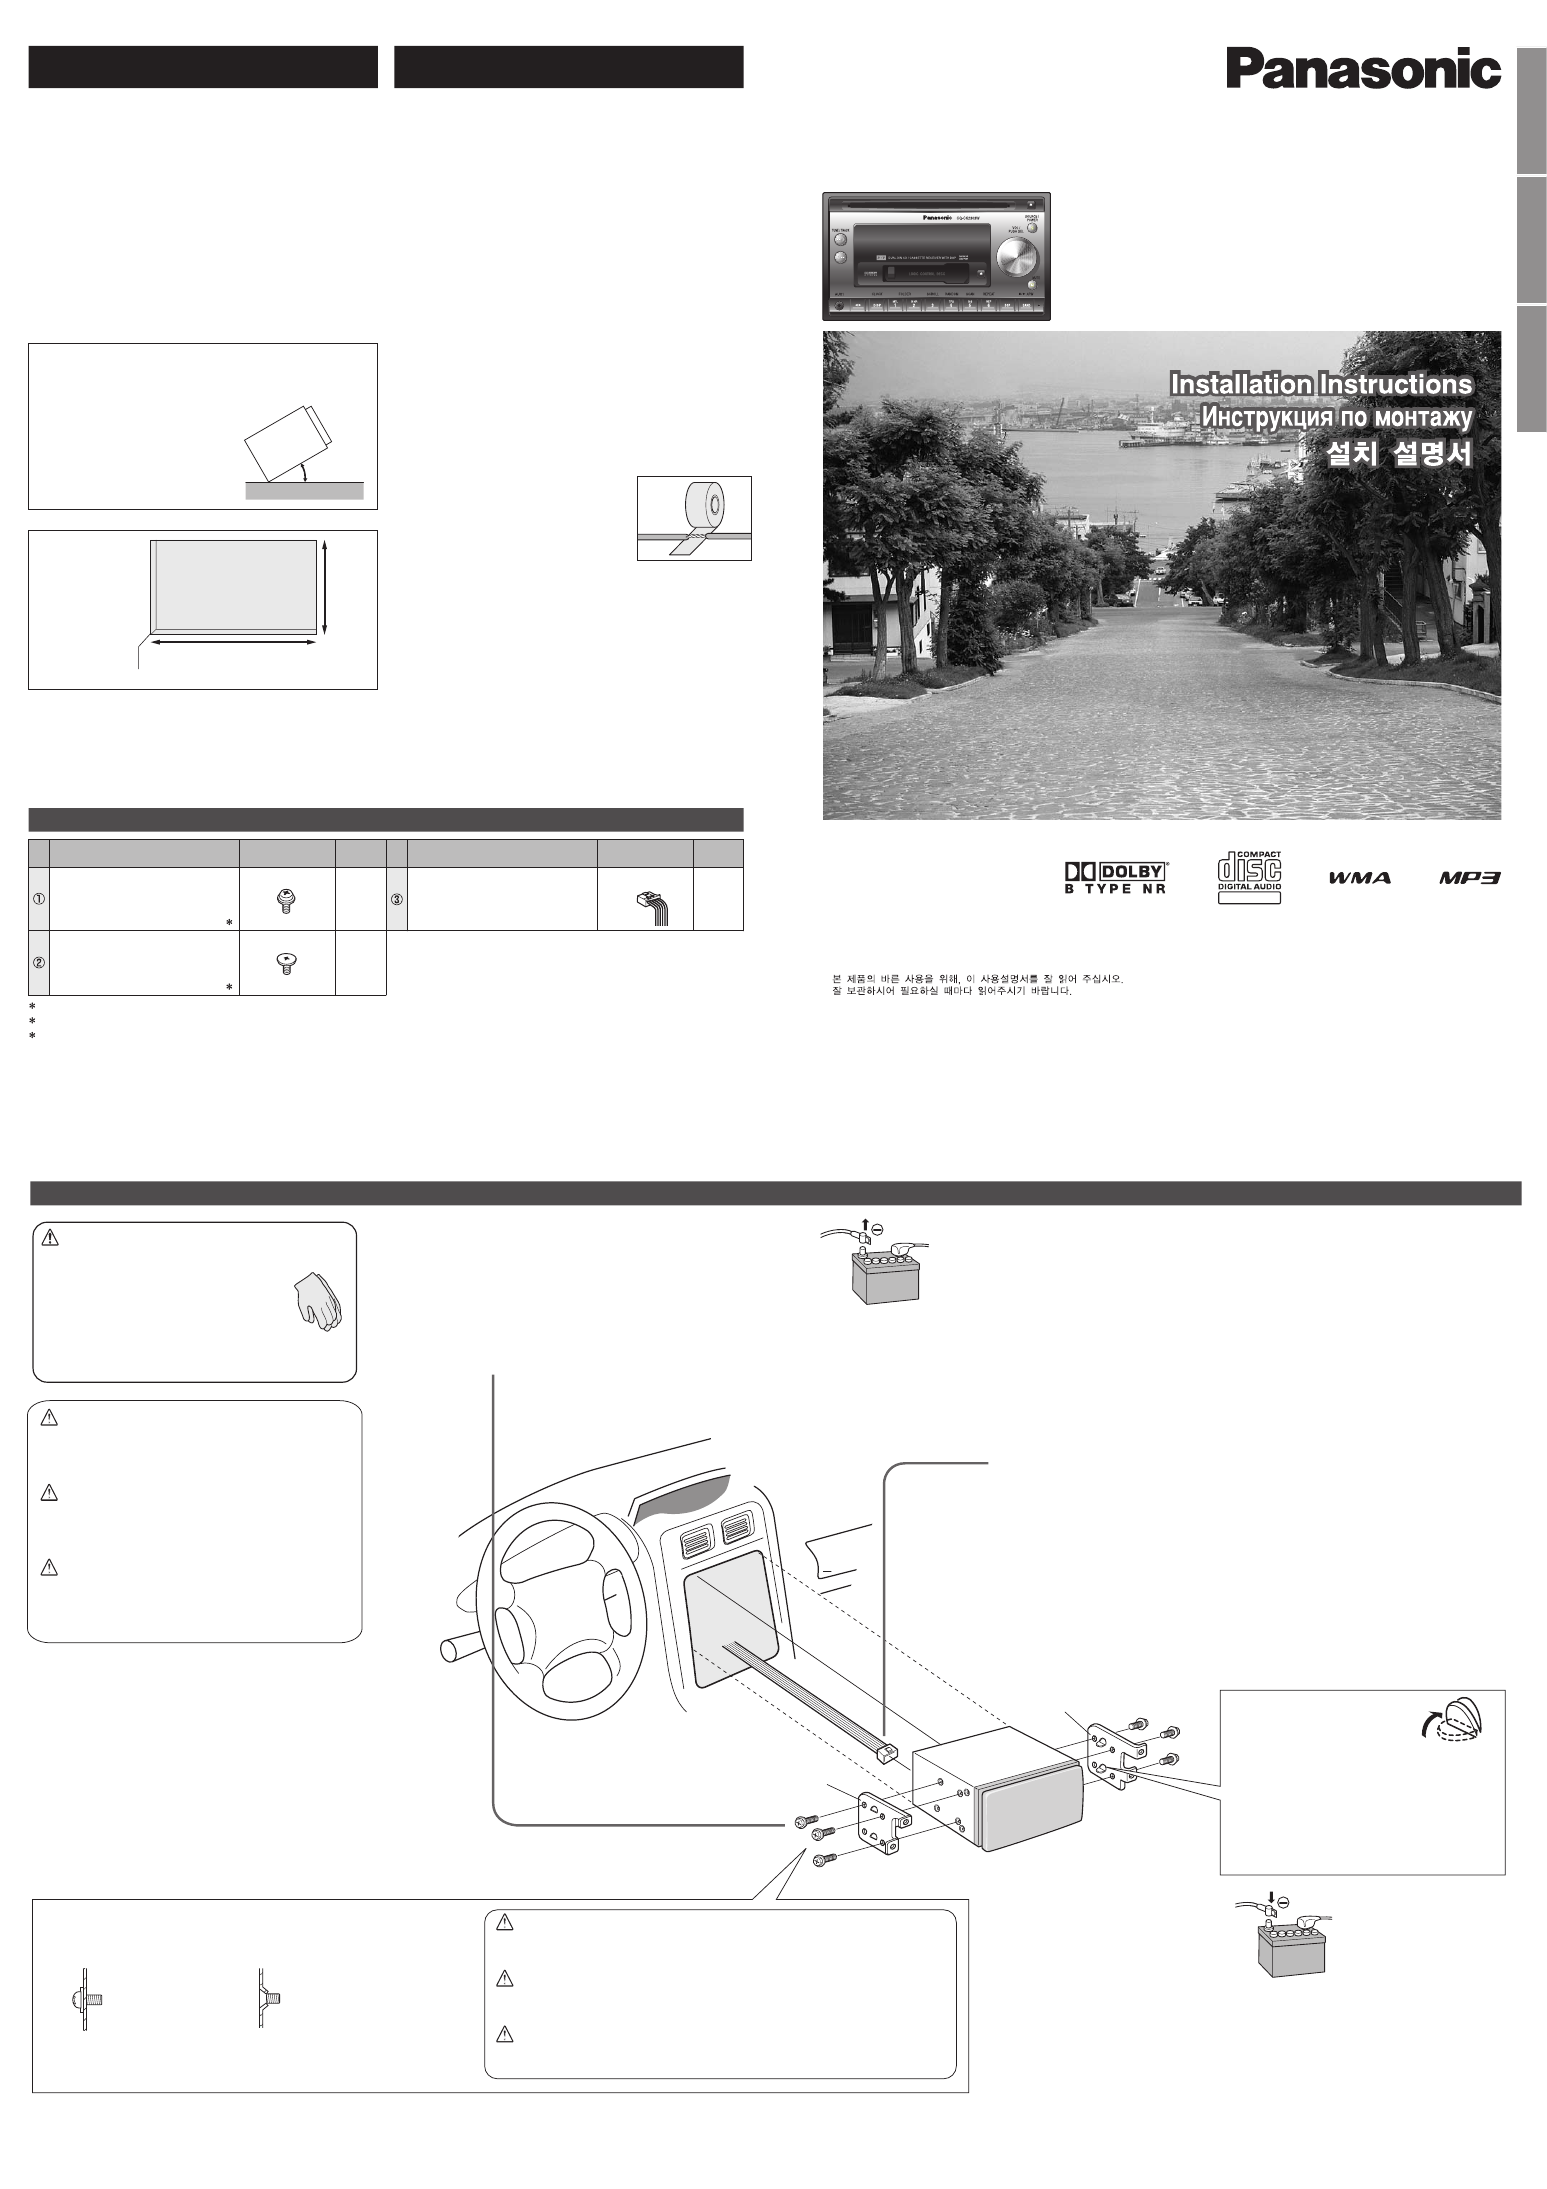
How to install the unit/
ä‡Í ÒÏÓÌÚËÓ‚‡Ú¸ ÔË·Ó/
장치를 설치하는 방법
Remove the cable from the battery negative terminal.
éÚÒÓ‰ËÌfl˛Ú ͇·Âθ ÓÚ ÓÚˈ‡ÚÂθÌÓ„Ó ‚˚‚Ó‰‡ ·‡Ú‡ÂË.
배터리의 음극 단자로부터 케이블을 탈착합니다.
Secure the main unit to the dashboard with brackets.
á‡ÍÂÔÎfl˛Ú „·‚Ì˚È ·ÎÓÍ ÔË·Ó‡ Í Ô‡ÌÂÎË ÔË·ÓÓ‚ Ò ÔÓÏÓ˘¸˛
ÍÓ̯ÚÂÈÌÓ‚.
브래킷으로 계기반에 장치를 고정하십시오.
Bracket (L) (supplied with car)
äÓ̯ÚÂÈÌ (L) (ÔÓÒÚ‡‚ÎflÂÏ˚È Ò ‡‚ÚÓÏÓ·ËÎÂÏ)
브래킷 (L) (자동차에 부속됨)
Bracket (R) (supplied with car)
äÓ̯ÚÂÈÌ (R) (ÔÓÒÚ‡‚ÎflÂÏ˚È Ò ‡‚ÚÓÏÓ·ËÎÂÏ)
브래킷 (R) (자동차에 부속됨)
Round-head Screw
q
ÇËÌÚ Ò ÔÓÎÛÍÛ„ÎÓÈ „ÓÎÓ‚ÍÓÈ q
둥근머리나사
q
Flat-head Screw
w
ÇËÌÚ Ò ÔÓÚ‡ÈÌÓÈ „ÓÎÓ‚ÍÓÈ w
접시머리나사
w
Cautions
●
Wear gloves for safety.
●
Make sure that wiring is completed before
installation.
ÇÌËχÌËÂ
●
ëΉÛÂÚ Ì‡‰ÂÚ¸ Ô˜‡ÚÍË ‰Îfl
·ÂÁÓÔ‡ÒÌÓÒÚË.
●
ëΉÛÂÚ Û·Â‰ËÚ¸Òfl, ˜ÚÓ ÏÓÌÚ‡Ê ˝ÎÂÍÚÓÔÓ‚Ó‰ÓÍ
Á‡‚¯ÂÌ ‰Ó ÏÓÌڇʇ ÔË·Ó‡.
주의
●
안전상 장갑을 착용해 주십시오.
●
배선을 끝마친 후에 설치해 주십시오.
1
2
3
4
5
5
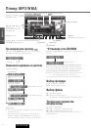
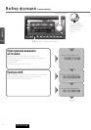
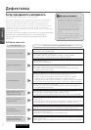
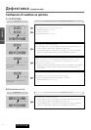
Connection of power connector
e
●
For simple electrical connection to your car, you can buy a prepared power connector
from your dealer.
èÓ‰ÒÓ‰ËÌÂÌË ÒËÎÓ‚Ó„Ó ‡Á˙Âχ e
●
ÑÎfl ÔÓÒÚÓ„Ó ÏÓÌڇʇ ˝ÎÂÍÚÓÔÓ‚Ó‰ÓÍ Ì‡ ‚‡¯ ‡‚ÚÓÏÓ·Ëθ ÏÓÊÌÓ ÔËÓ·ÂÒÚË Û ‰Ë· „ÓÚÓ‚˚È
ÒËÎÓ‚ÓÈ ÍÓÌÌÂÍÚÓ.
전원 커넥터
e
의 접속
●
자동차의 간단한 전기 접속을 하려면 대리점에서 기성품의 전원 커넥터를 구입하십시
오.
Caution
When this unit is installed in dashboard, ensure that
there is sufficient air flow around the unit to prevent
damage from overheating, do not block any ventilation
holes on the unit.
ÇÌËχÌËÂ
èË ÏÓÌڇʠ̇ÒÚÓfl˘Â„Ó ÛÒÚÓÈÒÚ‚‡ ̇ Ô‡ÌÂθ ÔË·ÓÓ‚
ÒΉÛÂÚ Ó·ÂÒÔ˜ËÚ¸ ‰ÓÒÚ‡ÚÓ˜Ì˚È ÔÓÚÓÍ ‚ÓÁ‰Ûı‡ ‚ÓÍÛ„ Ì„Ó
‚Ó ËÁ·ÂʇÌËÂ Â„Ó ÔÓ‚ÂʉÂÌËfl ËÁ-Á‡ Ô„‚‡, Ô˘ÂÏ ÌÂ
ÒΉÛÂÚ Á‡Í˚‚‡Ú¸ ‚ÂÌÚËÎflˆËÓÌÌ˚ ÓÚ‚ÂÒÚËfl ÛÒÚÓÈÒÚ‚‡.
주의
본 제품을 계기반에 설치할 경우에는 과열에 의한 손상을
방지하기 위하여 공기의 흐름이 가능한 충분한 공간을 장
치 주위에 확보하고 장치의 환기부를 차단하지 않도록 주
의해 주십시오.
Note:
●
Use pliers to bend the fingers on the bracket
vertically.
èËϘ‡ÌËÂ:
●
ä΢‡ÏË Á‡„Ë·‡˛Ú ԇθˆ˚ ÍÓ̯ÚÂÈ̇ ‚
‚ÂÚË͇θÌÓ ÔÓÎÓÊÂÌËÂ.
주:
●
펜치를 사용하여 브래킷의 날개를 수직으로
구부립니다.
Select appropriate ones matching the hole shape of the bracket.
Ç˚·Ë‡˛Ú Í΢Ë, ÒÓÓÚ‚ÂÚÒÚ‚Û˛˘Ë ÙÓÏ ÓÚ‚ÂÒÚËÈ ÍÓ̯ÚÂÈÌÓ‚.
브래킷의 구멍 모양에 맞는 적절한 공구를 선택하십시오.
Battery cable reconnection
èÓ‚ÚÓÌÓ ÔÓ‰ÒÓ‰ËÌÂÌË ͇·ÂÎfl Í ·‡Ú‡ÂÂ
배터리 케이블 재접속
Caution
Never use a screw of which length is different from those of the screws
attached to this unit. Failure to observe this may cause trouble.
ÇÌËχÌËÂ
çÂθÁfl ÔËÏÂÌflÚ¸ ‚ËÌÚ‡, ‰ÎË̇ ÍÓÚÓÓ„Ó ÓÚ΢‡ÂÚÒfl ÓÚ ‰ÎËÌ˚ ÔÓÒÚ‡‚ÎÂÌÌ˚ı Ò ‰‡ÌÌ˚Ï
‡ÔÔ‡‡ÚÓÏ ‚ËÌÚÓ‚. çÂÒӷβ‰ÂÌË ‰‡ÌÌÓ„Ó Ô‡‚Ë· ÏÓÊÂÚ ÔË‚ÂÒÚË Í ÌÂËÒÔ‡‚ÌÓÒÚË.
주의
본 장치에 부속된 나사와 길이가 다른 나사는 절대로 사용하지 마십시오. 지키지 않을 경우
고장의 원인이 됩니다.