n
Radio
H
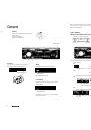
® Change to the Radio mode
Press [PWR] to change to the radio mode.
CPlease press [U] (eject) to eject the tape when cassette tape play mode starts.
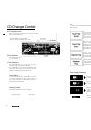
FM stereo indicator
® Band
Press [BAND] to change the band.
® Manual Tuning
[> TUNE]: Higher frequency
[k TUNE]: Lower frequency
Seek Tuning
Press and hold for more than 0.5 second.
[> TUNE]: Higher frequency
[k TUNE]: Lower frequency
Tuning will automatically stop when the signals
of the next broadcast station are received.
® Mono Selection
Press [MONO] for monaural reception in case a lot
of interference is present in an FM stereo signal or
to improve the listening quality of weak FM
broadcasts.
Press [MONO] again to cancel.
MONO indicator
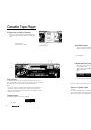
Preset Station Setting
Up to 6 stations can be saved in each of the FM1, FM2,
FM3 and AM preset station memories.
Display Change
Press [DISP] (display) to switch to the clock display.
Note: Existing saved stations are overwritten with new
stations after following this procedure.
Frequency
Band
Press [BAND] to select a desired band.
(^ page 8)
Clock display
Preset buttons from [1] to [6]
W Auto Preset Memory (APM)
Press and hold [BAND] (APM: auto preset memory) for more
than 2 seconds.
• The 6 stations with good reception will be automatically
sared in the memory under preset buttons.
• Once set, the preset stations are sequentially scanned for 5
seconds each.
Manual Preset Memory
o Use manual or seek tuning to find a station.
(*■
page 8)
w
Press and hold one of the preset buttons from [1] to [6]
until the display blinks once.
blinks once
Preset Station Calling
Press the corresponding preset button from [1]
to [6] to tune in a preset station.
Caution: To ensure safety, never attempt to preset stations
while you are driving.
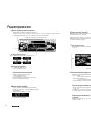
CQ-RG133W
CQ-RG133W
H
8
9