Доступность: Бесплатно как и все руководства на сайте. Без регистрации и SMS.
Дополнительно: Чтение инструкции онлайн
6
AF360FZ_540FGZ.book Page 6 Friday, December 20, 2013 6:11 PM
Страница: (7 из 68)
навигация
1
2
3
4
5
6
7
8
9
10
11
12
13
14
15
16
17
18
19
20
21
22
23
24
25
26
27
28
29
30
31
32
33
34
35
36
37
38
39
40
41
42
43
44
45
46
47
48
49
50
51
52
53
54
55
56
57
58
59
60
61
62
63
64
65
66
67
68
Оглавление инструкции
Страница 1 из 69 Cover_1-4.fm Page 1 Friday, December 20, 2013 4:04 PM RICOH IMAGING COMPANY, LTD. RICOH IMAGING EUROPE S.A.S RICOH IMAGING DEUTSCHLAND GmbH RICOH IMAGING UK LTD. RICOH IMAGING AMERICAS CORPORATION RICOH IMAGING CANADA INC. RICOH IMAGING CHINA CO., LTD. 2-35-7, Maeno-cho, Itabashi-ku, Tokyo
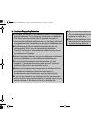
Страница 2 из 69 AF360FZ_540FGZ.book Page 1 Friday, December 20, 2013 6:11 PM Introduction Thank you for purchasing the Auto-flash AF540FGZ II/ AF360FGZ II. In addition to easy daylight sync photography with P-TTL auto, the AF540FGZ II/AF360FGZ II also allows wireless P-TTL auto photography and high-speed sync in
Страница 3 из 69 AF360FZ_540FGZ.book Page 2 Friday, December 20, 2013 6:11 PM CAUTION Do not use the flash and/or LED beam near a person’s eyes, as it may hurt them. Be particularly careful when using the flash around infants. The following may lead to an explosion or fire. l Shorting the batteries l Exposing the
Страница 4 из 69 AF360FZ_540FGZ.book Page 3 Friday, December 20, 2013 6:11 PM Precautions for Your Flash Unit l Never use organic solvents such as paint thinner, alcohol or benzine to clean the flash unit. l Avoid leaving the flash unit for extended period in places where the humidity and temperature are very high
Страница 5 из 69 AF360FZ_540FGZ.book Page 4 Friday, December 20, 2013 6:11 PM n Cautions Regarding Batteries l This flash unit uses four AA alkaline, lithium, or nickel metal hydride batteries. Do not use any other types of batteries. The flash unit may not be able to operate correctly or demonstrate sufficient
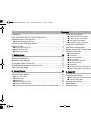
Страница 6 из 69 AF360FZ_540FGZ.book Page 5 Friday, December 20, 2013 6:11 PM Contents Introduction ......................................................................................... 1 FOR THE SAFE USE OF YOUR FLASH UNIT.................................. 1 Precautions for Your Flash
Страница 7 из 69 AF360FZ_540FGZ.book Page 6 Friday, December 20, 2013 6:11 PM 6
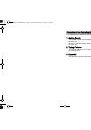
Страница 8 из 69 AF360FZ_540FGZ.book Page 7 Friday, December 20, 2013 6:11 PM Overview of the Operating Manual The operating manual includes the following chapters. 1 Getting Ready This chapter explains about getting ready to take pictures after you purchase the flash unit. Be sure to read this chapter before you
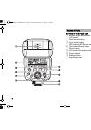
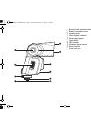
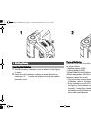
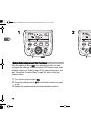
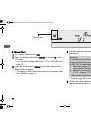
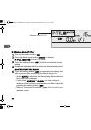
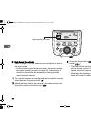
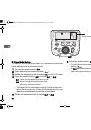
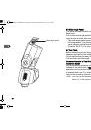
Страница 9 из 69 AF360FZ_540FGZ.book Page 8 Friday, December 20, 2013 6:11 PM Names of Parts n Parts of This Flash Unit 1 Bounce angle adjustment 2 LCD panel 3 Flash mode button 4 Sync mode button 5 LED button/LED Ready lamp 6 Test button/Ready lamp 7 Zoom button 8 LCD panel illumination button/Function button 9
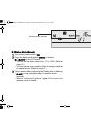
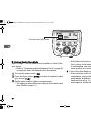
Страница 10 из 69 AF360FZ_540FGZ.book Page 9 Friday, December 20, 2013 6:11 PM b c d e f g h i j k Bounce lock release button Battery chamber cover Locking lever Flash signal contacts Wide-angle panel Flash head LED emitter Wireless slave sensor Shoe bracket Shoe lock pin 9
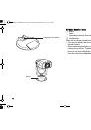
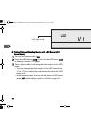
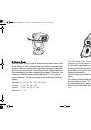
Страница 11 из 69 AF360FZ_540FGZ.book Page 10 Friday, December 20, 2013 6:11 PM Opening of the stand Stand 10 n Major Bundled Items 1 Stand 2 Case 3 Operating manual (this manual) 4 Certification Slide the hot shoe bracket into the opening of the stand. • You cannot attach the off-camera shoe adapter F to the
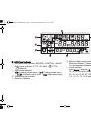
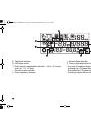
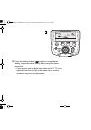
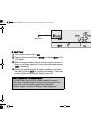
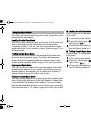
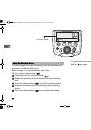
Страница 13 из 69 AF360FZ_540FGZ.book Page 12 Friday, December 20, 2013 6:11 PM 8 Catchlight indicator 9 LED beam mode 0 Flash output compensation indicator: -4.0 to +2.0 levels, (auto (A), 1/3, 1/2 step) a Function menu indicator b Flash frequency indicator 12 c Bounce flash indicator d Flash output adjustment
Страница 14 из 69 AF360FZ_540FGZ.book Page 13 Friday, December 20, 2013 6:11 PM 1 2 1 1. Getting Ready Inserting the Batteries 1 2 Slide the battery chamber cover as shown in the figure to open. Insert four AA batteries, making sure the plus/minus markings (+, -) match the diagram inside the battery chamber cover.
Страница 15 из 69 AF360FZ_540FGZ.book Page 14 Friday, December 20, 2013 6:11 PM 1 • If you let the flash unit discharge successively using lithium batteries, the batteries will overheat, activating a safety circuit that temporarily disables the flash unit. If this occurs, rest the flash unit so that the temperature
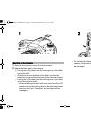
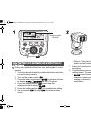
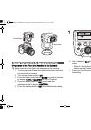
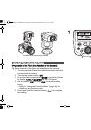
Страница 16 из 69 AF360FZ_540FGZ.book Page 15 Friday, December 20, 2013 6:11 PM 1 2 1 Mounting to the Camera 1 2 Remove the hot shoe cover from the camera. Attach the flash unit to the camera. 1 Facing the LCD panel, turn the locking lever of the flash unit to the left. 2 Slide the hot shoe bracket of the flash unit
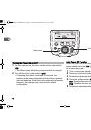
Страница 17 из 69 AF360FZ_540FGZ.book Page 16 Friday, December 20, 2013 6:11 PM 1 Power switch Ready lamp Turning the Power On and Off 1 2 16 Turn the camera on, then turn on the unit’s power switch (ON). • The Ready lamp will light up when the flash is charged. Turn off the unit’s power switch (OFF). • If charging
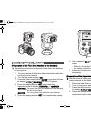
Страница 18 из 69 AF360FZ_540FGZ.book Page 17 Friday, December 20, 2013 6:11 PM 6 Press the setting button (SET) to complete the setting. • To exit the function menu, press and hold the function button ( ). • Refer to “Using the Function Menu” (page 36) for details on the function menu. • In wireless mode, the power
Страница 19 из 69 AF360FZ_540FGZ.book Page 18 Friday, December 20, 2013 6:11 PM 1 1 Setting Button/Adjustment Dial Functions With the setting button (SET) and adjustment dial, you can configure the settings of flash modes or LED beam mode, such as flash output, etc. Refer to page 20 for each setting item, and also
Страница 20 из 69 AF360FZ_540FGZ.book Page 19 Friday, December 20, 2013 6:11 PM 3 1 4 Press the setting button (SET) again to complete the setting. Adjust the other setting items using the same procedure. • If you want to use multiple flash units set to P-TTL and adjust the amount of light at the same time, use the
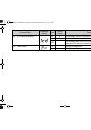
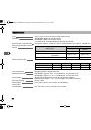
Страница 21 из 69 AF360FZ_540FGZ.book Page 20 Friday, December 20, 2013 6:11 PM Setting Items in Flash Modes Sync mode Flash mode 1 P-TTL (auto) Flash frequency (Multi) -4.0 to +2.0 – – – – – 1/1, 1/2, 1/4, 1/8, 1/16, 1/32, 1/64, 1/128, 1/256 – – – – – 1/4, 1/8, 1/16, 1/32, 1/64, 1/128, 1/256 2 to 100 1 to 200 z z
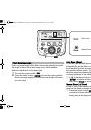
Страница 22 из 69 AF360FZ_540FGZ.book Page 21 Friday, December 20, 2013 6:11 PM 1 Auto zoom Manual zoom Flash Coverage Angle Flash coverage angle of this flash unit can be adjusted to match the angle of view of the lens being used, which enables effective distribution of the flash light. 1 2 Turn on the power switch
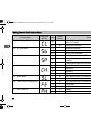
Страница 23 из 69 AF360FZ_540FGZ.book Page 22 Friday, December 20, 2013 6:11 PM The zoom position is switched in the order shown in the diagram on page 23. 1 Zoom Positions for Each Format *Wide-angle panel used. K series (APS-C) 645D Q series 13mm* 25mm* 3mm* 16mm 30mm 4mm 19mm 35mm 5mm 24mm 43mm 6mm 34mm 62mm 9mm
Страница 24 из 69 AF360FZ_540FGZ.book Page 23 Friday, December 20, 2013 6:11 PM • In the auto zoom mode (Zoom), the flash coverage angle will be adjusted automatically to suit the lens focal length when you press the shutter release button halfway, and the camera exposure metering timer is on. • In the auto zoom
Страница 25 из 69 AF360FZ_540FGZ.book Page 24 Friday, December 20, 2013 6:11 PM 2. Taking Pictures Using the Flash Modes 2 This flash unit has the following flash modes. Select the mode best suited for the subject. P-TTL Auto Flash (P-TTL) A pre-flash is discharged before the main flash so that the multi-segment
Страница 26 из 69 AF360FZ_540FGZ.book Page 25 Friday, December 20, 2013 6:11 PM P-TTL auto flash 2 n P-TTL Auto Flash 1 2 3 4 5 Turn on the power switch (ON). Press the flash mode button (MODE) until P-TTL is displayed on the LCD panel. Press the sync mode button (SYNC) to cycle through the display of: leading
Страница 27 из 69 AF360FZ_540FGZ.book Page 26 Friday, December 20, 2013 6:11 PM Manual flash 2 n Manual Flash 1 2 3 4 Turn on the power switch (ON). Press the flash mode button (MODE) to display M on the LCD panel. • You can set the flash output from 1/1 to 1/256. (Refer to page 18.) Press the zoom button (ZOOM) to
Страница 28 из 69 AF360FZ_540FGZ.book Page 27 Friday, December 20, 2013 6:11 PM Multi flash 2 n Multi Flash 1 2 3 4 Turn on the power switch (ON). Press the flash mode button (MODE) to display Multi on the LCD panel. Blink the desired setting item from flash output, number of flashes, and flash frequency, by
Страница 29 из 69 AF360FZ_540FGZ.book Page 28 Friday, December 20, 2013 6:11 PM Wireless mode (P-TTL) 2 n Wireless Mode (P-TTL) 1 2 3 4 5 28 Turn on the power switch (ON). Press the flash mode button (MODE) to display P-TTL MASTER on the LCD panel. Press the setting button (SET) to blink the wireless mode setting.
Страница 30 из 69 AF360FZ_540FGZ.book Page 29 Friday, December 20, 2013 6:11 PM Wireless mode (manual) 2 n Wireless Mode (Manual) 1 2 3 Turn on the power switch (ON). Press the flash mode button (MODE) to display M SLAVE on the LCD panel. • You can set the flash output from 1/1 to 1/256. (Refer to page 18.) • You
Страница 31 из 69 AF360FZ_540FGZ.book Page 30 Friday, December 20, 2013 6:11 PM LED beam mode 2 n Taking Pictures/Shooting Movies with LED Beam (LED Beam Mode) 1 2 3 30 Turn on the power switch (ON). Press the LED button (LED) to turn on the LED beam. LED is displayed on the LCD panel. Take a picture after
Страница 32 из 69 AF360FZ_540FGZ.book Page 31 Friday, December 20, 2013 6:11 PM z Using the Sync Modes This flash unit has the following sync modes. Select the mode best suited for the subject. Leading Curtain Sync Mode This is the most commonly used sync mode. In this mode, the flash is discharged at the instant
Страница 33 из 69 AF360FZ_540FGZ.book Page 32 Friday, December 20, 2013 6:11 PM High-speed sync mode 2 n High-Speed Sync Mode Refer to page 31 for the features and conditions of use of this sync mode. • As the shutter speed becomes faster, the guide number becomes smaller (as seen in page 59). Accordingly, it should
Страница 34 из 69 AF360FZ_540FGZ.book Page 33 Friday, December 20, 2013 6:11 PM 4 5 6 7 8 Press the setting button (SET) to blink 0.0 for setting exposure compensation. Then set the number by rotating the adjustment dial. • The exposure compensation can be set in the range of -4.0 to +2.0 (1/3, or 1/2 step). (Refer
Страница 35 из 69 AF360FZ_540FGZ.book Page 34 Friday, December 20, 2013 6:11 PM Contrast control sync mode 2 n Contrast Control Sync Mode Refer to page 31 for the features and conditions of use of this sync mode. • Refer to “Connecting with the Extension Cord” on page 55 on using the flash unit detached from the
Страница 36 из 69 AF360FZ_540FGZ.book Page 35 Friday, December 20, 2013 6:11 PM 5 Confirm that the subject is within the effective flash range and the Ready lamp is lit. Then take a picture. • If you are using a single flash unit, you can only perform leading curtain sync photography even when you set contrast
Страница 37 из 69 AF360FZ_540FGZ.book Page 36 Friday, December 20, 2013 6:11 PM Function menu 2 Using the Function Menu You can configure the various settings, such as catchlight or AF spot beam, in the function menu. Refer to page 37 for each function menu item. 1 2 3 4 5 6 36 Turn on the power switch (ON). Press
Страница 38 из 69 AF360FZ_540FGZ.book Page 37 Friday, December 20, 2013 6:11 PM About the Function Menu Catchlight A catchlight is a reflection of light source (LED beam) in the subject’s eyes. It usually appears as a white dot and makes the human subject look more lively (only when combined with the bounce flash).
Страница 39 из 69 AF360FZ_540FGZ.book Page 38 Friday, December 20, 2013 6:11 PM Setting Items in the Function Menu Function Menu Fn1: Catchlight (LED beam) 2 Fn2: AF Spot Beam Displayed Symbol Option Default Setting Enable the catchlight when using the bounce flash ( on the LCD panel.) On OFF z Disable the
Страница 40 из 69 AF360FZ_540FGZ.book Page 39 Friday, December 20, 2013 6:11 PM Function Menu Fn8: LCD Panel Illumination Displayed Symbol Option HI Default Setting z Lo m ft The backlight works in conjunction with the camera. The backlight works in conjunction with the camera. The backlight does not work in
Страница 41 из 69 AF360FZ_540FGZ.book Page 40 Friday, December 20, 2013 6:11 PM Advanced Functions 2 n Wireless Mode In wireless mode (P-TTL), you can take photographs with this flash unit separated from the camera wirelessly. Combine the flash unit with the built-in flash unit of the camera, or another flash unit
Страница 42 из 69 AF360FZ_540FGZ.book Page 41 Friday, December 20, 2013 6:11 PM 1 2 3 Wireless mode (SLAVE) 2 Using This Flash Unit in Combination with a Built-in Flash Unit of the Camera 1 Firstly, set a channel of this flash unit, and register it on the camera. 1 Turn the camera off and then attach this flash unit
Страница 43 из 69 AF360FZ_540FGZ.book Page 42 Friday, December 20, 2013 6:11 PM 2 3 2 4 42 Remove the flash unit from the camera and place it in the desired position. • Press the flash mode button (MODE) to display P-TTL on the LCD panel if the flash mode is set to the modes other than P-TTL . Enable the built-in
Страница 44 из 69 AF360FZ_540FGZ.book Page 43 Friday, December 20, 2013 6:11 PM 1 Control flash Wireless mode (CONTROL) Main flash Attaching This Flash Unit to the Camera for Control Flash 2 6 (Preparation of the Flash Unit Attached to the Camera) 1 Set a channel of the flash unit attached to the camera. 1 Turn the
Страница 45 из 69 AF360FZ_540FGZ.book Page 44 Friday, December 20, 2013 6:11 PM 2 Wireless mode (SLAVE) 2 (Preparation of the Separated Flash Unit) 2 Set the channel of the separated (wireless) flash unit to the same channel as the flash unit attached to the camera. 1 Place the other flash unit in the desired
Страница 46 из 69 AF360FZ_540FGZ.book Page 45 Friday, December 20, 2013 6:11 PM 1 Wireless mode (MASTER) 2 Use both flash units as main flashes. Using Both Flash Units as Main Flashes (Preparation of the Flash Unit Attached to the Camera) 1 Set a channel of the flash unit attached to the camera. 1 Turn the camera
Страница 47 из 69 AF360FZ_540FGZ.book Page 46 Friday, December 20, 2013 6:11 PM 2 Wireless mode (SLAVE) 2 (Preparation of the Separated Flash Unit) 2 Set the channel of the separated (wireless) flash unit to the same channel as the flash unit attached to the camera. 1 Place the other flash unit in the desired
Страница 48 из 69 AF360FZ_540FGZ.book Page 47 Friday, December 20, 2013 6:11 PM 2 Wireless High-speed Sync Photography 6 (Preparation of the Flash Unit Attached to the Camera) 1 Set wireless mode and a channel of this flash unit attached to the camera. 1 Turn the camera off and then attach this flash unit to the hot
Страница 49 из 69 AF360FZ_540FGZ.book Page 48 Friday, December 20, 2013 6:11 PM 5 6 2 3 4 Press the setting button (SET) to complete the setting. Set the same channel (CH1 through CH4) of the flash unit attached to the camera from the function menu. • Refer to “Using the Function Menu” (page 36) for details on the
Страница 50 из 69 AF360FZ_540FGZ.book Page 49 Friday, December 20, 2013 6:11 PM 4 Check that the Ready lamp is lit, then take a picture. • When charging is complete, ( ) is lit in the viewfinder of the camera. • Position this flash unit so that the wireless slave sensor can receive the flash discharged by the
Страница 51 из 69 AF360FZ_540FGZ.book Page 50 Friday, December 20, 2013 6:11 PM Slave mode 2 n Slave Mode Setting To properly control the slave flash, it is necessary to set slave mode settings from the function menu. 1 2 3 4 Turn on the power switch (ON). Press and hold the function button ( ). Rotate the
Страница 52 из 69 AF360FZ_540FGZ.book Page 51 Friday, December 20, 2013 6:11 PM 2 n Bounce Flash With this flash unit, you can tilt and swivel the flash head to aim at the ceiling or wall to bounce the flash before it reaches the subject. Doing so creates softer light and shadows to make the picture look more
Страница 53 из 69 AF360FZ_540FGZ.book Page 52 Friday, December 20, 2013 6:11 PM 2 P-TTL Auto Flash Photography The amount of reflective light will change according to the condition of the reflective surface, angle, and distance. Check the flash output in the LCD panel of this flash unit when taking pictures. Manual
Страница 54 из 69 AF360FZ_540FGZ.book Page 53 Friday, December 20, 2013 6:11 PM • Camera models marketed after September 2013 can use the LED beam as the AF-assist spot beam for the phase difference autofocus method. This feature can also be made available on the models listed below, by downloading the necessary
Страница 55 из 69 AF360FZ_540FGZ.book Page 54 Friday, December 20, 2013 6:11 PM Wide-angle panel 2 n Wide-Angle Panel This flash unit has a built-in wide-angle panel at the top of the flash head. Pull out the wide-angle panel from the top of the flash head and cover the front of the flash head with it, if necessary.
Страница 56 из 69 AF360FZ_540FGZ.book Page 55 Friday, December 20, 2013 6:11 PM Hot shoe adapter FG 2 Off-camera shoe adapter F Extension cord F5P n Connecting with the Extension Cord When using this flash unit separately from the camera and connected by an extension cord, use the optional extension cord F5P. Attach
Страница 57 из 69 AF360FZ_540FGZ.book Page 56 Friday, December 20, 2013 6:11 PM 3. Appendix Flash Effective Range n Calculating the Flash Effective Range When setting the lens to manual F/stop, calculate the guide number at full flash with the use of flash’s zoom position and ISO. Divide the resulting guide number
Страница 58 из 69 AF360FZ_540FGZ.book Page 57 Friday, December 20, 2013 6:11 PM Effective flash range Display of Effective Flash Range The effective flash range will be displayed on the LCD panel of this flash unit. Make sure that you are within the effective flash range before taking pictures. • The effective flash
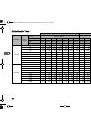
Страница 59 из 69 AF360FZ_540FGZ.book Page 58 Friday, December 20, 2013 6:11 PM Guide Number Table *Wide-angle panel used. AF540FGZ Ⅱ Format Sensitivity 3 ISO100 ISO400 58 Flash output AF360FGZ Ⅱ Zoom Position Zoom Position K series (APS-C) *13mm 16mm 19mm 24mm 34mm 48mm 58mm *13mm 16mm 19mm 24mm 34mm 48mm 58mm 645D
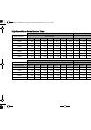
Страница 60 из 69 AF360FZ_540FGZ.book Page 59 Friday, December 20, 2013 6:11 PM High-Speed Sync Guide Number Table *Wide-angle panel used. AF540FGZ Ⅱ (ISO100) K series (APS-C) Shutter speed AF360FGZ Ⅱ (ISO100) Zoom Position *13mm 16mm 19mm 24mm Zoom Position 34mm 48mm 58mm *13mm 16mm 19mm 24mm 34mm 48mm 58mm 1/250
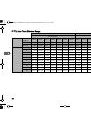
Страница 61 из 69 AF360FZ_540FGZ.book Page 60 Friday, December 20, 2013 6:11 PM P-TTL Auto Flash Effective Range Format Aperture 3 AF540FGZ Ⅱ (ISO100) AF360FGZ Ⅱ (ISO100) Zoom Position Zoom Position K series (APS-C) 13mm 16mm 19mm 24mm 34mm 48mm 58mm 13mm 16mm 19mm 24mm 34mm 48mm 58mm 645D 25mm 30mm 35mm 43mm 62mm
Страница 62 из 69 AF360FZ_540FGZ.book Page 61 Friday, December 20, 2013 6:11 PM Optional Accessories A number of dedicated accessories are available for this flash unit. Off-camera Shoe Clip CL-10 Setting clip for using this flash unit as a wireless slave flash. Hot Shoe Adapter FG Adapter for using this flash unit
Страница 63 из 69 AF360FZ_540FGZ.book Page 62 Friday, December 20, 2013 6:11 PM Specifications Type Guide No. Flash duration (1/2 peak each) Recycling time/Total number of flashes Clip-on, P-TTL auto zoom flash unit with series control AF540FGZ II: Maximum 54 (ISO 100/m). AF360FGZ II: Maximum 36 (ISO 100/m). In
Страница 64 из 69 AF360FZ_540FGZ.book Page 63 Friday, December 20, 2013 6:11 PM Flash output setting Multi flash Flash sync modes Wireless flash Bounce flash Power saving Red-eye reduction Wide-angle panel LCD panel illumination Power source Dimensions and weight Wireless flash (P-TTL): (1/1Ý2/3Ý1/2Ý1/3) Manual
Страница 65 из 69 AF360FZ_540FGZ.book Page 64 Friday, December 20, 2013 6:11 PM Warranty Policy 3 All our products purchased through authorized bona fide photographic distribution channels are guaranteed against defects of material or workmanship for a period of twelve months from the date of your purchase. Service
Страница 66 из 69 AF360FZ_540FGZ.book Page 65 Friday, December 20, 2013 6:11 PM For customers in the USA STATEMENT OF FCC COMPLIANCE This device complies with Part 15 of the FCC Rules. Operation is subject to the following two conditions: (1) This device may not cause harmful interference, and (2) this device must
Страница 67 из 69 AF360FZ_540FGZ.book Page 66 Friday, December 20, 2013 6:11 PM Information for Users on Collection and Disposal of Old Equipment and Used Batteries 3 1. In the European Union 2. In other countries outside the EU These symbols on the products, packaging and/or accompanying documents mean that used
Страница 68 из 69 Cover_1-4.fm Page 1 Friday, December 20, 2013 4:04 PM RICOH IMAGING COMPANY, LTD. RICOH IMAGING EUROPE S.A.S RICOH IMAGING DEUTSCHLAND GmbH RICOH IMAGING UK LTD. RICOH IMAGING AMERICAS CORPORATION RICOH IMAGING CANADA INC. RICOH IMAGING CHINA CO., LTD. 2-35-7, Maeno-cho, Itabashi-ku, Tokyo