Инструкция для PHILIPS 20HF5474/10

(скачивание инструкции бесплатно)
Формат файла: PDF
Доступность: Бесплатно как и все руководства на сайте. Без регистрации и SMS.
Дополнительно: Чтение инструкции онлайн
background image


The pictures you receive may be transmitted in 16:9 format (wide screen) or 4:3 format (conventional 
screen). 16:9 pictures sometimes have a black band at the top and bottom of the screen (letterbox 

format). This function allows you to optimise the picture display on screen.


Using the different formats 

Use the 

16:9 Formats

 button on the Remote Control to select the different modes: Auto, 4:3, Zoom 

14:9, Zoom 16:9, Subtitle zoom, Fullscreen, Super wide and Widescreen. 
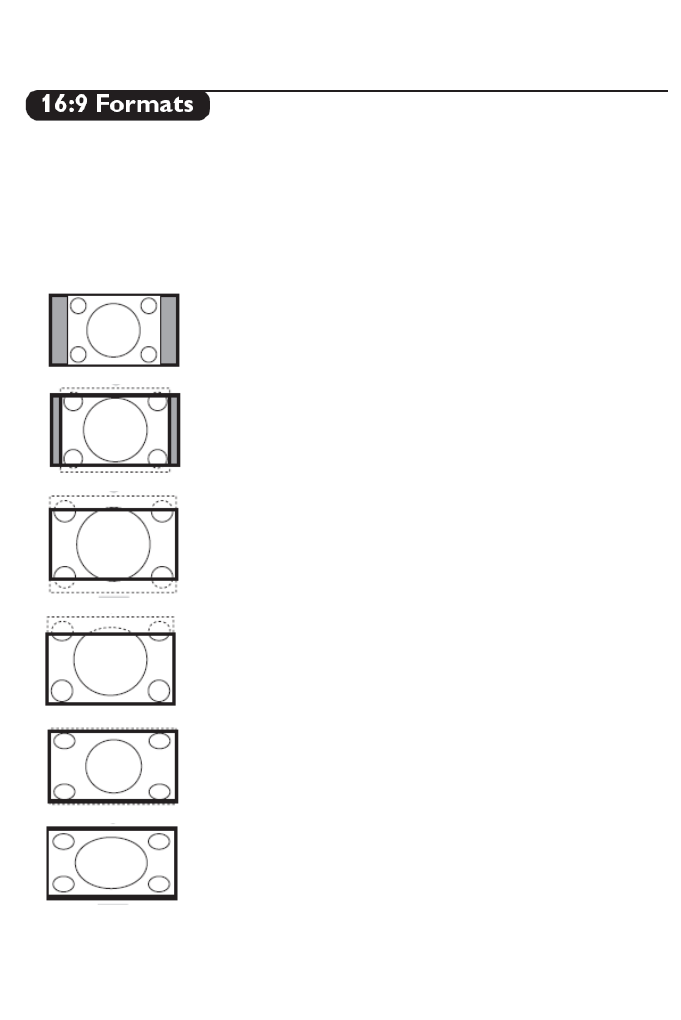


4:3

The picture is reproduced in 4:3 format and a black band is 

displayed on either side of the picture. 


Zoom 14:9

The picture is enlarged to 14:9 format, a thin black band remains 
on both sides of the picture. 


Zoom 16:9

The picture is enlarged to 16:9 format. This mode is 

recommended when displaying pictures that have black bands at 
the top and bottom (letterbox format). 


Subtitle Zoom

This mode is used to display 4:3 pictures using the full surface of 
the screen leaving the subtitles visible. 


Super Wide

This mode is used to display 4:3 pictures using the full surface of 

the screen by enlarging the sides of the picture 


Widescreen

This mode restores the correct proportions of pictures 

transmitted in 16:9 using the full screen display. 

                                               - 16 - 

1
2
3
4
5
6
7
8
9
10
11
12
13
14
15
16
17
18
19
20
21
22
Оглавление инструкции

Document Outline

  • Information for users in the UK (not applicable outside the 
  • Installing the remote control
  • Navigation
  • Inbetriebnahme der Fernbedienung
  • Menüfunktionen abrufen
    • Model / Input
    • AV1
    • AV2
    • Side AV
    • Side S-Video
    • DVI
    • 20HF5474
    • Scart1
    • -
    • Video In
    • S-Video In
    • DVI
    • 23HF5474
    • Scart1
    • -
    • Video In
    • S-Video In
    • DVI
      • Instructions de montage au mur /Présentoir
      • Assurez-vous que l’air circule librement via les fentes d’aé
      • Branchement au secteur
  • Installation de la télécommande
  • Navigation
    • Modèle / Entrée
    • AV1
    • AV2
    • Side AV
    • Side S-Video
    • DVI
    • 20HF5474
    • Scart1
    • -
    • Video In
    • S-Video In
    • DVI
    • 23HF5474
    • Scart1
    • -
    • Video In
    • S-Video In
    • DVI
      • Zorg ervoor dat de lucht kan circuleren door de ventilatiegl
      • Electrische aansluiting
  • De afstandsbediening installeren
  • In de menu’s bladeren
    • Model / Input
    • AV1
    • AV2
    • Side AV
    • Side S-Video
    • DVI
    • 20HF5474
    • Scart1
    • -
    • Video In
    • S-Video In
    • DVI
    • 23HF5474
    • Scart1
    • -
    • Video In
    • S-Video In
    • DVI
    • Opmerking: SmartCard XPress box dient doorgaans op Scart 1 a
      • Istruzioni per l’installazione a parete / su piedistallo
      • Verificare che vi sia una sufficiente circolazione d’aria at
      • Collegamento alla rete di alimentazione elettrica
  • Installazione del telecomando
  • Navigazione
    • Tipo di ingresso
    • AV1
    • AV2
    • Side AV
    • Side S-Video
    • DVI
    • 20HF5474
    • Scart1
    • -
    • Video In
    • S-Video In
    • DVI
    • 23HF5474
    • Scart1
    • -
    • Video In
    • S-Video In
    • DVI
    • Nota: Utilizzando un dispositivo di tipo SmartCard XPress Bo
      • Instrucciones para el montaje en la pared/soporte de mesa
      • Asegúrese que el aire pueda circular libremente por las ranu
      • Conectando el cable de corriente
      • Inserte el enchufe del cable de corriente en el enchufe de l
  • Instalando el mando a distancia
  • Navegación
    • Model / Input
    • AV1
    • AV2
    • Side AV
    • Side S-Video
    • DVI
    • 20HF5474
    • Scart1
    • -
    • Video In
    • S-Video In
    • DVI
    • 23HF5474
    • Scart1
    • -
    • Video In
    • S-Video In
    • DVI
    • Nota: Cuando se utilice una SmartCard XPress Box , esta se c
    • .
      • Instruções para montagem em parede / em móvel
      • Conforme o tipo de televisor que tenha adquirido, o suporte 
      • Certifique-se de que o ar circula livremente através dos ori
      • Ligações principais
  • Instalação do telecomando
  • Navegação
    • Model / Input
    • AV1
    • AV2
    • Side AV
    • Side S-Video
    • DVI
    • 20HF5474
    • Scart1
    • -
    • Video In
    • S-Video In
    • DVI
    • 23HF5474
    • Scart1
    • -
    • Video In
    • S-Video In
    • DVI
    • NOTA: Quando uma SmartCard XPress Box é utilizada, é normalm
      • Οδηγίες τοποθέτησης στον Τοίχο/σε Επιτραπέζια βάση
      • Βεβαιωθείτε ότι ο αέρας μπορεί να κυκλοφορεί ελεύθερα μέσα α
      • Σύνδεση στο ρεύμα
  • Ετοιμασία του τηλεχειριστηρίου
  • Πλοήγηση
    • Μοντέλο/Είσοδος
    • AV1
    • AV2
    • Side AV
    • Side S-Video
    • DVI
    • 20HF5474
    • Scart1
    • -
    • Video In
    • S-Video In
    • DVI
    • 23HF5474
    • Scart1
    • Scart2 CVBS
    • AV-In
    • S-Video In
    • DVI
    • Σημείωση: Όταν χρησιμοποιείται ένα SmartCard XPress Box, συν
      • Duvara montaj yönergeleri/Sehpa
      • Havalandırma deliklerinin çevresinde havanın rahat bir şekil
      • Elektrik Fişinin Prize Takılması
  • Uzaktan kumandanın kullanılması
  • Gezinme
    • Model / Giriş
    • AV1
    • AV2
    • Side AV
    • Side S-Video
    • DVI
    • 20HF5474
    • Scart1
    • -
    • Video In
    • S-Video In
    • DVI
    • 23HF5474
    • Scart1
    • -
    • Video In
    • S-Video In
    • DVI
    • Dikkat: SmartCard XPress Box kullanıldığında, genellikle Ska