Инструкция для PHILIPS CEM2101

(скачивание инструкции бесплатно)
Формат файла: PDF
Доступность: Бесплатно как и все руководства на сайте. Без регистрации и SMS.
Дополнительно: Чтение инструкции онлайн
background image

7

English

EN

3  Get started

Caution


Use the controls only as stated in this user manual.

Always follow the instructions in this chapter in 

sequence.

If you contact the Consumer Care, you will be 

asked for the model and serial number of this 

apparatus. The model number and serial number 

are on the bottom of your apparatus. Write the 

numbers here: 

Model No. __________________________

Serial No. ___________________________

Install the car audio

These instructions are for a typical installation. 

However, if your car has different requirements, 

make the corresponding adjustment. If you have 

any question regarding installation kits, consult 

your local retailer.

Caution


This unit is designed for negative ground (earth) 12 V 

DC operation only.


Always install this unit in the car dashboard. Other 

locations can be dangerous as the rear of the unit heats 

up during use.


To avoid short-circuit: before you connect, ensure that 

the ignition is off.


Ensure that you connect the yellow and red power 

supply leads after all other leads are connected.


Ensure that all loose leads are insulated with electrical tape.


Ensure that the leads do not get caught under screws 

orin parts that will move (e.g. seat rail).


Ensure that all ground (earth) leads are run to a 

common ground (earth) point.


Use only the supplied mounting hardware for a safe 

and secure installation.


Improper fuses can cause damage or fire. When you 

need to change the fuse, consult a professional.

Note on the power supply lead (yellow)

• 

When you connect other devices to this 

apparatus, ensure that the rating of the car 

circuit is higher than the total fuse value of 

all the connected devices.

Notes on speaker connection

• 

Never connect speaker wires to the metal 

body or chassis of the car.

• 

Never connect speaker wires with stripes 

to one another.

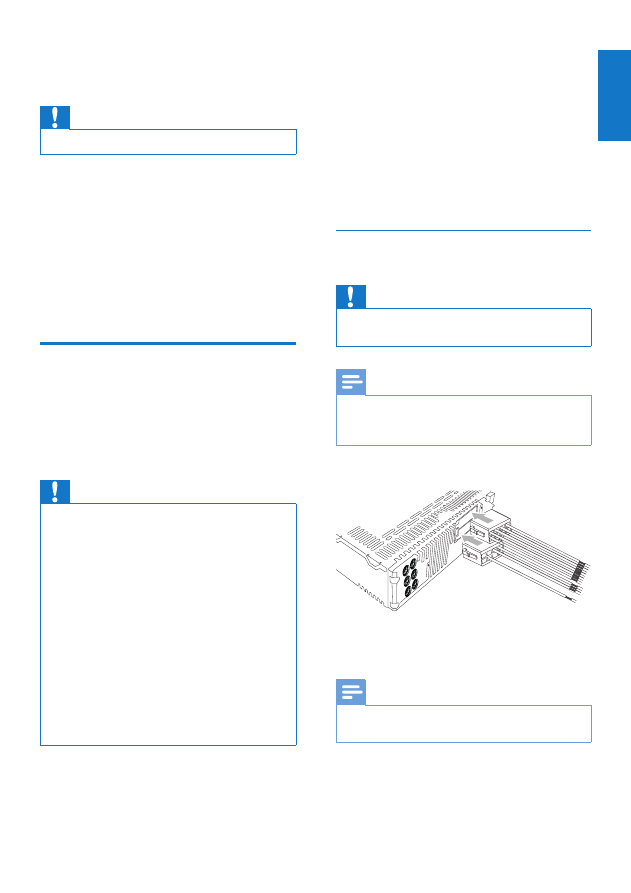
Connection: for cars with ISO 

connectors

Caution


Ensure that all loose leads are insulated with electrical 

tape.

Note


Consult a professional to connect CEM2101 as 

instructed below.


The ISO male connectors are not supplied.

Connect the male connector to the unit.


Check the car's wiring carefully and 

connect them to the the male connector.

Note


Risk of danger! Please consult a professional to perform 

the below steps!

1
2
3
4
5
6
7
8
9
10
11
12
13
14
15
16
17
18
19
20
21
22
23
24
25
26
Оглавление инструкции
  • Страница 1 из 27
    Always there to help you Register your product and get support at www.philips.com/welcome Question? Contact Philips User manual CEM2101
  • Страница 2 из 27
  • Страница 3 из 27
    1 Important  2 2 2 2 Your car audio system  4 4 4 5 Safety  Notice  Introduction  What's in the box  Overview of the main unit  3 Get started  Install the car audio  Turn on  Select country/region  Set clock  4 Listen to radio  Tune to a radio station  Store radio stations in memory 
  • Страница 4 из 27
    1 Important Safety • • • • • • • • • • • • Read and understand all instructions before you use your apparatus. If damage is caused by failure to follow instructions, the warranty does not apply. This apparatus is designed for negative ground (earth) 12 V DC operation only. To ensure safe driving,
  • Страница 5 из 27
    English packaging materials, exhausted batteries and old equipment. The making of unauthorized copies of copyprotected material, including computer programs, files, broadcasts and sound recordings, may be an infringement of copyrights and constitute a criminal offence. This equipment should not be
  • Страница 6 из 27
    2 Your car audio system What's in the box Check and identify the contents of your package: a Main unit (with a sleeve) Congratulations on your purchase, and welcome to Philips! To fully benefit from the support that Philips offers, register your product at www.philips.com/welcome. b Front panel c
  • Страница 7 из 27
    a b r q c d e p f o n m l t a SOURCE • Select audio source. b MENU • Access system menu. c d • • • Return to previous menu. / Turn the unit on or off. Confirm selection. k g j i h s • • Mute or unmute sound. Rotate to adjust volume. e ZONE / • Select tuner band. • Select MP3/WMA folder. • Switch
  • Страница 8 из 27
    h MP3 LINK • Connect external audio device. i  6281' • • Turn on or off Maximizing volume. View clock. j DBB • Turn on or off Dynamic Bass Boost (DBB) sound. • Access to tuner auto store. k • • • Select preset radio station No.6. Start play. Pause or resume play. l REP / SHUF • Select preset radio
  • Страница 9 из 27
    Caution •• Use the controls only as stated in this user manual. Always follow the instructions in this chapter in sequence. If you contact the Consumer Care, you will be asked for the model and serial number of this apparatus.The model number and serial number are on the bottom of your apparatus.
  • Страница 10 из 27
    1 2 3 4 e f g h i Green/black strip White/black strip Gray/black strip Purple/black strip Red Left speaker (Rear) Left speaker (Front) Right speaker (Front) 1 2 Right speaker (Rear) 3 Ignition key +12V DC when ON/ACC Blue Motor/electric antenna relay control lead White-edged Amplifier relay control
  • Страница 11 из 27
    Ensure that car dashboard opening is within these measurements: English 2 m 18 3m 53.5 mm 5m mm 53mm 183 m 3 4 5 Place the supplied rubber cushion over the end of the mounting bolt. 6 Slide the unit into the dashboard until you hear a click sound. Remove the mounting sleeve with the supplied
  • Страница 12 из 27
    7 Reconnect the negative terminal of the car battery. Attach the front panel 1 2 Attach the trim plate. 3 Press the left side of the panel until the mechanism locks it into place. 1 Press to turn the unit on. »» [SELECT OPERATING REGION] is displayed. 2 Rotate to select an option: • [USA] (United
  • Страница 13 из 27
    Tune to a radio station 1 2 3 4 • Press SOURCE repeatedly to select radio mode. To receive more radio stations or only stations with strong signal, you can adjust the tuner sensitivity. 1 2 Press BAND or / repeatedly to select band: [FM1],[FM2], [FM3], [AM1], or [AM2]. Press and hold or until the
  • Страница 14 из 27
    7 Play with RDS The RDS (Radio Data System) function operates only in areas with FM stations broadcasting RDS signals. If you tune to an RDS station, the station name are displayed. Turn on RDS Note •• The default setting for RDS is on. 1 2 Press MENU. 3 Rotate to select [RDS ON]. »» The RDS
  • Страница 15 из 27
    [REG ON] [REG OFF] Only stations in current region can be tuned to automatically. All stations can be tuned to automatically. 1 2 Press MENU. 3 Rotate Press or displayed. repeatedly until [REG] is to select a setting. Receive traffic announcement If you do not want to miss traffic announcement when
  • Страница 16 из 27
    5 Play audio files Note •• Ensure that the disc or device contains playable files. Play from USB Note •• Ensure that the USB device contains playable music. Insert the USB device Play a disc Note 1 2 •• You cannot play CDs encoded with copyright protection technologies. You can play commercially
  • Страница 17 из 27
    •• To go back to upper level of a folder, press . View play information During playing, press DISP repeatedly to view: • Track number and elapsed play time • Folder • File • Album • Artist • Title Connect external sound source 1 2 3 English Tip Connect the external sound source to MP3 LINK socket
  • Страница 18 из 27
    6 Adjust sound Adjust volume Select preset equalizer 1 Press EQ / AUDIO. »» Current Equalizer setting is displayed. 2 Press EQ / AUDIO again to select a preset EQ setting: • [OPTIMAL] (optimal) • [FLAT] (flat) • [POP] (pop) • [USER] (user) • [TECHNO] (techno) • [ROCK] (rock) • [CLASSIC] (classic) •
  • Страница 19 из 27
    English Other sound settings You can also adjust the preset EQ / AUDIO settings. 1 2 Press EQ / AUDIO for 3 seconds. 3 Rotate Press or repeatedly to select the item to be adjusted: • [BAS] (bass) range: -7 to +7. • [TRE] (treble) range: -7 to +7. • [BAL] (balance) range: 12L to 12R. (L=left
  • Страница 20 из 27
    7 Adjust system settings Turn beep sound on/off Dance You can turn on or off the spectrum on the LCD display. 1 2 Press MENU. 3 Rotate to select a setting: • [DANCE ON]: turn the spectrum on. • [DANCE OFF]: turn the spectrum off. Each time you press a button, the unit beeps. You can turn this beep
  • Страница 21 из 27
    English 8 Additional information Detach the front panel You can detach the front panel to deter theft. 1 2 Press to release the panel. Pull the panel towards you to disengage it from the classis. Note •• If the new fuse gets damaged again, there may be an internal malfunction. Consult your dealer.
  • Страница 22 из 27
    9 Product information Note notice. Fuse Suitable speaker impedance Maximum power output Continuous power output Pre-Amp output voltage Aux-in level Dimensions (W x H x D) Weight 12 V DC (11 V - 16 V), negative ground 15 A 40 W x 4 channels 21 W x 4 RMS (4 10% T.H.D.) 2.5V 500 mV 181.5 x 52 x 191.4
  • Страница 23 из 27
    Caution •• Never remove the casing of this apparatus. To keep the warranty valid, never try to repair the system yourself. If you encounter problems when using this apparatus, check the following points before requesting service. If the problem remains unsolved, go to the Philips web site
  • Страница 24 из 27
    11 Glossary M MP3 A file format with a sound data compression system. MP3 is the abbreviation of Motion Picture Experts Group 1 (or MPEG-1) Audio Layer 3. With the MP3 format, one CD-R or CD-RW can contain about 10 times more data than a regular CD. R RDS (Radio Data System) RDS tuners can
  • Страница 25 из 27
    23 English
  • Страница 26 из 27
    2014 © WOOX Innovations Limited. All rights reserved. Philips and the Philips’ Shield Emblem are registered trademarks of Koninklijke Philips N.V. and are used by WOOX Innovations Limited under license from Koninklijke Philips N.V. CEM2101_12_UM_V4.0
  • Страница 27 из 27