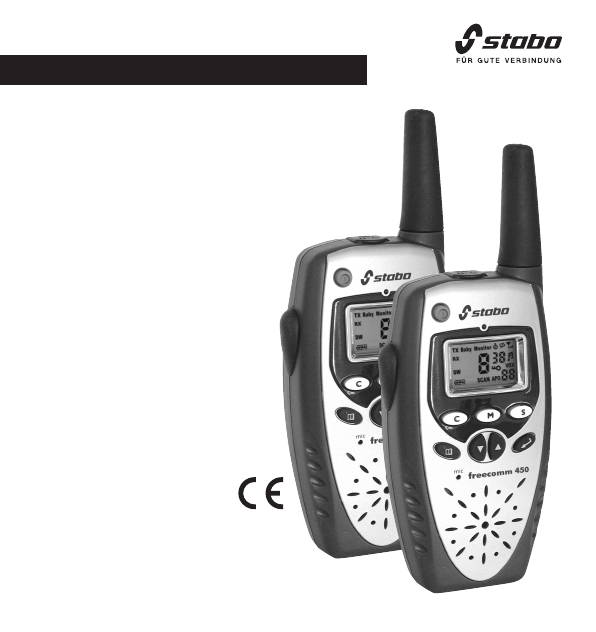
Инструкция для President FREECOMM 450

(скачивание инструкции бесплатно)
Формат файла: PDF
Доступность: Бесплатно как и все руководства на сайте. Без регистрации и SMS.
Дополнительно: Чтение инструкции онлайн
background image

13

stabo freecomm 450

Set

Owners Manual

Art.-Nr. 20455

PMR 446 radio handheld

Important

Before your installation please

read this manual carefully and

keep it for further information

.

1
2
3
4
5
6
7
8
9
10
11
12
13
14
15
16
17
18
19
20
Оглавление инструкции
  • Страница 1 из 21
    PMR 446 radio handheld Art.-Nr. 20455 stabo freecomm 450 Set Owners Manual Important Before your installation please read this manual carefully and keep it for further information. 13
  • Страница 2 из 21
    Table of contents General notes................................................................................................................................3 Safety
  • Страница 3 из 21
    General notes Please read this manual carefully and completely to make yourself familiar with the various functions of your radio set. Make sure to observe the safety instructions to avoid any danger for you and other persons as well as damage to the radio set. Keep the operating instructions in a
  • Страница 4 из 21
    Protect your radio sets and the accessories against moistness, heat, dust and strong vibrations. Avoid operating temperatures below -10°C or above +50°C. Do not expose the radio sets to direct sunlight for a prolonged period (e.g. rear window shelf in the vehicle). Do not employ the radio sets in
  • Страница 5 из 21
    Scope of delivery 2 PMR 446 hand voice radio sets 2 belt clips 1 design double tabletop charger 1 power supply unit 230 V/50 Hz 2 NiMH battery packs 700 mAh/3.6 V * * Important information: Both NiMH-battery packs have already been inserted correctly into the radio sets! Before you can use the
  • Страница 6 из 21
    Control elements and connections 1 18 2 17 16 15 3 4 14 13 5 12 6 11 7 8 10 9 1. Antenna The antenna is fixed to the housing; do not try to unscrew it! 2. LC display 3. Monitor key M A short keystroke bypasses the squelch (the display shows “RX“) for 15 sec. or until renewed short keystroke. 4.
  • Страница 7 из 21
    9. Battery lock 10. Battery cover 11. DOWN key t Stepwise or continuous turning down the volume In the Set menu: Stepping forward through the individual settings 12. Microphone 13. Menu key functions Switching over to the Set menu and stepping forward to the individual 14. Call key C Sending out a
  • Страница 8 из 21
    The display: Shows whether you are transmitting Shows when your radio set is receiving a signal Shows when your radio set is receiving a signal Dual Watch is activated Battery charge indicator (3 steps) Baby sitting: Radio set is activated as baby sitter Baby sitting: Radio set is activated as
  • Страница 9 из 21
    Important provisions for the operation! The battery packs included in the scope of delivery have already been inserted correctly into the radio sets! Before the commissioning of the radio sets the battery packs have to be charged (charging time approx. 12 to 14 hours). Note: Before the first
  • Страница 10 из 21
    There is explosion hazard! The charger must only be operated with the delivered power supply unit. Do not abuse it as DC voltage source for other applications. Prevent small metal parts from penetrating into the charger. Do not disassemble neither the power supply unit nor the charger. Disconnect
  • Страница 11 из 21
    Energy management The power consumption of this radio set is very small. If no signal is received, the electronic battery stand-by mode is activated. If the capacity of the battery pack is too low or if the batteries are empty, the radio set will emit an audio warning that is repeated every 15 sec.
  • Страница 12 из 21
    Transmitting/receiving Hold the PTT button pressed and speak with normal voice level and a distance of approx. 5 cm into the microphone. If your message is finished, release the PTT key, thus you free the channel and your radio partner can reply. If you receive a signal, RX will be displayed.
  • Страница 13 из 21
    Note: You and your partner have to adjust the same speech scrambling code! Your radio set is equipped with 4 speech scrambling codes that are designated as 1, 2, 3, and 4 in the menu. The display OF means: no scrambling. Activate speech scrambling 1. Push the key three times until OF is indicated
  • Страница 14 из 21
    Display lighting A short stroke on the  key activates the display lighting for approx. 5 sec. Automatic scan The automatic scan permits to find active channels quickly. It scans independently all of the 8 channels and stops as soon as a signal exceeds the squelch threshold. After having found a
  • Страница 15 из 21
    Deactivate the stop watch Push the  or the key, the channel number is displayed. VOX function (phonetic transmission) This function permits to send without activating the transmit key: Voices/noises that hit the microphone thus switch on the transmitter of the radio set. In order to avoid a
  • Страница 16 из 21
    Note: Check (with an assistant or for instance with a portable radio as sound source), whether there is sufficient radio reception between the children’s room and the room where you stay! Optimise the position of the radio set, if required. Baby sitter function This additional function assures that
  • Страница 17 из 21
    Activate APO 1. Push the key nine times until APO is displayed and 0 is flashing. 2. Select 1, 2, 3 or 6 by means of the keys s or t. 3. Validate by means of the PTT or  key, APO is displayed. Deactivate APO 1. Push the key nine times until 1, 2, 3, or 6 is flashing in the display. 2. Select the
  • Страница 18 из 21
    Troubleshooting Fault Your radio set cannot be switched on. Remedy Charge the battery pack or renew the batteries. Fault You can neither speak nor hear your radio partner. Remedy Adjust the same channel and possibly the same CTCSS-tone for all radio sets. If you are out of reach, reduce the
  • Страница 19 из 21
    Manufacturer warranty We offer a 2-year warranty for the product stabo freecomm 450 Set. The warranty period starts with the day you have bought the product (please keep the receipt as proof of purchase in a safe place!); the validity period of the warranty is not extended, if the product is
  • Страница 20 из 21
    Errors and technical modifications reserved. Copyright © 08/2008 stabo Elektronik GmbH stabo Elektronik GmbH . Münchewiese 14 –16 . 31137 Hildesheim/Germany Tel. +49 (0) 5121-76 20 - 0 . Fax: +49 (0) 5121- 51 29 79 Internet: www.stabo.de . E-Mail: info@stabo.de
  • Страница 21 из 21