12
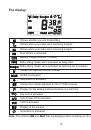
Transmitting/receiving
Hold the PTT button pressed and speak with normal voice level and a distance of approx.
5 cm into the microphone. If your message is finished, release the
PTT
key, thus you free the
channel and your radio partner can reply. If you receive a signal,
RX
will be displayed.
Automatic squelch
Your radio set is equipped with an automatic squelch that prevents that an annoying noise can
be heard on free radio channels. However, under certain conditions – and depending on the
distance – computers, electric or electronic devices might interfere with this squelch, so that you
hear noises.
Due to the supersensitive receiver of the radio set, such interferences in immediate proximity
are normal and unavoidable.
In case of such interferences you should change the distance to the source of interference and
hold the radio set in such a manner that the antenna could send freely.
Pilot tone process CTCSS
Your radio set is equipped with a pilot tone process that permits to address specific individual
partner stations or groups or to receive only calls from the latter. For this, the radio sets are
switched to mute and only the transmission or reception of the corresponding pilot tone “opens”
the channel, so that only desired messages are exchanged (key/lock principle).
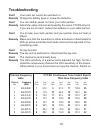
Note: Make sure that you and your partner use the same channel and the same pilot
tone
. 38 different tones are available (see table).
Activate pilot tone process CTCSS
1. Push the key twice until the pilot tone number is flashing.
2. Select the pilot tone number by means of the
s
or
t
key.
3. Validate by means of the
PTT
or
key.
Deactivate the pilot tone process CTCSS
1. Push the key twice until the pilot tone number is flashing.
2. Select the
00
by means of the
s
or
t
key.
3. Validate by means of the
PTT
or
key.
Speech scrambling
Speech scrambling prevents that your transmission can be tapped without further auxiliaries by
unauthorized persons.