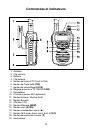
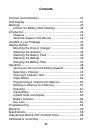
Страница 3 из 61 Table des matières Commandes et indicateurs ................................................. 4 Afficheur LCD ...................................................................... 5 Avertissement ! ................................................................... 6 Avertissement bloc accus
Страница 4 из 61 Commandes et indicateurs 1. 2. 3. 4. 5. 6. 7. 8. 9. 10. 11. 12. 13. 14. 15. 16. 17. 18. 19. Antenne Clip ceinture Batterie Clip batterie Bouton émission PTT (Push to Talk) Bouton de Triple veille (TRI) Bouton de verrouillage (LOCK) Réglage puissance TX 1W/5W (1/5W) Microphone Prise haut-parleur MIC
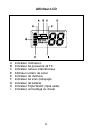
Страница 5 из 61 Afficheur LCD A B C D E F G H I Indicateur d’émission Indicateur de puissance de TX Indicateur canaux internationaux Afficheur numéro de canal Indicateur de mémoire Indicateur de scan (balayage) Indicateur de batterie Indicateur Triple Watch (triple veille) Indicateur verrouillage du clavier 5
Страница 6 из 61 Avertissement ! • Le PM-2000 WP est étanche uniquement lorsque l’antenne et la batterie sont fixées correctement. • Ne faites pas fonctionner l’émetteur sans l’antenne. • N’utilisez pas l’émetteur dans une atmosphère explosive. • Ne laissez pas des enfants utiliser l’émetteur radio sans
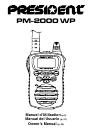
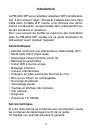
Страница 7 из 61 Introduction Le PM-2000 WP est un émetteur-récepteur VHF portable étanche. Il est compact, léger, robuste et s’adapte bien à la main. Cette radio portable VHF marine vous donnera une performance conséquente, exceptionnelle dans pratiquement toutes les conditions et situations. Pour vous assurer de
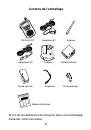
Страница 8 из 61 Contenu de l’emballage PM-2000 WP Adaptateur DC Clip de ceinture Adaptateur AC Chargeur Dragonne Antenne Batterie Lithium Vis de montage Manuel d’utilisation Si l’un de ces éléments est manquant dans votre emballage, contactez votre fournisseur. 8
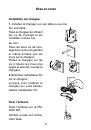
Страница 9 из 61 Mise en route Installation du chargeur 1. Installez le chargeur sur une table ou au mur. Sur une table : Fixez le chargeur en utilisant les vis de montage et les rondelles comme suit. Au mur : Fixez les deux vis de montage dans le mur en gardant le même entraxe que les trous sur le chargeur. Placez
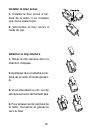
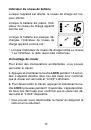
Страница 10 из 61 Installer le bloc accus 1. Installez le bloc accus à l’arrière de la radio. Il ne s’adapte que d’une seule façon. 2. Verrouillez le bloc accus à l’aide du clip. Attacher le clip ceinture 1. Tenez le clip ceinture dans la direction indiquée. 2. Appliquez le sur l’attache à l’arrière de la radio.
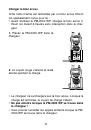
Страница 11 из 61 Charger le bloc accus Votre radio marine est alimentée par un bloc accus lithium ion spécialement conçu pour lui : • Avant d’utiliser le PM-2000 WP, chargez le bloc accus lithium ion durant 6 heures sans interruption dans le chargeur. 1. Placez le PM-2000 WP dans le chargeur 2. Le voyant rouge
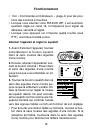
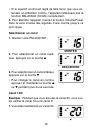
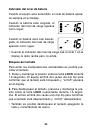
Страница 12 из 61 Fonctionnement • Voir « Commandes et indicateurs » (page 4) pour les positions des boutons et touches. • Lorsque vous allumez votre PM-2000 WP, il est automatiquement réglé sur canal 16, la fréquence pour signal de détresse, sécurité et appel. • Lorsque vous appuyez sur n’importe quelle touche
Страница 13 из 61 • Si le squelch control est réglé de telle façon que vous entendiez un sifflement continu, l’appareil n’effectuera pas la fonction BALAYAGE (SCAN) correctement. 4. Pour éteindre l’appareil, tournez le bouton Volume/Power dans le sens inverse des aiguilles d’une montre jusqu’à ce qu’il clique.
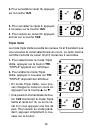
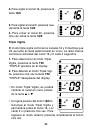
Страница 14 из 61 2. Pour surveiller le canal 16, appuyez sur la touche 16/9. 3. Pour surveiller le canal 9, appuyez à nouveau sur la touche 16/9. 4. Pour revenir au canal 20, appuyez encore sur la touche 16/9. Triple Veille Le mode triple Veille surveille les canaux 16 et 9 pendant que vous écoutez le canal
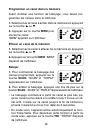
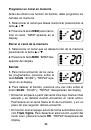
Страница 15 из 61 Programmer un canal dans la mémoire Avant d’utiliser une fonction de balayage, vous devez programmer les canaux dans la mémoire. 1. Sélectionnez le canal à entrer dans la mémoire en appuyant sur la touche ▲ ou ▼. 2. Appuyez sur la touche MEM pour stocker le canal. “MEM” apparaît sur l’afficheur.
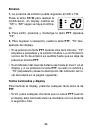
Страница 16 из 61 Emission 1. La puissance d’émission peut être réglée sur 5 W ou 1W. Appuyez sur la touche 1/5W pour faire la modification, ensuite l’indicateur “5W” ou “1W” sur l’afficheur change en conséquence. 2. Pour émettre, appuyez et maintenez la touche PTT .“TX” s’affiche. 3. Pour revenir à la réception,
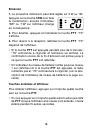
Страница 17 из 61 Indicateur du niveau de batterie Lorsque l’appareil est allumé, le niveau de charge est toujours affiché. Lorsque la batterie est pleine, l’indicateur du niveau de charge apparaît comme suit : Lorsque la batterie est presque déchargée, l’indicateur du niveau de charge apparaît comme suit : •
Страница 18 из 61 Dépannage • n’émet pas sur la gamme de 5 Watt mais émet sur la gamme de 1 W cause : batterie faible Þ recharger ou remplacer les batteries • n’émet pas lorsqu’il est en charge cause : batterie faible Þ l’appareil n’est pas conçu pour émettre durant la charge. Le chargeur ne fournit pas assez de
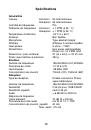
Страница 19 из 61 Spécifications Généralités Canaux Emission 54 Internationaux Réception 55 Internationaux Contrôle de fréquences PLL Tolérance de fréquences Emission ± 1 PPM (à 25 ° C) Réception ± 1 PPM (à 25° C) Température d’utilisation -20°C à + 55°C Antenne Brin flexible Microphone Type électret intégré
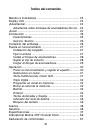
Страница 21 из 61 Índice del contenido Mandos e Indicadores ...................................................... Display LCD ...................................................................... ¡Advertencia! ..................................................................... Advertencia sobre el bloque de
Страница 22 из 61 Mandos e Indicadores 1 2 3 4 5 6 7 8 9 10 11 12 13 14 15 16 17 18 19 Antena Clip de cinturón Batería Clip de batería Tecla de emisión PTT (Push to Talk) Tecla triple vigilia (TRI) Tecla de cierre (LOCK) Regulación de potencia TX 1W/5W (1/5W) Micrófono Toma de altavoz MIC (opcional) Tecla de Volumen
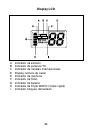
Страница 23 из 61 Display LCD A B C D E F G H I Indicador de emisión Indicador de potencia TX Indicador de canales internacionales Display número de canal Indicador de memoria Indicador de Scan Indicador de batería Indicador de Triple WATCH (triple vigilia) Indicador bloqueo del teclado 23
Страница 24 из 61 ¡Advertencia! • El PM-2000 WP es totalmente estanco siempre y cuando la antena y la batería estén correctamente instalados. • No ponga en funcionamiento el emisor sin la antena. • No utilice el emisor en una atmósfera explosiva. • No permita utilizar el emisor a niños sin la pertinente vigilancia.
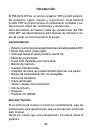
Страница 25 из 61 Introducción El PM-2000 WP es un emisor-receptor VHF portátil estanco. Es compacto, ligero, robusto y ergonómico. Esta emisora portátil VHF le proporcionará un rendimiento confiable y excepcional en todas las condiciones y situaciones. Para aprovechar al máximo todas las prestaciones del PM2000 WP,
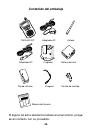
Страница 26 из 61 Contenido del embalaje PM-2000 WP Adaptador DC Clip de cinturón Adaptador AC Cargador Dragona Antena Batería de Litio Tornillo de montaje Manual del Usuario Si alguno de estos elementos faltase en el envoltorio, póngase en contacto con su proveedor. 26
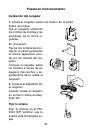
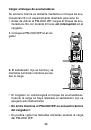
Страница 27 из 61 Puesta en funcionamiento Instalación del cargador 1. Instale el cargador sobre una mesa o en la pared Sobre una mesa: Fije el cargador utilizando los tornillos de montaje y las arandelas de la forma siguiente: En una pared: Fije los dos tornillos de montaje en la pared guardando la misma separación
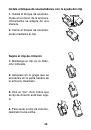
Страница 28 из 61 Instale el bloque de acumuladores con la ayuda del clip 1. Instale el bloque de acumuladores en el dorso de la emisora. Unicamente se adapta de una manera. 2. Cierre el bloque de acumuladores mediante el clip Sujete el clip de cinturón 1. Mantenga el clip en la dirección indicada. 2. Aplíquelo en
Страница 29 из 61 Cargar el bloque de acumuladores Su emisora marina se alimenta mediante un bloque de acumuladores litio ion especialmente diseñado para este fin: • Antes de utilizar el PM-2000 WP, cargue el bloque de acumuladores litio ion durante 6 horas sin interrupción en el cargador. 1. Coloque el PM-2000 WP
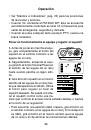
Страница 30 из 61 Operación • Ver “Mandos e indicadores” (pág. 22) para las posiciones de las teclas y botones.. • Cuando Vd. enciende el PM-2000 WP, éste se encuentra automáticamente conectado al canal 16, la frecuencia para señal de emergencia, seguridad y llamada. • Cuando se pulsa cualquier tecla (excepto PTT),
Страница 31 из 61 • Si el squelch control está regulado de manera que se oiga un silbido continuo, el equipo no realizará la función Barrido (SCAN) correctamente. 4. Para apagar el equipo, gire el botón VOLUMEN / POWER en el sentido contrario a las agujas de un reloj hasta que se oiga un “clic”. Seleccionar un canal
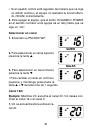
Страница 32 из 61 2. Para vigilar el canal 16, presione la tecla 16/9 3. Para vigilar el canal 9, presione nuevamente la tecla 16/9 4. Para volver al canal 20, presione otra vez sobre la tecla 16/9 Triple Vigilia El modo triple vigilia controla los canales 16 y 9 mientras que Vd. escucha el canal seleccionado en
Страница 33 из 61 Programar un canal en memoria Antes de utilizar una función de barrido, debe programar los canales en memoria. 1. Seleccionar el canal que desee memorizar presionando la tecla ▲ o ▼. 2. Presione la tecla MEM para memorizar el canal. “MEM” aparece en el display. Borrar el canal de la memoria 1.
Страница 34 из 61 Emisión 1. La potencia de emisión puede regularse en 5W o 1W. Pulse la tecla 1/5 W para realizar la modificación, en display cambia en “1W” o “5W” según se haya modificado. 2. Para emitir, presione y mantenga la tecla PTT. Aparece “TX”. 3. Para regrasar a recepción, suelte la tecla PTT. “TX”
Страница 35 из 61 Indicador del nivel de batería Cuando el equipo está encendido, el nivel de batería aparece siempre en el display. Cuando la batería está cargada, el indicador del nivel de carga aparece como sigue: Cuando la batería está casi descargada, el indicador del nivel de carga aparece como sigue: • Cuando
Страница 36 из 61 Averías • no emite en la gama de 5 W pero sí emite en la gama de 1W causa: batería débil Þ recargar o substituir las baterías • no emite cuando está en carga causa: batería débil Þ el equipo no está diseñado para emitir durante la carga, El cargador no suministra suficiente potencia para emitir •
Страница 37 из 61 Especificaciones Generales Canales Emisión 54 Internacionales Recepción 55 Internacionales Control de frecuencias PLL Tolerancia de frecuencias Emisión ± 1 PPM (a 25ºC) Recepción ± 1 PPM (a 25ºC) Temperatura de utilización -20ºC a + 55ºC Atena Radial flexible Micrófono Tipo electret integrado
Страница 39 из 61 Contents Controls and Indications ................................................... LCD Display ...................................................................... Warning! ........................................................................... Lithium Ion Battery Pack Warning
Страница 40 из 61 Controls and Indications 1. 2. 3. 4. 5. 6. 7. 8. 9. 10. 11. 12. 13. 14. 15. 16. 17. 18. 19. Antenna Belt Clip Battery Battery Release Clip PTT (Push to Talk) Key Triple Watch Button (TRI) Lock Button (LOCK) TX Power / (1/5W) Microphone Speaker MIC (Optional) Jack Volume / Power Knob Squelch Knob
Страница 41 из 61 LCD Display A B C D E F G H I Transmit Indicator TX Power Indicator International channels Indicator Channel Number Display Memory Indicator Scan Indicator Battery Indicator Triple Watch Indicator Key Lock Indicator 41
Страница 42 из 61 Warning! • The PM-2000 WP is waterproof only when both the antenna and the battery are properly attached. • Do not operate the transmitter of any radio equipment unless all the Radio Frequency (RF) connectors are secure and any open connectors are properly terminated. • Do not operate the
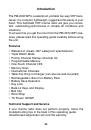
Страница 43 из 61 Introduction The PM-2000 WP is a waterproof, portable two-way VHF transceiver. It is compact, lightweight, rugged and fits easily in your hand. This handheld VHF marine radio will give you consistent, outstanding performance in virtually all conditions and situations. To ensure that you get the
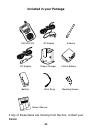
Страница 44 из 61 Included in your Package PM-2000 WP DC Adapter Beltclip AC Adapter Drop-in Charger Wrist Strap Antenna Lithium Battery Mounting Screws Owner’s Manual If any of these items are missing from the box, contact your Dealer. 44
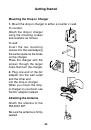
Страница 45 из 61 Getting Started Mounting the Drop-in Charger 1. Mount the drop-in charger to either a counter or wall. To counter: Attach the drop-in charger using the mounting screws and washers as follows. To wall: Insert the two mounting screws into the wall keeping the same space as the holes on the charger.
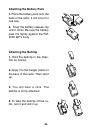
Страница 46 из 61 Attaching the Battery Pack 1. Place the battery pack onto the back of the radio. It will only fit in one way. 2. Snap the battery release clip until it clicks. Be sure the battery pack fits tightly against the PM2000 WP’s body. Attaching the Beltclip 1. Hold the beltclip in the direction as
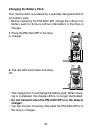
Страница 47 из 61 Charging the Battery Pack Your marine radio is powered by a specially designed Lithium Ion battery pack. • Before operating the PM-2000 WP, charge the Lithium Ion battery pack for 6 hours without interruption in the drop-in charger. 1. Place the PM-2000 WP in the dropin charger. 2. The red LED
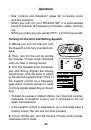
Страница 48 из 61 Operation • See “controls and Indicators” (page 40) for button, knob, and key positions. • When you turn On your PM-2000 WP, it is automatically tuned to channel 16, frequency for distress, safety, and calling. • When you press any key (except PTT), a short tone sounds. Turning On the Unit and
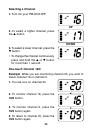
Страница 49 из 61 Selecting a Channel 1. Turn On your PM-2000 WP. UP 2 .To select a higher channel, press the ▲ button. DOWN 3. To select a lower channel, press the ▼ button. • To change the channel continuously, press and hold the ▲ or ▼ button for more than 1 second. One-touch Channel 16/9 Example: While you are
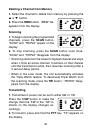
Страница 50 из 61 Triple Watch Triple Watch mode monitors channels 16 and 9 for a signal while you listen to the currently selected channel. The marine radio checks channel 16 and 9 for activity every 2 seconds. 1. To select Triple Watch mode, press the TRI button. “TRIPLE” appears on the display. 2. To exit from
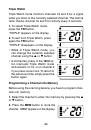
Страница 51 из 61 Deleting a Channel from Memory 1. Select the channel to delete from memory by pressing the ▲ or ▼ button. 2. Press the MEM button. “MEM” disappears from the display. Scanning 1. To begin scanning the programmed channels, press the SCAN button. “SCAN” and “TRIPLE” appear on the display. 2. To stop
Страница 52 из 61 3. To return to receive, release the PTT key. “TX” disappears from the display. • If the PTT key is pressed for more than 5 minutes, “TX” starts blinking and the transmission ends. The TX time out tone will sound until the PTT key is released. • If the battery indicator drops to the 1-mark level on
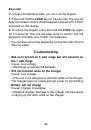
Страница 53 из 61 Key Lock To prevent accidental entries, you can lock the keypad. 1. Press and hold the LOCK key for 1.5 seconds. The unit will beep two timesto confirm that the keypad is locked with “LOCK” indication on the display. 2. To unlock the keypad, press and hold the LOCK key again for 1.5 seconds. The
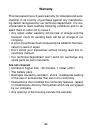
Страница 54 из 61 Warranty This transceiver has a 2 years warranty for materials and workmanship in its country of purchase against any manufacturing defect recognized by our technical department. It is recommended to read carefully following conditions and to respect them in order not to loose it. • Any repair
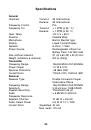
Страница 55 из 61 Specifications General Channels Frequency Control Frequency Tol. Transmit Receive Transmit Receive Oper. Temp. Antenna Microphone Display Speaker Power Source Size (without antenna) Weight (w/battery & antenna) Transmitter Frequency Range Power Output Spurious Emissions Current Drain Receiver
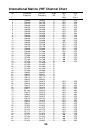
Страница 56 из 61 International Marine VHF Channel Chart Chl Transmitter Frequency Receiver Frequency Mode S/D 1 ..................... 156.050 ................ 160.650 ............... D 2 ..................... 156.100 ................ 160.700 ............... D 3 ..................... 156.150 ................ 160.750
Страница 57 из 61 DÉCLARATION DE CONFORMITÉ DECLARACIÓN DE CONFORMIDAD CERTIFICATE OF CONFORMITY Nous, GROUPE PRESIDENT ELECTRONICS, Route de Sète, BP 100 – 34540 Balaruc – FRANCE, Nosotros, GROUPE PRESIDENT ELECTRONICS, Route de Sète, BP 100 – 34540 Balaruc – FRANCIA, We, GROUPE PRESIDENT ELECTRONICS, Route de
Страница 60 из 61 Siège Social / Head Office France – Route de Sète BP 100 – 34540 BALARUC Site internet : http://www.president-electronics.com E-mail : groupe@president-electronics.com 0341 0496/07-03 UTZZ01889AA