12
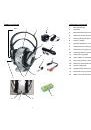
COMPONENT IDENTIFICATION
1
RF transmitter
2
RF receiver headphones
3
Power On/Off switch
4
Power On indicator light
5
Rechargeable 1.2 V 500 mAh batteries (Ni-MH, LR03/AAA size)
6
Charge contacts
7
12.5 V 150 mA mains adapter
8
Jack plug adapter (3.5 mm/6.3 mm diameter)
9
RCA socket audio adapter
10
Operating indicator light
11
Charge indicator light
12
Audio connection cable with 3.5 mm jack plug
13
Volume control knob (VOL)
14
AUTO SCAN indicator
15
AUTO SCAN button
16
Channel selector (CHANNEL 3 2 1)
17
DC IN connector
18
Audio input cable
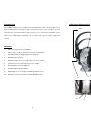
INSTALLATION
TRANSMITTER
1.
Connect the mains adapter provided to an electrical outlet.
2.
Connect the mains adapter cable to the DC IN input connector located on the
transmitter rear panel.
3.
A cable is provided from the transmitter rear panel that can be connected to the audio
outputs (Left and Right) present on a TV set, Hi-Fi system, VCR or radio-cassette
player, or to a headphones/earphones output using the connector supplied.
13
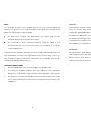
The red Auto On indicator light will light up as soon as you have connected the power
adapter to the mains outlet and the audio cable to a signal source. If the Auto On indicator
light remains off, switch on the audio source and increase its output level until the red
indicator light comes on.
RECEIVER HEADPHONES
1.
Open the cover of the battery compartment located on the right hand receiver
headphone.
2.
Insert two rechargeable LR03/AAA size batteries taking care to ensure correct
polarity.
3.
Close the battery compartment cover.
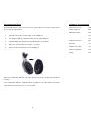
OPERATION
1.
Switch on the sound source (TV set or audio component) that the transmitter is
connected to.
2.
Place the headphones On/Off switch in the On position.
3.
Place the headphones on your head and adjust the volume to obtain the desired
sound level.
4.
If you cannot find the best reception frequency, press the "Auto Scan" button on the
headphones. The corresponding indicator light will come on.