4. Disassembly and Reassembly
4-1 Compressor Replacement Flow Chart
Samsung Electronics
4-1
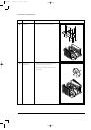
Locate cause of defect
Release refrigerant
Disconnect electrical wiring
from compressor
Cut refrigerant lines
from compressor
Plug disconnected lines
Replace compressor
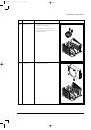
Inspect electrical
wiring for defects,
and terminals for
correct and secure
connections
Solder discharge line
Corrective action
Check refrigerant oil level
Add oil as necessary
Solder suction line
Use nitrogen gas
Perform soldering function
Fill system with nitrogen gas
Check for leakage
Recharge system
Recharge system
Evacuate system
Release nitrogen gas?
Problem?
Low oil level?
N
Y
Y
N
N
Y
Leakage?
AW126JB-1 6/27/98 10:38 AM Page 11