Sanus Systems 2221 Hwy 36 West, Saint Paul, MN 55113 USA
Americas: 800-359-5520 • 651-484-7988 • info@sanus.com • www.sanus.com
Europe, Middle East, and Africa: 31 (0) 40 26 68 619 • sanus.europe@sanus.com • www.sanus.com
Asia Pacific: 86 755 8996 9226 • 800 999 6688 (mainland China only) • sanus.ap@milestone.com • www.sanus.com
©2008 Milestone AV Technologies
(6901-170155 <00>)
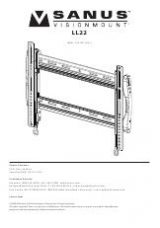
LC1A
EN
Thank you for choosing the Sanus Systems VisionMount LC1A
ceiling mount. The LC1A is designed to support monitors 30 to 55 in. (76 to
140 cm), weighing up to 79 kg (175 lbs.). The LC1A is adjustable, allowing tilt
+5 to -15˚, swivel ±55˚, and roll ±6˚.
FR
Merci d’avoir choisi le support pour plafond VisionMount LC1A
Systems. Le LC1A a été conçu pour supporter des moniteurs de 76 à140 cm,
d’un poids allant jusqu’à 79 kg. Le support LC1A est ajustable, permettant une
inclinaison de +5 à -15˚, un pivotement de ±55˚, et un roulement de ±6˚.
DE
Vielen Dank, dass Sie sich für die Deckenhalterung VisionMount
LC1A von Sanus Systems entschieden haben. Die LC1A ist ideal für
Bildschirme von 30 bis 55 Zoll (76 bis 140 cm) und bis zu einem Gewicht von
79 kg. Die LC1A ist um +5˚ bis -15˚ neigbar, um ±55˚ schwenkbar und um ±6˚
drehbar.
ES
Gracias por elegir el soporte de techo VisionMount LC1A de Sanus
Systems. El LC1A está diseñado para soportar monitores de 30” a 55” (76 a 140
cm), con un peso de hasta 79 kg (175 lbs). El LC1A se puede ajustar, con lo que
se podrá inclinar entre +5˚ y -15˚, girar ±55˚ y tumbar ±6˚.
PT
Obrigado por ter escolhido a armação de tecto Visionmount LC1A
da Sanus Systems. O LC1A foi concebido para suportar monitores de 30 a 55
polegadas (76 a 140 cm), pesando até 79 KG (175 lbs.). O LC1A é ajustável,
permitindo uma inclinação de +5 a -15˚, rotação de ±55˚, e translação de ±6˚.
NL
Hartelijk dank voor uw aankoop van de VisionMount™ LC1A
plafondbevestiging van Sanus Systems. De LC1A is ontworpen om
beeldschermen van 76 tot 140 cm met een gewicht tot 79 kg te dragen.
De LC1A is verstelbaar en kan +5 tot -15˚ worden gekanteld, ±55˚worden
gedraaid, en ±6˚ worden gerold.
IT
Grazie per aver scelto il supporto a soffitto Sanus Systems
VisionMount LC1A. Il supporto LC1A è progettato per il montaggio di schermi
da 30 a 55 pollici (da 76 a 140 cm), e ha una portata massima di 79 kg (175
libbre). Il supporto LC1A è regolabile, permettendo un’inclinazione tra +5 e
-15˚, una rotazione di ±55˚ e un rullio di ±6˚.
EL
Ευχαριστούμε που επιλέξατε τη βάση οροφής VisionMount LC1A
της Sanus Systems. Η βάση LC1A έχει σχεδιαστεί ώστε να στηρίζει οθόνες
30 με 55 ιντσών (76 με 140 εκατοστών) και βάρους έως και 79 kg (175 lbs). Η
βάση LC1A είναι ρυθμιζόμενη, επιτρέπει κλίση +5 έως -15˚, περιστροφή ±55˚
και κύλιση ±6˚.
NO
Takk for at du har valgt VisionMount LC1A-takfestet fra Sanus
Systems. LC1A-takfestet er konstruert for skjermer fra 30 til 55 tommer (76 til
140 cm) og som veier opptil 79 kg (175 lb). LC1A kan justeres, med helning fra
+5 til -15˚, kan dreies ±55˚, og vippes ±6˚.
DA
Tak for dit valg af Sanus Systems VisionMount LC1A-loftbeslaget.
LC1A er beregnet til at bære skærme på mellem 30” og 60”, som vejer op til 79
kg. LC1A er justerbar og kan vippes fra +5 til -15˚, drejes ±55˚ og roteres ±6˚.
SV
Tack för att du valde Sanus Systems takfäste VisionMount™ LC1A.
LC1A är konstruerat för att klara bildskärmar från 30 till 55 tum (76 till 140 cm)
och vikter upp till 79 kg (175 lbs). LC1A är ställbart och kan lutas +5 till -15˚,
vridas ±55˚ och rullas ±6˚.
RU
Благодарим вас за приобретение потолочного крепления Sanus
Systems VisionMount LC1A. Крепления серии LC1A предназначены для
мониторов с диагональю от 30 до 55 дюймов (от 76 до 140 см) и весом не
более 79 кг. LC1A – регулируемое крепление с углом наклона от + 5 до
-15°, углом поворота ±55˚ и углом вращения ±6˚.
PL
Dziękujemy za wybór uchwytu do montażu sufitowego LC1A firmy
Sanus Systems. Uchwyt LC1A jest przeznaczony do monitorów o przekątnej
ekranu od 30 do 55 cali (od 76 do 140 cm); maksymalna waga montowanego
urządzenia wynosi 79 kg (175 funtów). Uchwyt można regulować: zakres
nachylenia wynosi od +5 do -15˚, obrotu ±55˚, a poziomowania ±6˚.
CS
Děkujeme vám za zakoupení nástropního držáku na monitor Sanus
Systems VisionMount LC1A. Držák LC1A je určen pro monitory o úhlopříčce
30 až 55“ (76 až 140 cm) a do hmotnosti 79 kg. Držák LC1A je nastavitelný;
umožňuje náklon +5 až -15°, otočení ±55° a sklopení ±6˚.
TR
Sanus Systems VisionMount LC1A duvara montaj düzeneğini
seçtiğiniz için teşekkür ederiz. LC1A, 30 - 55 inç (76 - 140 cm) ve en çok 79 kg
(175 lbs) ağırlığındaki monitörleri taşıyacak şekilde tasarlanmıştır. +5 ile -15˚
arasında eğme, ±55˚ döndürme ve ±6˚ çevirme olanağı sunan LC1A istenen
şekilde ayarlanabilir.
JP
このたびは SANUS VisionMount LC1A 天吊りマウントお選びい
ただき誠にありがとうございます。LC1A は、重量が 79Kg以下で30イ
ンチから55インチまでの大きさの薄型テレビに対応できるよう設計さ
れています。画面の上下角は+5度から-15度、左右旋回は±55
˚、水平角
度は±6度まで調整することが可能です。
MD
感谢您选择尚纳斯壁挂架系列--LC1A天花板安装架. LC1A适用于
30-55英寸(76-139.7厘米), 承重79公斤(175磅). LC1A可倾斜调节+5 t到-
15˚, 旋转调节±55˚, 左右滚转±6˚.