© 2009 Sony Corporation
4-160-344-
11
( )
U
LCD Digital Colour TV
Operating Instructions
KDL-19S57xx
1
Printed in Spain
4-160-344-
11
(1)
U
For useful information about Sony products
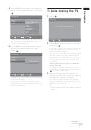
Instructions about “Installing Wall Mount Bracket” are included within
this TV’s instructions manual
416034411