Инструкция для SONY KDL-19S5720, KDL-19S5700, KDL-19S5710, KDL-19S5730

(скачивание инструкции бесплатно)
Формат файла: PDF
Доступность: Бесплатно как и все руководства на сайте. Без регистрации и SMS.
Дополнительно: Чтение инструкции онлайн
background image

9

 GB

Safety 
Information

Installation/Set-up

Install and use the TV set in accordance 
with the instructions below in order to 
avoid any risk of fire, electrical shock or 
damage and/or injuries.

Installation

• The TV set should be installed near an 

easily accessible mains socket.

• Place the TV set on a stable, level 

surface.

• Only qualified service personnel should 

carry out wall installations.

• For safety reasons, it is strongly 

recommended that you use Sony 

accessories, including:
– Wall-mount bracket SU-WL100 

• Be sure to use the screws supplied with 

the Wall-mount bracket when attaching 

the mounting hooks to the TV set. The 

supplied screws are designed so that they 

are 8 mm to 12 mm in length when 

measured from the attaching surface of 

the mounting hook. 

The diameter and length of the screws 

differ depending on the Wall-mount 

bracket model. 

Use of screws other than those supplied 

may result in internal damage to the TV 

set or cause it to fall, etc.

Transporting

• Before 

transporting the 

TV set, disconnect 

all cables.

• When 

transporting the 

TV set by hand, 

hold it as shown 

on the right. Do 

not put stress on 

the LCD panel.

• When transporting the TV set, do not 

subject it to jolts or excessive vibration.

• When transporting the TV set for repairs 

or when moving, pack it using the 

original carton and packing material.

Ventilation

• Never cover the ventilation holes or 

insert anything in the cabinet.

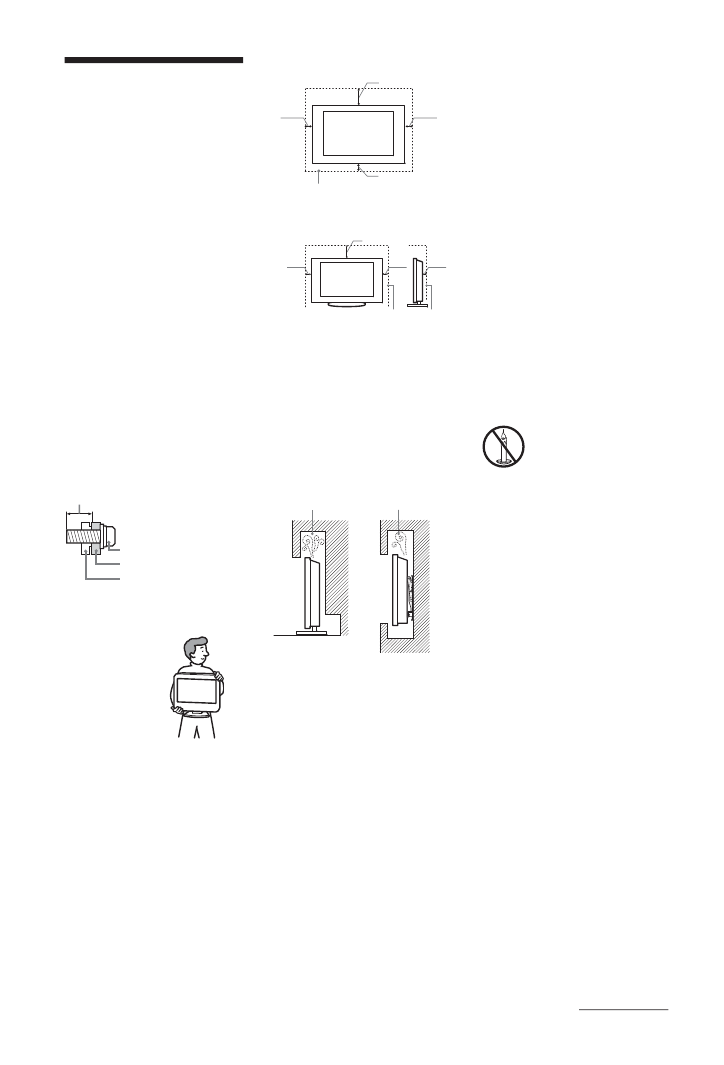
• Leave space around the TV set as shown 

below.

• It is strongly recommended that you use 

a Sony wall-mount bracket in order to 

provide adequate air-circulation.

Installed on the wall

Installed with stand

• To ensure proper ventilation and prevent 

the collection of dirt or dust:
– Do not lay the TV set flat, install 

upside down, backwards, or 
sideways.

– Do not place the TV set on a shelf, 

rug, bed or in a closet.

– Do not cover the TV set with a cloth, 

such as curtains, or items such as 
newspapers, etc.

– Do not install the TV set as shown 

below.

Mains lead

Handle the mains lead and socket as 
follows in order to avoid any risk of fire, 
electrical shock or damage and/or injuries:
– Use only mains leads supplied by 

Sony, not other suppliers.

– Insert the plug fully into the mains 

socket.

– Operate the TV set on a 220–240 V AC 

supply only.

– When wiring cables, be sure to unplug 

the mains lead for your safety and take 
care not to catch your feet on the 
cables.

– Disconnect the mains lead from the 

mains socket before working on or 
moving the TV set.

– Keep the mains lead away from heat 

sources.

– Unplug the mains plug and clean it 

regularly. If the plug is covered with 
dust and it picks up moisture, its 
insulation may deteriorate, which 
could result in a fire. 

Notes

• Do not use the supplied mains lead on 

any other equipment.

• Do not pinch, bend, or twist the mains 

lead excessively. The core conductors 

may be exposed or broken.

• Do not modify the mains lead.
• Do not put anything heavy on the mains 

lead.

• Do not pull on the mains lead itself when 

disconnecting the mains lead.

• Do not connect too many appliances to 

the same mains socket.

• Do not use a poor fitting mains socket.

Prohibited Usage

Do not install/use the TV set in locations, 
environments or situations such as those 
listed below, or the TV set may 
malfunction and cause a fire, electrical 
shock, damage and/or injuries.

Location:

Outdoors (in direct sunlight), at the 
seashore, on a ship or other vessel, inside a 
vehicle, in medical institutions, unstable 
locations, near water, rain, moisture or 
smoke.

Environment:

• To prevent the spread of fire, 

keep candles or other open 
flames away from this 
product at all time.

• Places that are hot, humid, or 

excessively dusty; where insects may 
enter; where it might be exposed to 
mechanical vibration, near flammable 
objects (candles, etc). The TV set shall 
not be exposed to dripping or splashing 
and no objects filled with liquids, such 
as vases, shall be placed on the TV.

Situation:

Do not use when your hands are wet, with 
the cabinet removed, or with attachments 
not recommended by the manufacturer. 
Disconnect the TV set from mains socket 
and aerial during lightning storms.

Broken pieces:

• Do not throw anything at the TV set. The 

screen glass may break by the impact and 

cause serious injury.

• If the surface of the TV set cracks, do not 

touch it until you have unplugged the 

mains lead. Otherwise electric shock 

may result.

When not in use

• If you will not be using the TV set for 

several days, the TV set should be 

disconnected from the mains for 

environmental and safety reasons. 

• As the TV set is not disconnected from 

the mains when the TV set is just turned 

off, pull the plug from the mains to 

disconnect the TV set completely.

• However, some TV sets may have 

features that require the TV set to be left 

in standby to work correctly.

Mounting Hook

Hook attachment on rear 
of TV set

Screw (supplied with the 
Wall-mount bracket)

8 mm - 12 mm

30 cm

10 cm

10 cm

10 cm

Leave at least this space around 
the set.

30 cm

10 cm

10 cm

6 cm

Leave at least this space around 
the set.

Air circulation is blocked.

Wall

Wall

Continued

1
2
3
4
5
6
7
8
9
10
11
12
13
14
15
16
17
18
19
20
21
22
23
24
25
26
27
28
29
30
31
32
33
34
35
Оглавление инструкции
  • Страница 1 из 36
    LCD Digital Colour TV Operating Instructions Instructions about “Installing Wall Mount Bracket” are included within this TV’s instructions manual KDL-19S57xx For useful information about Sony products 416034411 4-160-344-11(1) U Printed in Spain U © 2009 Sony Corporation 4-160-344-11(1)
  • Страница 2 из 36
    NOTICE FOR CUSTOMERS IN THE UNITED KINGDOM A moulded plug complying with BS1363 is fitted to this equipment for your safety and convenience. Should the fuse in the plug supplied need to be replaced with the same rating of fuse approved by ASTA or BSI to BS 1362 (i.e., marked with or ) must be used.
  • Страница 3 из 36
    Table of Contents Start-up Guide 4 Safety information.............................................................................................................9 Precautions......................................................................................................................10
  • Страница 4 из 36
    Start-up Guide 1: Checking the accessories 2: Attaching the handle Remote RM-ED017W (1) Handle (1) Screws for handle (4) Size AA batteries (R6 type) (2) To insert batteries into the remote Push and slide to open. ~ ~ • Observe the correct polarity when inserting batteries. • Do not use different
  • Страница 5 из 36
    Connecting an aerial/cable/VCR/DVD recorder with HDMI ~ • This product has been tested and found to compliant with the limits set out in the EMC Directive for using connection cables not longer than 3 meters (9.8 feet). Connecting an aerial/cable only Coaxial cable Terrestrial signal or cable
  • Страница 6 из 36
    3 Tie the wood screw and the machine screw with a strong cord. z • An optional Sony support belt kit is used to secure the TV. Contact your nearest Sony Service Centre to purchase a kit. Have your TV model name ready for reference. 6: Selecting the language, country/region and location 5: Bundling
  • Страница 7 из 36
    4 7: Auto-tuning the TV 1 Auto Start-up Press Start-up Guide Press F/f to select the country/region in which you will operate the TV, then press . . Auto Tuning Language Country - Location United Kingdom Ireland Do you want to start Auto Tuning? Nederland België/Belgique Luxembourg France Italia
  • Страница 8 из 36
    4 When the Eco Preset menu appears on the screen, press G/g to select “Yes” or “No”, then press . If you press “Yes”, the “Eco” settings are changed to recommended values to reduce power consumption. Detaching the TableTop Stand from the TV ~ • Do not remove the Table-Top Stand for any reason other
  • Страница 9 из 36
    Installed on the wall Safety Information Notes 30 cm 10 cm 10 cm Installation/Set-up Install and use the TV set in accordance with the instructions below in order to avoid any risk of fire, electrical shock or damage and/or injuries. 10 cm Leave at least this space around the set. Installation •
  • Страница 10 из 36
    For children • Do not allow children to climb on the TV set. • Keep small accessories out of the reach of children, so that they are not mistakenly swallowed. If the following problems occur... Turn off the TV set and unplug the mains lead immediately if any of the following problems occur. Ask
  • Страница 11 из 36
    Overview of the remote 1 "/1 – TV standby Turns the TV on and off from standby mode. DIGITAL ANALOG SCENE AUDIO 2 AUDIO GUIDE 3 SCENE – Scene Select (page 14) Press to change the dual sound mode (page 23). 4 Coloured buttons (page 14, 16) 5 RETURN / – Info/Text reveal • In digital mode: Displays
  • Страница 12 из 36
    Overview of the TV buttons and indicators 1 1 – Power Turns the TV on or off. ~ • To disconnect the TV completely, pull the plug from the mains. • When you turn on the TV, the power indicator lights in green. PROG PROG 2 PROG +/-/ / • In TV mode: Selects the next (+) or previous (-) channel. • In
  • Страница 13 из 36
    Watching TV 1 Watching TV When the TV is in standby mode (the 1 (standby) indicator on the TV front panel is red), press "/1 on the remote to turn on the TV. The channels available vary depending on the mode. 1 PROG Press DIGITAL to switch to digital mode, or ANALOG to switch to analogue mode. 3
  • Страница 14 из 36
    To access Text Wide Press /. Each time you press /, the display changes cyclically as follows: Text t Text over the TV picture (mix mode) t No Text (exit the Text service) To select a page, press the number buttons or / . To reveal hidden information, press . z • When four coloured items appear at
  • Страница 15 из 36
    Using the Digital Electronic Programme Guide (EPG) * Fri 3 Nov 15:39 Today 15:30 16:00 16:30 17:00 001 BBC ONE 002 BBC TWO 003 ITV 1 005 five In digital mode, press GUIDE. Perform the desired operation as shown in the following table or displayed on the screen. 006 ITV 2 007 BBC THREE 009 Teletext
  • Страница 16 из 36
    Using the Digital Favourite list Favourite Set-up Enter Programme number --- Favourites 1 001 TV3 011 33 012 Tienda en VEO 003 3/24 013 NET TV 004 K3/300 014 CUATRO 005 TVE1 015 CNN+ 006 TVE2 016 40 LATINO 007 24H TVE 017 CLAN TVE 018 TELEDEPORTE 019 T5 Estrellas 010 VEO 020 . Telecinco 009 In
  • Страница 17 из 36
    Using Optional Equipment Connecting optional equipment You can connect a wide range of optional equipment to your TV. Connecting cables are not supplied. Hi-Fi audio equipment E A DVD player with component output F PC G Hi-Fi audio equipment with optical audio input C Video game equipment DVD
  • Страница 18 из 36
    Viewing pictures from connected equipment Symbol on the Description screen USB Turn on the connected equipment, then perform one of the following operation. For an auto-tuned VCR page 7 In analogue mode, press PROG +/-, or the number buttons, to select the video channel. AV3 To see the equipment
  • Страница 19 из 36
    Using the Tools menu Press TOOLS to display the following options when viewing pictures from connected equipment. Options Close Closes the Tools menu. • Description Picture Mode (except See page 22. PC input mode, USB input mode) • • Display Mode (in PC See page 22. input mode only) Sound Effect
  • Страница 20 из 36
    To connect the equipment that is compatible with control for HDMI Connect the compatible equipment and the TV with a HDMI cable. When connecting an audio system, be sure to also connect the DIGITAL AUDIO OUT (OPTICAL) socket of the TV and the audio system using an optical audio cable. For details,
  • Страница 21 из 36
    Using MENU Functions 5 External Inputs Navigating through menus “MENU” allows you to enjoy various convenient features of this TV. You can easily select channels or inputs sources and change the settings for your TV. 6 Photo / Music Displays the “Photo / Music” menu (page 19). 7 Settings Displays
  • Страница 22 из 36
    Settings Picture Adjustment Picture Mode Selects the picture mode except for PC input source. “Vivid”: For enhanced picture contrast and sharpness. “Standard”: For standard picture. Recommended for home entertainment. “Cinema”: For viewing film-based content. Most suitable for viewing in a
  • Страница 23 из 36
    Resets all “Picture Adjustment” settings except “Picture Mode” and “Display Mode” (only in PC mode) to the factory settings. Reset ~ • “Brightness”, “Colour”, “Hue” and “Sharpness” are not available when “Picture Mode” is set to “Vivid” or when “Display Mode” is set to “Text”. • “Noise Reduction”
  • Страница 24 из 36
    Eco Power Saving Selects the power saving mode to reduce the power consumption of the TV. “Standard”: Default settings. “Reduce”: Reduces the power consumption of the TV. “Picture Off”: Switches off the picture. You can listen to the sound with the picture off. Idle TV Standby Selects the time
  • Страница 25 из 36
    Set-up Starts the initial set-up to select the language, country/region and location, and tune in all available digital and analogue channels. Usually, you do not need to do this operation because the language and country/region will have been selected and channels already tuned when the TV was
  • Страница 26 из 36
    System Update You can update the TV system using USB memory. Obtain information from the website below. http://support.sony-europe.com/TV/ Manual Programme Preset (Only in analogue mode) Changes the available analogue channel setting. Press F/f to select the programme number you want to modify.
  • Страница 27 из 36
    Digital Set-up Digital Tuning Digital Auto Tuning Tunes in the available digital channels. This option allows you to retune the TV after moving house, or to search for new channels that have been launched by broadcasters. Press . Programme List Edit Removes any unwanted digital channels stored on
  • Страница 28 из 36
    ~ • The effect may not function or may vary depending on the programme regardless of the “Dynamic Range” setting. “Optical Out”: Sets the audio signal that is output from the DIGITAL AUDIO OUT (OPTICAL) jack of the TV. Set to “Auto”, when connecting equipment compatible with Dolby Digital. Set to
  • Страница 29 из 36
    Additional Information Installing the Accessories (Wall-Mount Bracket) To Customers: For product protection and safety reasons, Sony strongly recommends that installing of your TV be performed by Sony dealers or licensed contractors. Do not attempt to install it yourself. To Sony Dealers and
  • Страница 30 из 36
    TV installation dimensions table Screen centre point Unit: cm Display dimensions Length for each mounting angle Screen centre dimension Angle (0 ) Angle (20 ) A B C D E F G H 50.7 34.6 12.2 31.1 13.0 21.0 32.9 30.9 Figures in the above table may differ slightly depending on the installation.
  • Страница 31 из 36
    Specifications System Panel System LCD (Liquid Crystal Display) Panel TV System Depending on your country/region selection Analogue: B/G/H, D/K, L, I Digital: DVB-T, DVB-C Colour/Video System Analogue: PAL, PAL60 (only video input), SECAM, NTSC3.58, NTSC4.43 (only video input) Digital: MPEG-2
  • Страница 32 из 36
    PC Input Signal Reference Chart for PC IN Signals Horizontal (Pixel) Vertical (Line) Horizontal frequency (kHz) Vertical Standard frequency (Hz) VGA 640 480 31.5 60 VGA SVGA 800 600 37.9 60 VESA Guidelines XGA 1024 768 48.4 60 VESA Guidelines WXGA 1280 768 47.4 60 VESA WXGA 1280 768 47.8 60 VESA
  • Страница 33 из 36
    Sound Troubleshooting Check whether the 1 (standby) indicator is flashing in red. When it is flashing The self-diagnosis function is activated. Press 1 on the side of the TV to turn it off, disconnect the mains lead, and inform your dealer or Sony service centre. If the red LED flashes 19 times,
  • Страница 34 из 36
    Television in the UK is going digital, bringing us all more choice and new services. Starting in late 2007 and ending in 2012, television services in the UK will go completely digital, TV region by TV region. Please see overleaf to find out when your area switches to digital. Digital UK is the
  • Страница 35 из 36
    How to re-tune 1 2 3 4 5 6 7 8 Press “MENU” on the remote. Press F/f to select “Settings”, then press . Press F/f to select “Set-up”, then press . Press F/f to select “Digital Set-up”, then press . Press F/f to select “Digital Tuning” and then press . Press F/f to select “Digital Auto Tuning” and
  • Страница 36 из 36