Инструкция для TIMBERK TOR 31.1606 QT

(скачивание инструкции бесплатно)
Формат файла: PDF
Доступность: Бесплатно как и все руководства на сайте. Без регистрации и SMS.
Дополнительно: Чтение инструкции онлайн
background image

www.timberk.com • electric oil filled radiator

6

1. Read section «Important precautions» carefully unless you already did it.
2. Connect the unit’s power cord to an electric outlet, observing all of the 

abovementioned precautions. Remember that you can connect the unit 

to electric mains only if the rotating power regulator is in OFF position 

(switched off), i.e. the knob is rotated against the stop counterclockwise.
3. It is also preferable to turn the temperature regulating knob against the 

stop counterclockwise. Then you can connect the unit to electric mains.
4. Set the unit’s power regulator (knob) to position I, II or III (corresponds to 

low, normal and maximum power of unit’s operation). Remember that the 

higher the power you choose, the faster the unit heats the air. But at a low 

power you save electric power and reduce the load on your electric mains.
5. After you chose the desired operating power in accordance with 

your individual preferences, you have to choose the desired heating 

temperature. Turning the thermostat knob clockwise (from MIN position 

towards MAX position), you thus adjust the temperature mode you need. 

Since the moment you choose the temperature mode (provided one or 

another power mode is activated  see item 4) the oil filled radiator will start 

to operate.
6. During the first minutes of radiator’s operation you may fell a slight smell 

of burning. It may be caused by dust on the unit; it will soon disappear. 

If necessary, you can perform a preliminary preventive cleaning of the 

unit, following rules, set forth in this manual and observing «Important 

precautions».
7. When the room temperature will reach the desired level, you should 

slowly turn the temperature regulator’s knob counterclockwise (towards 

MIN). You will hear a click of the thermostat turning off, and the light on the 

control panel will go out. Now the room temperature will be maintained at 

the chosen level.
8. If you need to reduce the room temperature, turn the thermostat knob 

counterclockwise. Also you can lower the unit’s operating power (I or II).
9. If you need to raise the room temperature, turn the thermostat knob 

clockwise (maximum possible position  MAX indicator). Also you can raise 

the unit’s operating power (II or III).
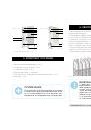
10. The lines of Timberk oil filled radiators TOR 31...QT are additionally 

equipped with a built-in fan heater, located on the front panel of the unit. To 

speed up the room heating, activate the fan heater by pressing the special 

button switch (the button can be located both on the front panel of the 

7. UNIT OPERATION RULES AND PROCEDURE

unit and on the side (to the left) of the front panel of the unit depending on 

the unit line). 
Pressing the fan heater button, you must select the ON position (switched 

on), upon that power supply will be automatically fed both to the fan motor 

and to the built-in heating element. If you need to turn on the fan heater, 

please, press the button again, selecting the OFF position (switched off).

IMPORTANT! 

For the unit to operate normally, the level of voltage in 

electric mains must be sufficient in strict compliance 

with the technical parameters indicated on the unit. 

Carefully study the technical label, as well as all labels 

with special warnings, attached to the unit’s surface.

1. Remember that you must clean the unit regularly to remove dust from 

the surface of heating sections. Dust and dirt on the unit’s surface have 

a negative effect on the unit’s operational efficiency, in some cases a 

smell of burning dust can cause a headache and nausea, as well as other 

negative health effects. Also a dirty unit cannot operate 100% effectively, 

temperature parameters of the room heating can be disrupted.
2. Prior to preventive cleaning of the unit, you must switch off the unit, 

unplug it from electric mains (see «Important precautions») and let the unit 

cool down.
3. Clean the unit’s sections and other surfaces with a soft, slightly damp 

duster/cloth. The cloth must not leave fluff on the unit’s surface.
4. It is not recommended to use detergents, including materials containing 

abrasive elements.
5. During cleaning, please, do not damage the unit’s surface by sharp 

objects (hard sponge, polishing paper, etc). Scratches on the painted 

surface can result in rusting.
Switch on and use the unit again only having carried out all «Important 

precautions»; also make sure that the unit’s surface is absolutely dry.

8. CLEANING AND MAINTENANCE OF THE UNIT

1
2
3
4
5
6
7
8
9
10
11
12
13
14
15
16
17
18
19
20
21
22
23
24
Оглавление инструкции
  • Страница 1 из 25
    Instruction manual Руководство по эксплуатации TOR 21...BCL TOR 21...BC TOR 11...SM Электрический маслонаполненный радиатор Electric oil filled radiator Модели/Models: TOR 21...ACX TOR 31...QT TOR 21...BTA TOR 21...SLX TOR 21.1206 BC TOR 21.1507 BC TOR 21.2009 BC TOR 21.2512 BC TOR 21.1206 BTA TOR
  • Страница 2 из 25
    Dear customer! Thank you for your good choice! You purchased a Timberk oil filled radiator. We did everything for the unit to operate reliably for a long time. Timberk electric oil filled radiator is designed to heat the air and create a comfortable environment indoors during cold season (early
  • Страница 3 из 25
    bathtub or other water container. 8. Do not run cord of the radiator under carpeting and do not press it with furniture. Arrange cord where it will not be tripped over. 9. To shut-off the radiator, use a power switch. Do not switch on and switch off the appliance by connection and disconnection of
  • Страница 4 из 25
    Model Power consumption, W Power supply, V/Hz Rated current A Number of fins Net weight, kg 4. RADIATOR DESCRIPTION Device dimensions, mm TOR 21.1005 SLX 1000 220~/50 4,5 5 4.8 250x235x620 TOR 21.1507 SLX 1500 220~/50 6,8 7 5.8 310x235x620 TOR 21.1809 SLX 1800 220~/50 8,1 9 6.8 385x235x620 TOR
  • Страница 5 из 25
    1 3 2 4 TOR 31...QT TOR 21...SLX 7 6 9 7 6 8 10 5 6. ASSEMBLY AND INSTALLATION 2 4 5 10 1. Unpack the radiator and roller wheels and remove all the packaging material. 2. Overturn the radiator on a mat or no soft surface, to avoid damage to lacquer coating. 3. Install wheel plates on the lower part
  • Страница 6 из 25
    7. UNIT OPERATION RULES AND PROCEDURE 1. Read section «Important precautions» carefully unless you already did it. 2. Connect the unit’s power cord to an electric outlet, observing all of the abovementioned precautions. Remember that you can connect the unit to electric mains only if the rotating
  • Страница 7 из 25
    11. UTILIZATION 9. TROUBLESHOOTING Possible malfunctions and remedies for them: Malfunction 1. The heater heats poorly 2. The heater does not work Cause 1. The heating element is faulty Remedy After end of life the fan heater should be utilized in accordance with the norms, regulations and
  • Страница 8 из 25
    Уважаемый покупатель! Благодарим вас за удачный выбор! Вы приобрели маслонаполненный радиатор Timberk. Со своей стороны мы сделали все, чтобы прибор работал надежно и прослужил вам долго. Электрический маслонаполненный радиатор Timberk предназначен для обогрева воздуха и создания комфортной
  • Страница 9 из 25
    5. Не включайте радиатор, если его сетевой шнур или вилка имеют повреждения. Во избежание опасности поражения электрическим током, поврежденный сетевой шнур должен меняться только в авторизованных сервисных центрах изготовителя, квалифицированными специалистами. 6. Не используйте радиатор на улице.
  • Страница 10 из 25
    Модель Номинальная потребляемая мощность, Вт Параметры электропитания, В/Гц Номинальная сила тока, А Количество секций Вес нетто, кг Размеры прибора, мм TOR 21.1206 BTA 1200 220~/50 5,4 6 6.6 280x235x600 TOR 21.1507 BTA 1500 220~/50 6,8 7 7.4 310x235x635 TOR 21.2009 BTA 2000 220~/50 9,1 9 9.0,
  • Страница 11 из 25
    1 3 2 4 TOR 31...QT TOR 21...SLX 7 6 9 7 6 8 10 5 ** - только для серии TOP 31 ... QT 6. СБОРКА И УСТАНОВКА 2 4 5 10 1. Выньте радиатор и роликовые колёса из упаковки и удалите весь упаковочный материал. 2. Переверните радиатор вверх дном на коврике или мягкой поверхности, чтобы не повредить
  • Страница 12 из 25
    7. ЭКСПЛУАТАЦИЯ ПРИБОРА 1. Внимательно прочитайте раздел «Важные меры предосторожности», если вы этого еще не сделали. 2. Подсоедините сетевой шнур прибора к электрической розетке, соблюдая все вышеперечисленные меры предосторожности. Помните, что подсоединять прибор к электрической сети можно
  • Страница 13 из 25
    8. ОБСЛУЖИВАНИЕ 1. Помните, что вы должны регулярно проводить чистку прибора для удаления пыли с поверхности обогревательных секций. Пыль и загрязнения на поверхности прибора отрицательно влияет на эффективность работы прибора, запах горящей пыли может вызывать в некоторых случаях головную боль и
  • Страница 14 из 25
    ГАРАНТИЙНЫЙ ТАЛОН Уважаемый покупатель! www.timberk.com Обратите внимание на необходимость вашей подписи на стр. 18
  • Страница 15 из 25
    Гарантийные обязательства Гарантийное обслуживание и ремонт бытового электрического маслонаполненного радиатора TIMBERK с соблюдением требований и норм Изготовителя (TIMBERK) производятся на территории РФ только в авторизованных сервисных центрах Изготовителя или мастерских, уполномоченных
  • Страница 16 из 25
    Изготовитель оставляет за собой право: отказать в гарантийном сервисном обслуживании изделия в случае несоблюдения изложенных ниже условий (cм. «Досрочное прекращение гарантийного обслуживания»); самостоятельно инициировать независимую экспертизу для выясне-ния обстоятельств, приведших к выходу
  • Страница 17 из 25
    если дефект вызван изменением/нарушением конструкции или схемы изделия, не предусмотренным Изготовителем; если обнаружены повреждения, вызванные попаданием внутрь изделия посторонних предметов, веществ, жидкостей, насекомых, скоплением большого количества пыли; если обнаружены повреждения,
  • Страница 18 из 25
    «Б» Бланк гарантийного талона. Дата приема Заполняется фирмой-продавцом Дата выдачи Изделие Печать сервисного центра Особые отметки Модель «В» Серийный номер Дата приема Дата продажи Дата выдачи Фирма-продавец Печать сервисного центра Особые отметки Адрес фирмы продавца «Г» Дата приема Телефон
  • Страница 19 из 25
    Отрывной талон«А» Изделие Модель Печать фирмы-продавца Серийный номер Дата продажи Фирма-продавец Заполняется фирмой-продавцом Отрывной талон«Б» Изделие Модель Печать фирмы-продавца Серийный номер Дата продажи Фирма-продавец Заполняется фирмой-продавцом Отрывной талон«В» Изделие Модель Печать
  • Страница 20 из 25
    Дата приема Дата выдачи Номер заказа-наряда Печать сервисного центра Проявление дефекта Мастер Код неисправности Заполняется сервисным центром Дата приема Дата выдачи Номер заказа-наряда Печать сервисного центра Проявление дефекта Мастер Код неисправности Заполняется сервисным центром Дата приема
  • Страница 21 из 25
    В целях информирования покупателей техники TIMBERK, мы дополнительно сообщаем, что русский является государственным языком в следующих государствах: • в Республике Казахстан • в Киргизской Республике • в административных единицах Украины, где доля носителей русского языка • в Российской Федерации
  • Страница 22 из 25
    www.btpart.ru Все расходные материалы для продукции TIMBERK вы можете приобрести на сайте www.btpart.ru Уважаемый покупатель! TIMBERK предоставляет вам специальный сервис в рамках программы клиентской поддержки. Теперь вы всегда сможете заказать и оформить доставку на запасные части и расходные
  • Страница 23 из 25
    www.timberk.com • электрический маслонаполненный радиатор 23
  • Страница 24 из 25
    www.timberk.com
  • Страница 25 из 25