Инструкция для TRIPP LITE APSINT2012

(скачивание инструкции бесплатно)
Формат файла: PDF
Доступность: Бесплатно как и все руководства на сайте. Без регистрации и SMS.
Дополнительно: Чтение инструкции онлайн
background image

5

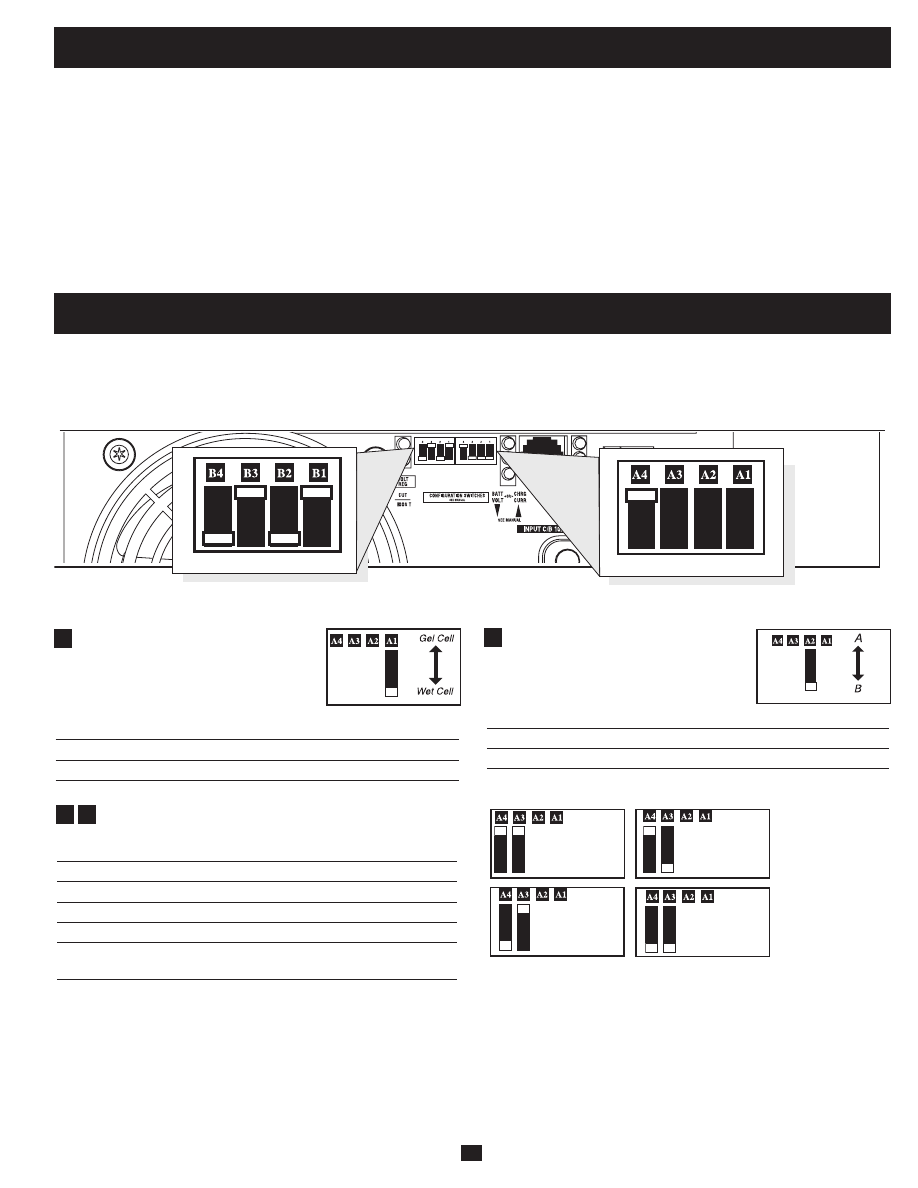
Select Battery Type—REQUIRED

CAUTION: The Battery Type DIP Switch setting must match 
the type of batteries you connect, or your batteries may be 
degraded or damaged over an extended period of time. See 
“Battery Selection,” for more information.

Battery Type 

Switch Position

AGM/Gel Cell (Sealed) Battery 

Up

Wet Cell (Vented) Battery 

Down (factory setting)

group A DIP Switches 

A1

Operation 

(continued)

Resetting Your Inverter/Charger to Restore AC Power

Your Inverter/Charger may cease supplying AC power or DC charging power in order to protect itself from overload or to protect your 

electrical system. To restore normal functioning:

Overload Reset:

 Switch operating mode switch to “DC OFF” and remove some of the connected electrical load (ie: turn off some of the 

AC devices drawing power which may have caused the overload of the unit). Wait one minute, then switch operating mode switch back to 

either “AUTO/REMOTE” or “CHARGE ONLY.” 

Output Circuit Breaker Reset:

 Alternatively, check output circuit breaker on the unit's front panel. If tripped, remove a portion of the 

electrical load, wait one minute to allow components to cool, then reset the circuit breaker. See the Troubleshooting section for additional 

possible reasons why AC output may be absent.

Select Low AC Input Voltage Point for Switching to 

Battery—OPTIONAL*


Voltage and Level


120V models  230V models  Switch Position

Level A  105V** 

201V** 

A4 Up & A3 Up

Level B  95V 

182V 

A4 Up & A3 Down

Level C  85V 

163V 

A4 Down & A3 Up

Level D  75V 

144V 

A4 Down & A3 Down 


(factory setting)

A3

A4

*  Most  of  your  connected  appliances  and  equipment  will  perform  adequately  when  your 
Inverter/Charger’s Low AC Voltage Input Point (DIP Switches #3 and #4 of Group A are set to 
95V.  However,  if  the  unit  frequently  switches  to  battery  power  due  to  momentary  low  line 
voltage swings that would have little effect on equipment operation, you may wish to adjust 
these settings. By decreasing the Low AC Voltage Point, you will reduce the number of times 
your unit switches to battery due to voltage swings.
** For APS3636VR and APSINT3636VR models Level A setpoints are the same as Level B.

Configuration

Select High AC Input Voltage Point  
for Switching to Battery-OPTIONAL*

Level  120V Models 

230V Models  Switch Position

145V 

278V 

Up

135V 

259V 

Down (factory setting)

A2

Set Configuration DIP Switches

Using a small tool, set the Configuration DIP Switches (located on the front panel, see diagram) to optimize Inverter/Charger operation 

depending on your application.

Group B Dip Switches 

Group A Dip Switches 

Level A

Level B

Level C

Level D

1
2
3
4
5
6
7
8
9
10
11
12
13
14
15
16
17
18
19
20
21
22
23
24
25
26
27
28
29
30
31
32
33
34
35
36
37
38
39
40
41
42
43
44
45
46
47
48
Оглавление инструкции
  • Страница 1 из 49
    e for Lit y ay ipp rant d to Tr ar arranty ine REE om/w l n W istration F c o g ister win a plite. e R Reg to .trip e nc ww ha t! w c a uc od pr Owner’s Manual PowerVerter® APS Series DC-to-AC Inverter/Charger APS Models - - 12, - - 24 and - - 36VR Input Output Invert: 12/24/36 VDC* 120V, 60 Hz. AC
  • Страница 2 из 49
    Important Safety Instructions SAVE THESE INSTRUCTIONS! This manual contains important instructions and warnings that should be followed during the installation, operation and storage of this product. Location Warnings • Install your Inverter/Charger in a location or compartment that minimizes
  • Страница 3 из 49
    Feature Identification Identify the premium features on your specific model and quickly locate instructions on how to maximize their use. 1 2 3 4 5 Configuration DIP Switches: optimize Inverter/Charger operation depending on your application. See Configuration section for setting instructions.
  • Страница 4 из 49
    Operation Switch Modes “INV” (Inverting) Yellow LED: This light will ILLUMINATE CONTINUOUSLY whenever connected equipment is receiving battery-supplied, inverted AC power (in the absence of a utility/ generator source or in over/under voltage situations). This light will be off when AC power is
  • Страница 5 из 49
    Operation (continued) Resetting Your Inverter/Charger to Restore AC Power Your Inverter/Charger may cease supplying AC power or DC charging power in order to protect itself from overload or to protect your electrical system. To restore normal functioning: Overload Reset: Switch operating mode
  • Страница 6 из 49
    Configuration (continued) Group B DIP Switches B2 B1 Select AC Sharing—OPTIONAL Your Inverter/Charger features a high-output battery charger that can draw a significant amount of AC power from your utility source or generator when charging at its maximum rate. If your unit is supplying its full AC
  • Страница 7 из 49
    Configuration (continued) Set Battery Charge Conserver (Load Sense) Dial—OPTIONAL In order to save battery power, the unit’s inverter automatically shuts off in the absence of any power demand from connected equipment or appliances (the electrical load). When the unit detects a load, it
  • Страница 8 из 49
    Battery Selection Select Battery Type Select “Deep Cycle” batteries to receive optimum performance from your Inverter/Charger. Do not use ordinary car or starting batteries or batteries rated in Cold Cranking Amps (CCA). If the batteries you connect to the Inverter/Charger are not true Deep Cycle
  • Страница 9 из 49
    Mounting WARNING! Mount your Inverter/Charger BEFORE DC battery and AC power connection. Failure to follow these instructions may lead to personal injury and/or damage to the Inverter/ Charger and connected systems. Tripp Lite recommends permanent mounting of your Inverter/Charger as illustrated
  • Страница 10 из 49
    Battery Connection Connect your Inverter/Charger to your batteries using the following procedures: • Connect DC Wiring: Though your Inverter/Charger is a high-efficiency converter of electricity, its rated output capacity is limited by the length and gauge of the cabling running from the battery to
  • Страница 11 из 49
    AC Input/Output Connection To avoid overloading your Inverter/Charger, match the power requirements of the equipment you plan to run at any one time (add their total watts) with the output wattage capacity of your Inverter/Charger model (see Nameplate). Do not confuse “continuous” wattage with
  • Страница 12 из 49
    Troubleshooting Try these remedies for common Inverter/Charger problems before calling for assistance. Call Tripp Lite Customer Service at 773.869.1234 before returning your unit for service. SYMPTOM PROBLEMS No AC Output Unit is not properly connected to utility power CORRECTIONS Connect unit to
  • Страница 13 из 49
    Manual del Propietario PowerVerter ® Serie APS Inversor/cargador de corriente continua a corriente alterna Inversion: Carga: Entrada 12 VCC 120V, 60 Hz. AC Salida 120V, 60 Hz. VAC 12 VCC 1111 W. 35th Street, Chicago, IL 60609 USA Soporte al cliente: 773.869.1234 www.tripplite.com Confiable energia
  • Страница 14 из 49
    Instrucciones de seguridad importantes ¡GUARDE ESTAS INSTRUCCIONES! Este manual contiene instrucciones y advertencias importantes que deben seguirse durante la instalación, operación y almacenamientode este producto. Advertencias de ubicación • Instale su inversor/cargador (ya sea para una
  • Страница 15 из 49
    Identificación de funciones Identifica las funciones Premium en su modelo específico y ubica rápidamente las instrucciones para optimizar su utilización. 1 2 3 4 5 Conmutadores DIP de configuración: optimizan la operación de su inversor/cargador en función de su aplicación. Vea la sección de
  • Страница 16 из 49
    Operacion Modos de conmutación Indicador INV (Inversión) amarillo: Esta luz se ILUMINARÁ CONTINUAMENTE siempre que el quipo conectado esté recibiendo energía de corriente alterna convertida desde baterías (en ausencia de alimentación de la red o de un generador, o en casos de sobrevoltaje o bajo
  • Страница 17 из 49
    Configuración Fijar conmutadores DIP de configuración Usando una herramienta pequeña, fije los conmutadores DIP de configuración (ubicados en el panel frontal de su unidad, vea el diagrama) para optimizar la operación del inversor/cargador en función de su aplicación. Conmutadores DIP Grupo B
  • Страница 18 из 49
    Configuración (continuación) B3 Seleccionar Ecualizar carga de batería—OPCIONAL Procedimiento de ajuste • Mueva a la posición "Equalize" (ABAJO) por tres segundos. • Mueva a la posición "Reset" (ARRIBA) y déjela ahí. Este es el ajuste de fábrica predeterminado. Este conmutador DIP está
  • Страница 19 из 49
    Selección de batería Seleccionar Tipo de batería Seleccione baterías de "ciclo profundo" para disfrutar de un óptimo rendimiento de su inversor/cargador. Las baterías de fabricación de celda húmeda (con desfogue) o de celda de gel /AGM (Absorbed Glass Mat) (sellada) son las ideales. Las baterías de
  • Страница 20 из 49
    Montaje ¡ADVERTENCIA! Monte su inversor/cargador ANTES de conectar la batería de corriente continua y la energía de corriente alterna. No seguir estas instrucciones puede producir lesiones personales y/o daños al inversor/cargador y a los sistemas conectados. Tripp Lite recomienda el montaje
  • Страница 21 из 49
    Conexión de batería Conecte su inversor/cargador a sus baterías usando los siguientes procedimientos: • Conexión del cableado de corriente continua: Aunque su inversor/cargador es un convertidor de electricidad de alta eficiencia, su capacidad de salida está limitada por la longitud y calibre del
  • Страница 22 из 49
    Conexión de entrada/salida de corriente alterna Para evitar sobrecargar su inversor/cargador, asegúrese de cumplir los requisitos de potencia del equipo que planea operar en cualquier momento a la vez (sume sus potencias totales) con la capacidad de potencia de salida del modelo de su
  • Страница 23 из 49
    Mantenimiento Su inversor/cargador no requiere mantenimiento y no contiene partes reemplazables o a las que el usuario pueda dar servicio, pero siempre debe mantenerse seco. Revise, limpie y apriete periódicamente todas las conexiones de cables según sea necesario, tanto en la unidad como en la
  • Страница 24 из 49
    Garantía limitada Tripp Lite garantiza que su inversor/cargador está libre de defectos en materiales y mano de obra por un período de un año (excepto fuera de EE.UU., Canadá y México-120 días) desde la fecha de compra por parte del usuario final. Bajo esta garantía, la obligación de Tripp Lite está
  • Страница 25 из 49
    r u po NT ui Lite h E ' M : urd ipp RE TIE s aujo duit Tr anty T r è S GI RANigne d un pro m/war E l o r R A n e .c EN E G ous e gagn ipplite D ez-v e de .tr Guide d'utilisation PowerVerter® w r ist anc ww reg la ch UIT ! n e ir T avo GRA Onduleur/chargeur CC/CA de série APS Modèles APS - - 12, - -
  • Страница 26 из 49
    Consignes de sécurité importantes CONSERVEZ CES INSTRUCTIONS ! Le présent manuel contient des instructions et des mises en garde qui doivent être respectées lors de l'installation et pendant l'exploitation du produit.. Mises en gardes concernant le site d'emplacement • Installez votre onduleur
  • Страница 27 из 49
    Identification des caractéristiques Permet d'identifier les caractéristiques supérieures de votre modèle particulier et de trouver rapidement les instructions vous permettant d'en maximiser l'utilisation. 1 2 3 4 5 Commutateurs de paramétrage DIP : pour optimiser l'exploitation de
  • Страница 28 из 49
    Exploitation Commutateur de modes Après avoir paramétré, installé et raccordé votre onduleur/chargeur, il vous est possible de l'exploiter en commutant entre les modes d'exploitation variés en fonction de votre situation : AUTO/REMOTE (AUTO/TÉLÉCOM.) : passez en ce mode pour obtenir une source
  • Страница 29 из 49
    Exploitation (suite) Réinitialisation de l'onduleur/chargeur pour rétablir l'alimentation en CA Votre onduleur/chargeur peut cesser de fournir l'alimentation CA ou l'alimentation du chargeur CC afin de se protéger lui-même contre les surcharges ou pour protéger votre système électrique. Pour
  • Страница 30 из 49
    Paramétrage (suite) Commutateurs DIP du groupe B Sélectionnez partage CA—OPTIONNEL Votre onduleur/chargeur dispose d'un chargeur de batteries d'accumulateur à haut débit pouvant soutirer une quantité signifiante d'énergie CA de votre service public ou de votre groupe électrogène lorsqu'il est sous
  • Страница 31 из 49
    Paramétrage (suite) Réglage du cadran de l'économiseur d'énergie de la batterie (détecteur de charge)—OPTIONNEL Pour conserver l'énergie de la batterie, l'onduleur s'arrête automatiquement en l'absence de toute demande de la part des appareils domestiques ou autres qui y sont branchés (la charge
  • Страница 32 из 49
    Sélection de la batterie Sélectionnez le type de batterie Choisissez des batterie à décharge poussée afin d'obtenir la performance optimale de la part de votre onduleur/chargeur. N'utilisez pas de batteries d'automobile ou de batteries de démarrage ordinaires classées par ampères de démarrage à
  • Страница 33 из 49
    Installation AVERTISSEMENT ! Effectuez l'installation de l'onduleur/chargeur AVANT celui de la batterie et le branchement de l'alimentation CA. Toute dérogation à ces directives peut provoquer des lésions corporelles et/ou dommages à l'onduleur/chargeur et aux systèmes qui y sont raccordés. Tripp
  • Страница 34 из 49
    Raccordement des batteries Raccordez l'onduleur/chargeur aux batteries selon la procédure ci-après : • Connectez le filage CC : même si votre appareil est considéré comme un onduleur super efficace, sa capacité nominale demeure limitée par la longueur et le calibre du filage à partir de la batterie
  • Страница 35 из 49
    Raccordement de la source CA/Sortie Pour prévenir les surcharges de l'onduleur/chargeur, appariez les demandes de puissance des appareils que vous souhaitez brancher simultanément (additionnez leur wattage total) au wattage de sortie de votre modèle d'onduleur/chargeur (voir la plaque nominative).
  • Страница 36 из 49
    Dépannage Essayez ces remèdes pour les problèmes communs aux onduleurs/chargeurs avant de demander de l'aide. Appelez le service à la clientèle de Tripp Lite en composant le 1.773.869.1234 avant d'envoyer réparer votre unité. SYMPTÔME Problème Solution Aucune sortie CA (Toutes les lampes témoin
  • Страница 37 из 49
    Я м я ва ОГО ци а на ет ь р и а ст ти тел н д ЛАТН ги ранедлинлай ЕСПLite! ranty е Р га зам я о ш Бpp ar е и ы i /w Руководство по эксплуатации Н ац гр Tr m р и я o ст ы и .c ги в ел lite ре с на издripp t н w. ша ww PowerVerter® Серия APS, преобразователь постоянного тока в постоянный/зарядное
  • Страница 38 из 49
    Важные инструкции по технике безопасности СОХРАНИТЕ ЭТИ ИНСТРУКЦИИ! В этом Руководстве имеются важные инструкции и предупреждения, которым необходимо следовать при установке, эксплуатации и хранении изделия.. Предупреждение о месте установки • Устанавливать преобразователь/ зарядное устройство в
  • Страница 39 из 49
    Определение функций Определить главные характеристики вашей конкретной модели и быстро найти инструкции по их максимально эффективному использованию. 6 Фиксированные клеммы входа/выхода переменного тока: 1 Конфигурация DIP-переключателей оптимизация работы 2 3 4 5 преобразователя/зарядного
  • Страница 40 из 49
    Эксплуатация Режимы работы переключателя Если переключатель режима работы установлен на “CHARGE ONLY” (Только зарядка), то этот сигнал будет МИГАТЬ, сообщая о том, что преобразователь устройства выключен и НЕ будет подавать электропитание переменного тока в отстуствие сетевого/ генераторного
  • Страница 41 из 49
    Эксплуатация (продолжение) Переустановка преобразователя/зарядного устройства для восстановления электропитания переменного тока Ваш преобразователь/зарядное устройство может прекратить подачу электропитания переменного тока или зарядное электропитание постоянного тока для того, чтобы защитить себя
  • Страница 42 из 49
    Конфигурация (продолжение) Dip-переключатели группы "В" B2 B1 Выбрать разделение переменного тока—ОПЦИОНАЛЬНОЕ Ваш преобразователь/зарядное устройство включает зарядное устройство для батарей с высоким выходным уровнем, которое может забирать значительное количество мощности переменного тока от
  • Страница 43 из 49
    Конфигурация (продолжение) Шкала устройства сохранения заряда батареи (чувствительность к нагрузке)—ОПЦИОНАЛЬНО Для сохранения мощности батареи, преобразователь устройства автоматически отключается от подключенного оборудования или приборов (электрическая нагрузка) при отсутствии потребности в
  • Страница 44 из 49
    Выбор батарей Выбор типа батареи Выбрать батареи глубокого цикла для обьеспечения максимальной эффективности вашего преобразователя/зарядного устройства. Не использовать обычные автомобильные или пусковые батареи, или батареи, обозначеннные в амперах холодного запуска (CCA). Если батареи,
  • Страница 45 из 49
    Установка РЕДУПРЕЖДЕНИЕ! Установить преобразователь/зарядное устройство ПЕРЕД подключением батареи постоянного тока и мощности переменного тока. Несоблюдение этих инструкций может вызвать телесные повреждения и (или) повредить преобразователь/зарядное устройство и подключенные системы. Компания
  • Страница 46 из 49
    Подключение батарей Подключить преобразователь/зарядное устройство к батареям с помощью следующей процедуры: • Подключить проводку постоянного тока: Хотя ваш преобразователь/зарядное устройство представляет собой высокоэффективный преобразователь электричества, его номинальная выходная мощность
  • Страница 47 из 49
    Соединение свходом/выходом переменного тока Для того, чтобы избежать перегрузки преобразователя/зарядного устройства, требования к электропитанию оборудования, которое вы планируете эксплуатировать одновременно (сложить общее количество ватт) должны соответствовать выходной мощности в ваттах вашей
  • Страница 48 из 49
    Устранение неисправностей Попробуйте эти методы для решения обычных проблем с преобразователями/зарядными устройствами до того, как обращаться за помощью. Перед отправкой вашего устройства на обслуживание, позвоните в Отдел обслуживания компании Tripp Lite по номеру (773) 869-1234. ПРИЗНАК
  • Страница 49 из 49