Инструкция для TRIPP LITE PDUMH15HVNET, PDUMH20HVNET

(скачивание инструкции бесплатно)
Формат файла: PDF
Доступность: Бесплатно как и все руководства на сайте. Без регистрации и SMS.
Дополнительно: Чтение инструкции онлайн
background image

15

4-1

A

B

C

A

6

Installation 

continued

 Networking the PDU

Note: The MAC address of the PDU (a 12-digit string in this format: 000667xxxxxx) is printed on a label attached to the PDU enclosure. 
The MAC address is also printed on a label attached to the internal network card.

If your network's DHCP server will assign a dynamic IP address to the PDU automatically, go to Step  

4-1

. If you will assign a static IP address to the PDU manually, go to Step 

5-1

. If you are uncertain 

which method to use, contact your network administrator for assistance before continuing the 
installation process.

Dynamic IP Address Assignment
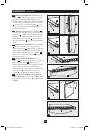
4-1 

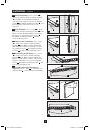
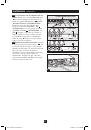
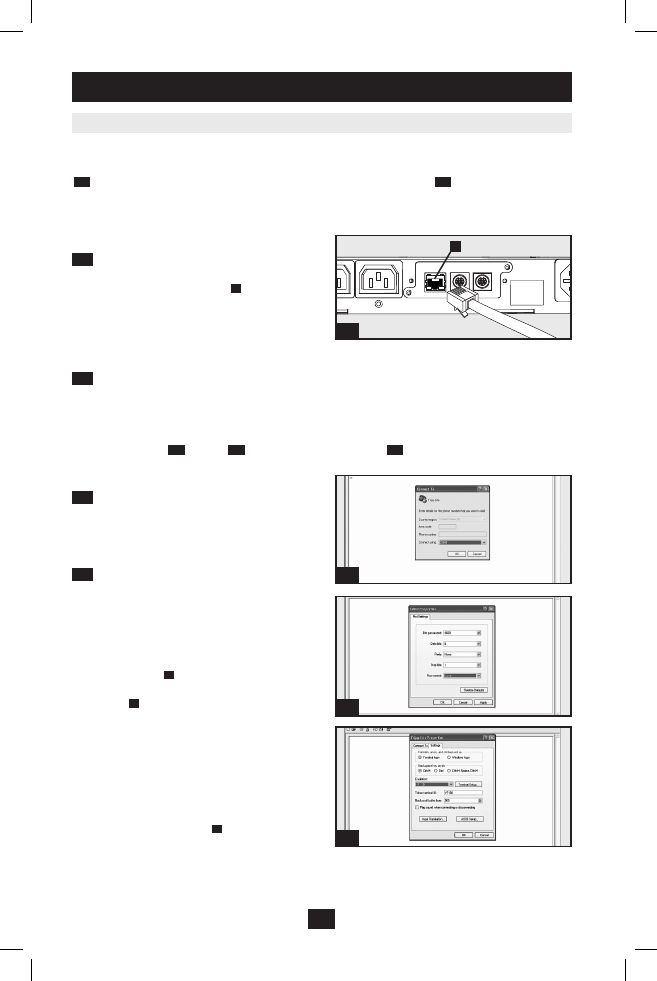
Connect PDU to Network:

 While the PDU 

is powered, connect a standard Ethernet patch 
cable to the RJ-45 Ethernet port 

A

 on the PDU. 

Note: This port is not compatible with PoE 
(Power over Ethernet) applications.

 The PDU 

will attempt to obtain an IP address via DHCP. 
This may take as long as several minutes, 
depending on your network environment.

4-2 

Discover IP Address:

 Contact your network administrator to determine which dynamic IP 

address has been assigned to the PDU by the DHCP server. The PDU can be identified on the DHCP 
server by referring to its MAC address. (The MAC address is a 12-digit string in this format: 
000667xxxxxx. Refer to the MAC address label attached to the PDU.) You may wish to request a long-
term lease period for the IP address, depending on your application. After you have discovered the IP 
address, skip Steps 

5-1

 through 

5-6

 and proceed directly to Step 

6-1

.

Static IP Address Assignment

5-1 

Determine IP Information:

 Before 

assigning a static IP address, you'll need to know 
the IP address, gateway address and subnet mask. 
If you do not have this information, contact your 
network administrator for assistance.
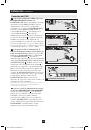
5-2 

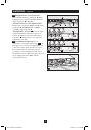
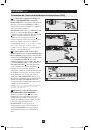
Configure Terminal Emulation Program:


Open a VT100-compatible terminal emulation 
program (such as the HyperTerminal program 
bundled with Microsoft

®

 Windows

®

) on a 

computer with an available DB9 serial port. (A 
notebook computer may be the most convenient 
choice.) Set the terminal emulation program to 
use the COM port 

A

 that corresponds to the 

computer’s DB9 serial port. Specify the 

parameters 

B

 required to communicate with the 

PDU terminal interface:

Bits per second: 

9600 

Data bits: 

Parity: None 

Stop bits: 

Flow control: 

None

If the terminal emulation program supports 
multiple emulation modes, you may also need 


to specify VT100 emulation 

C

.

201110149-93-2718.indd   6

11/9/2011   11:17:32 AM

1
2
3
4
5
6
7
8
9
10
11
12
13
14
15
16
17
18
19
20
21
22
23
24
25
26
27
28
29
30
31
32
33
34
35
36
Оглавление инструкции
  • Страница 1 из 37
    R e W to gis w te Re ar in r g ra w a on i w s l F i nt w. R ne t r tri E y a t pp E od t lit Tri ay io e. pp f n c o L or m ite a /w c ar pro ha ra d nc nt uc e y t! Owner’s Manual PDUMH15NET/PDUMH20NET Switched Rack PDU • 120V, 60Hz AC Input and Output PDUMH15HVNET/PDUMH20HVNET Switched Rack PDU
  • Страница 2 из 37
    Important Safety Instructions SAVE THESE INSTRUCTIONS This manual contains instructions and warnings that should be followed during the installation, operation, and storage of this product. Failure to heed these instructions and warnings may affect the product warranty. • The PDU provides
  • Страница 3 из 37
    Installation continued 1-2 0U Rack Mounting: Use 3 screws A to attach each of the 2 shorter mounting brackets B to the PDU as shown. Mount the PDU vertically by inserting 2 or more user-supplied screws C through the mounting brackets D and into mounting points in the rack or rack enclosure. B 1-3
  • Страница 4 из 37
    Installation continued Connecting the PDU 2-1 NEMA Adapter Connection (Optional PDUMH20HVNET Only): The PDUMH20HVNET includes a plug adapter that adds a NEMA L6-20P plug to the input power cord. Use this adapter only if you will be connecting the PDUMH20HVNET to a NEMA L6-20R outlet. Insert the IEC
  • Страница 5 из 37
    Installation continued 2-4 Equipment Power Cord Connection: Insert the IEC 60320 C14 connectors A of the equipment power cords into the IEC 60320 C13 output receptacles B of the PDU (PDUMH15HVNET and PDUMH20HVNET). Insert power cords into the NEMA 5-15R output receptacles B (PDUMH15NET) or NEMA
  • Страница 6 из 37
    Installation continued Networking the PDU Note: The MAC address of the PDU (a 12-digit string in this format: 000667xxxxxx) is printed on a label attached to the PDU enclosure. The MAC address is also printed on a label attached to the internal network card. If your network's DHCP server will
  • Страница 7 из 37
    Installation continued Networking the PDU continued 5-3 Connect PDU to Computer: Use the mini-DIN to DB9 serial cable (part number 73-1025) included with the PDU to connect the PDU to the computer. The circular connector A at one end of the cable attaches to the 8-pin mini-DIN serial port B on the
  • Страница 8 из 37
    Installation continued Networking the PDU continued Testing Network Connection 6-1 Access PDU with Web Browser: After an IP address has been assigned to the PDU, attempt to access it with a Web browser that supports frames, forms and Java™. Open a Web browser on a computer connected to the LAN and
  • Страница 9 из 37
    Features AC Input Power Inlet (Model PDUMH15HVNET): The IEC 60320 C14 inlet connects to the detachable AC Input Power Cord. AC Input Power Inlet (Model PDUMH20HVNET): The IEC 60320 C20 inlet connects to the detachable AC Input Power Cord. A A B B AC Input Power Cord (Model PDUMH15HVNET): The
  • Страница 10 из 37
    Features continued NEMA 5-15R Output Receptacles (PDUMH15NET): During normal operation, the output receptacles distribute AC power to connected equipment. When an outlet is live, the associated LED illuminates. NEMA 5-15/20R Output Receptacles (PDUMH20NET): During normal operation, the output
  • Страница 11 из 37
    Features continued PS/2 Port: Use this port to connect a Tripp Lite ENVIROSENSE environmental sensor to provide remote temperature/humidity monitoring and a dry contact interface to control and monitor alarm, security and telecom devices. Contact Tripp Lite Customer Support at (773) 869-1234 for
  • Страница 12 из 37
    Technical Support Website: www.tripplite.com/support E-mail: techsupport@tripplite.com Warranty and Warranty Registration LIMITED WARRANTY Seller warrants this product, if used in accordance with all applicable instructions, to be free from original defects in material and workmanship for a period
  • Страница 13 из 37
    Manual del propietario PDUMH15NET/PDUMH20NET PDU con tomas de corriente controlables para bastidor • 120V, 60Hz AC Input y Output PDUMH15HVNET/PDUMH20HVNET PDU con tomas de corriente controlables para bastidor • 208/230V, 50/60Hz AC Input y Output Instrucciones de seguridad importantes 14
  • Страница 14 из 37
    Instrucciones de seguridad importantes GUARDE ESTAS INSTRUCCIONES Este manual contiene instrucciones y advertencias que deben seguirse durante la instalación, operación y almacenamiento de este producto. De no seguirlas, se afectar la garantía del producto. • El PDU proporciona cómodas salidas
  • Страница 15 из 37
    Instalación continuación 1-2 Montaje en Bastidor 0U (Vertical): Use 3 tornillos A para fijar cada uno de los 2 soportes de montajes más largos B al PDU como se muestra. Monte el PDU verticalmente insertando 2 o más tornillos, suministrados por el usuario C a través de los soportes de montaje D y
  • Страница 16 из 37
    Instalación continuación Conexión del PDU 2-1 Conexión del Adaptador NEMA (Opcional PDUMH20HVNET únicamente): El PDUMH20HVNET incluye un adaptador de clavija que añade la clavija NEMA L6-20P al cable de alimentación de entrada. Use este adaptador solamente si va a conectar el PDUMH20HVNET a 2-1 una
  • Страница 17 из 37
    Instalación continuación 2-4 Conexión del Cable de Alimentación del Equipo: Inserte los conectores IEC 60320 C14 A del cable de alimentación del equipo en las tomas de corriente IEC 60320 C13 B del PDU (PDUMH15HVNET y PDUMH20HVNET). Inserte los cables de energía dentro de los receptáculos de salida
  • Страница 18 из 37
    Instalación continuación Conectando Su PDU a la Red Nota: La dirección MAC (Media Access Control / Control de Acceso de Medios) del PDU (una serie de 12-dígitos en este formato: 000667xxxxxx) está impresa en una etiqueta adherida al gabinete del PDU. La dirección MAC también está impresa en una
  • Страница 19 из 37
    Instalación continuación Conectando Su PDU a la Red continuación 5-3 Conecte el PDU a la Computadora: Use el cable serial mini-DIN a DB9 (parte número 73-1025) incluido con el PDU para conectar el PDU con la computadora. El conector circular A en uno de los extremos del cable se conecta al puerto
  • Страница 20 из 37
    Instalación continuación Conectando Su PDU a la Red continuación Probando la Conexión de Red 6-1 Acceda al PDU con el Navegador de Red: Después que una dirección IP ha sido asignada al PDU, trate de acceder con navegador de Web que soporte frames [marcos], forms [formas] y Java™. Abra un Navegador
  • Страница 21 из 37
    Características Toma de la Energía de Entrada CA (Modelo PDUMH15HVNET): La toma IEC 60320 C14 conecta el cable de alimentación CA desprendible. Toma de la Energía de Entrada CA (Modelo PDUMH20HVNET): La toma IEC 60320 C20 conecta el cable de alimentación CA desprendible. A B Cable de Alimentación
  • Страница 22 из 37
    Características continuación Receptáculos de salida NEMA 5-15R (PDUMH13NET): Durante la operación normal, los receptáculos de salida distribuyen la energía de CA al equipo conectado. Cuando una salida está viva se ilumina el LED asociado. Receptáculos de salida NEMA 5-15/20R (PDUMH20NET): Durante
  • Страница 23 из 37
    Características continuación Puerto PS/2: Use este puerto para conectar el sensor ambiental ENVIROSENSE de Tripp Lite para monitorear la temperatura y humedad en forma remota y una interfaz de contacto seco para controlar y monitorear los dispositivos de alarma, seguridad y telecomunicaciones.
  • Страница 24 из 37
    Soporte técnico Website: www.tripplite.com/support Correo Electronico: techsupport@tripplite.com Garantía GARANTÍA LIMITADA El vendedor garantiza que este producto, si se emplea de acuerdo con todas las instrucciones aplicables, no tendrá defectos en materiales ni mano de obra por un período de 2
  • Страница 25 из 37
    Manuel du propriétaire PDUMH15NET/PDUMH20NET Unité de distribution d’alimentation (PDU) en bâti • 120V, 60Hz AC Input et Output PDUMH15HVNET/PDUMH20HVNET Unité de distribution d’alimentation (PDU) en bâti • 208/230V, 50/60Hz AC Input et Output Importantes consignes de sécurité 26 Installation 26
  • Страница 26 из 37
    Importantes consignes de sécurité CONSERVER CES DIRECTIVES Ce manuel contient des instructions et des mises en garde que vous devez respecter durant l’installation, l’utilisation et l’entreposage de ce produit. Le non-respect de ces instructions et mises en garde affecter la garantie du produit. •
  • Страница 27 из 37
    Installation suite 1-2 Montage en bâti 0U (vertical) : Utilisez 3 vis A pour fixer chacun des deux supports de fixation courts B à l'unité, comme illustré. Montez l'unité de distribution verticalement en insérant 2 vis (ou plus, fournies par vous) C dans les supports de fixation D et dans les trous
  • Страница 28 из 37
    Installation suite Connexion de l'unité de distribution d'alimentation (PDU) 2-1 Connexion des adaptateurs NEMA (en option - PDUMH20HVNET seulement) : PDUMH20HVNET comprend un adaptateur de fiche qui ajoute une fiche NEMA L6-20P au cordon d'alimentation. N'utilisez cet adaptateur que si vous
  • Страница 29 из 37
    Installation suite 2-4 Connexion du cordon d'alimentation de l'équipement : Insérez les connecteurs IEC 60320 C14 A de l'adaptateur dans les prises de sortie IEC 60320 C13 B de l'unité de distribution (PDUMH15HVNET et PDUMH20HVNET). Insérer les cordons d'alimentation dans les prises de sortie NEMA
  • Страница 30 из 37
    Installation suite Mise en réseau de l'unité de distribution Note : L'adresse MAC de la PDU (une chaîne de 12 chiffres de ce format : 000667xxxxxx) est imprimée sur l'étiquette fixée à l'enceinte de la PDU. Cette adresse est aussi imprimée sur l'étiquette fixée sur la carte réseau interne. Si votre
  • Страница 31 из 37
    Installation suite Mise en réseau de l'unité de distribution 5-3 Connecter la PDU à l'ordinateur : Utiliser le câble série mini-DIN à DB9 (pièce no 73-1025) joint à la PDU pour connecter celle-ci à l'ordinateur. Le connecteur circulaire A à l'une des extrémités du câble se fixe au port série
  • Страница 32 из 37
    Installation suite Mise en réseau de l'unité de distribution suite Test de la connexion réseau 6-1 Accès à la PDU à l'aide d'un navigateur Web : Une fois une adresse IP affectée à la carte, essayer d'y accéder à l'aide d'un navigateur Web qui supporte les cadres, les masques de saisie et Java™.
  • Страница 33 из 37
    Caractéristiques Entrée de courant alternatif (modèle PDUMH15HVNET) : L'entrée IEC 60320 C14 se connecte à un cordon d'alimentation en courant alternatif détachable. Entrée de courant alternatif (modèle PDUMH20HVNET) : L'entrée IEC 60320 C20 se connecte à un cordon d'alimentation en courant
  • Страница 34 из 37
    Caractéristiques suite Prises de courant de sortie NEMA 5-15R (PDUMH15NET) : durant le fonctionnement normal, les prises de courant de sortie distribue du courant CA à l’équipement connecté. Lorsqu’une prise est sous tension, la DEL lui étant associée s’allume. Prises de courant de sortie NEMA
  • Страница 35 из 37
    Caractéristiques suite Port PS/2 : Utiliser ce port pour connecter un capteur environnemental ENVIROSENSE de Tripp Lite de façon à fournir une surveillance à distance de la température et de l'humidité et une interface à contact sec pour commander et surveiller les dispositifs d'alarme, de sécurité
  • Страница 36 из 37
    Assistance technique Website: www.tripplite.com/support Courriel: techsupport@tripplite.com Garantie GARANTIE LIMITÉE Le vendeur garantit que ce produit, s'il est utilisé selon toutes les directives applicables, est exempt de défauts d'origine de matériel et de main-d'œuvre pour une période de 2
  • Страница 37 из 37