10
3. Installation
3.2-2
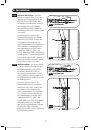
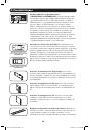
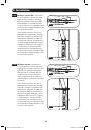
NEMA Adapter Connection
(Optional - PDUMNH20HV Only):
The PDUMNH20HV includes a plug
adapter that adds a NEMA L6-20P
plug to the input power cord. Use
this adapter only if you will be
connecting the PDUMNH20HV to a
NEMA L6-20R outlet. Insert the
IEC 60320 C19 connector
A
of
the adapter into the IEC 60320
C20 connector
B
of the input
power cord. Secure the connection
with the retention bracket
C
by
using the included bolts to fasten
the two halves of the bracket
around the connection as shown.
Caution: To avoid the risk of
electric shock, ensure that the
Neutral (L2) conductor has been
identified before connecting the
PDU.
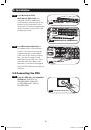
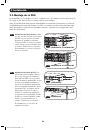
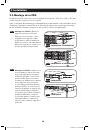
3.2-3
Input Power Cord Connection
(PDUMNH20HV Only):
Insert the
IEC 60320 C19 connector
A
of
the input power cord into the IEC
60320 C20 inlet
B
of the PDU.
Connect the other end of the input
power cord
C
to a compatible
source of AC power, such as a UPS
system, PDU or utility outlet. The
PDU should be provided with
over-current protection.
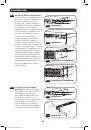
PDUMNH20HV should be provided
with a maximum 20A branch-rated
over-current protection device.
Note: The AC power source should
not share a circuit with a heavy
electrical load (such as an air
conditioner or refrigerator).
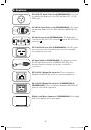
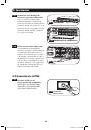
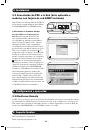
3.2-4
Connect Equipment to PDU:
Do
not exceed the load rating of the
PDU. The total electrical current
used by the PDU will be displayed
on the digital meter in amperes.
Refer to: 2. Features, Digital Load
Meter (Ammeter) for details.
3.2-4
PDUMNH20HV
3.2-4
PDUMNH30HV
3.2-2
A
B
C
PDUMNH20HV
3.2-3
88
C
A
B
3.2-2 C
201110150-93-3050.indb 10
11/9/2011 11:13:13 AM