1
Owner’s Manual
Monitored Rack PDU
Switched Rack PDU
Zero U (Vertical) Format
AGPD7897 (208/230V 16 Amp Models) • AGPD7898 (208V 24 Amp Models)
AG00CA (200-240V 32A models)
1111 W. 35th Street, Chicago, IL 60609 USA • www.tripplite.com/support
Copyright © 2013 Tripp Lite. All rights reserved.
Important Safety Instructions
2
Monitored Rack PDU Features
2
Switched Rack PDU Features
3
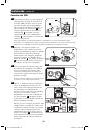
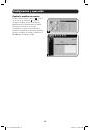
Installation
3
Features 8
Configuration and Operation
10
Warranty and Warranty Registration
11
Español 13
Français 25
Русский
37
Warranty
Registration
Register online today for a
chance to win a FREE T
ripp Lite
product! www
.tripplite.com/warranty
13-11-194-933093.indb 1
12/5/2013 5:21:52 PM