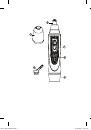
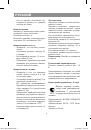
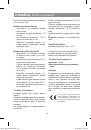
Инструкция для VITEK VT-2515 W

(скачивание инструкции бесплатно)
Формат файла: PDF
Доступность: Бесплатно как и все руководства на сайте. Без регистрации и SMS.
Дополнительно: Чтение инструкции онлайн
background image

3

 ENGLISH

Trimmer

Description

1.  Protective cap
2.  Attachment for cutting hair in nose 

or ears

3.  ON/OFF switch
4.  Body
5.  Battery compartment lid
6.  Cleaning brush

Safety measures

Read  these  instructions  carefully 
before using the unit and keep these 
instructions for future reference.

• 

Use the unit for the intended pur-
poses  only  as  described  in  the 
instruction manual. 

• 

Do  not  use  the  unit  if  the  attach-
ment is broken or damaged, it may 
cause injuries.

• 

This  unit  is  intended  only  for  cut-
ting hair in nose and ears; do not 
use it for other purposes.

• 

Use  only  the  accessories  sup-
plied.

• 

Do  not  leave  the  operating  unit 
unattended.

• 

Always  unplug  the  unit  if  you  do 
not  use  it  and  if  you  are  going  to 
remove the attachment for clean-
ing.

• 

Do not immerse the unit into water 
or any other liquids.

• 

For children safety reasons do not 
leave  polyethylene  bags,  used  as  
packaging, unattended. 

• 

Attention!

  Do  not  allow  children 

to  play  with  polyethylene  bags  or 
packaging  film. 

Danger  of  suf-

focation!

• 

Do  not  allow  children  to  use  the 
unit as a toy. Close supervision is 
necessary  when  children  or  dis-
abled  persons  are  near  the  oper-
ating unit.

• 

This unit is not intended for usage 
by  children  or  disabled  persons 
unless  they  are  given  all  the  nec-
essary 

and 

understandable 

instructions  by  a  person  who  is 
responsible  for  their  safety  on 
safety  measures  and  information 
about danger that can be caused 
by improper usage of the unit.

• 

Check  the  batteries.  Remove  the 
batteries  from  the  battery  com-
partment  if  you  are  not  going  to 
use the unit for a long time.

THE  UNIT  IS  INTENDED  FOR 
HOUSEHOLD USAGE ONLY

Battery installation

–  Remove the battery compartment 

lid rotating it counterclockwise.

–  Install  AA  battery,  following  the 

polarity. 

–  Match  the  mark  on  the  battery 

compartment lid (5) with the mark 
on  the  unit  body  (4);  turn  the  lid 
clockwise till bumping.

Usage

Attachment (2) is used for cutting hair 
in the nose or ears
Remove the protection cap (1).
Switch the trimmer on by setting the 
switch (3) to the “ON” position.

Cutting hair in the nose

–  Make  sure  that  the  nasal  cavity 

is clean.

VT-2515_IM_105x148.indd   3

22.02.2013   12:39:51

1
2
3
4
5
6
7
8
9
10
11
12
13
14
15
16
17
18
19
20
Оглавление инструкции
  • Страница 1 из 21
    VT-2515 W Trimmer Триммер 3 5 7 9 11 13 15 17 1 VT-2515_IM_105x148.indd 1 22.02.2013 12:39:50
  • Страница 2 из 21
    T-2515_IM_105x148.indd 2 2 1 3 4 6 5 22.02.2013 12:39:50
  • Страница 3 из 21
    ENGLISH • Trimmer Description 1. Protective cap 2. Attachment for cutting hair in nose or ears 3. ON/OFF switch 4. Body 5. Battery compartment lid 6. Cleaning brush • Safety measures Read these instructions carefully before using the unit and keep these instructions for future reference. • Use the
  • Страница 4 из 21
    ENGLISH – – – Carefully insert the attachment (2) into the nostril. Do not insert the attachment (2) into the nostril deeper than 0.5 cm. Make circular movements with the unit to remove undesirable hair in the nostrils. Use the brush (6) to clean the attachment (2). For better cleaning periodically
  • Страница 5 из 21
    русский ТРИММЕР • Описание 1. Защитный колпачок 2. Насадка для стрижки волос в носу или в ушах 3. Выключатель ON/OFF 4. Корпус 5. Крышка батарейного отсека 6. Щеточка для чистки • Меры безопасности Перед использованием устройства внимательно прочитайте инструкцию по эксплуатации и сохраните ее для
  • Страница 6 из 21
    русский кой на корпусе устройства (4), поверните крышку по часовой стрелке до упора. Чистка и уход Извлеките элемент питания из батарейного отсека. Протрите внешнюю поверхность корпуса устройства мягкой, слегка влажной тканью, избегайте попадания воды внутрь корпуса. Не используйте абразивные
  • Страница 7 из 21
    Қазақша ТРИММЕР Сипаттамасы 1. Қорғаныс қалпақша 2. Мұрын немесе құлақ қуысындағы шаштарды қиюға арналған қондырма 3. ON/OFF сөндіргіші 4. Корпусы 5. Батареялық бөлік қақпағы 6. Тазалауға арналған қылшақ • • Қауіпсіздік шаралары Құрылғыны пайдалану алдында пайдалану бойынша нұсқаулықты зейін қойып
  • Страница 8 из 21
    Қазақша Пайдаланылуы Қондырма (2) мұрын немесе құлақ қуысындағы шаштарды жою үшін пайдаланылады. Қалпақшаны (1) шешіңіз. Ауыстырғышты (3) “ON” күйіне белгілеп, триммерді іске қосыңыз. Құрылғы корпусының сыртқы бетін жұмсақ, сәл дымқыл матамен сүртіңіз, корпусты ішіне судың тиюне жол бермеңіз.
  • Страница 9 из 21
    romÂnĂ/ Moldovenească TRIMMER Descriere 1. Căpăcel de protecţie 2. Accesoriu pentru tunderea părului din nas şi urechi 3. Întrerupător ON/OFF 4. Carcasă 5. Capac locaş pentru baterii 6. Periuţă pentru curăţare • • Măsuri de siguranţă Citiţi cu atenţie instrucţiunea de exploatare înainte de
  • Страница 10 из 21
    romÂnĂ/ Moldovenească Porniţi trimmer-ul mutând întrerupătorul (3) în poziţia “ON”. Pentru curăţarea accesoriului (2) utilizaţi periuţa (6). Pentru o curăţare mai minuţioasă scoateţi accesoriul (2) şi ştergeţi-l cu spirt. Instalaţi accesoriul (2) în poziţia iniţială. Instalaţi bateria în locaşul
  • Страница 11 из 21
    Český Zastřihovač chloupků • Popis 1. Chránítko 2. Nástavec pro zastřihávání chloupků v nose a v uších 3. Vypínač ON/OFF 4. Plášť 5. Víko bateriového prostoru 6. Kartáček na čištění • Bezpečnostní pokyny Před použitím přístroje si pozorně přečtěte tuto příručku a uschovejte ji pro pozdější použití.
  • Страница 12 из 21
    Český Zapněte zastřihovač převedením vypínače (3) do polohy ON. Utřete vnější povrch pláště přístroje měkkým lehce navlhčeným hadříkem, dbejte aby se voda nedostala dovnitř. Nepoužívejte abrazivní čisticí prostředky ani rozpouštědla. K čištění nástavce (2) použijte kartáček (6). Pro důkladnější
  • Страница 13 из 21
    УКРАЇНЬСКа ТРИМЕР • Опис 1. Захисний ковпачок 2. Насадка для стриження волосся в носі і вухах 3. Вимикач ON/OFF 4. Корпус 5. Кришка батарейного відсіку 6. Щіточка для чищення • Заходи безпеки Перед експлуатацією уважно прочитайте інструкцію з експлуатації і збережіть її для використання як
  • Страница 14 из 21
    УКРАЇНЬСКа Використання Насадка (2) використовується для усунення волосся в носі і вухах. Зніміть ковпачок (1). Увімкніть тример, встановивши перемикач (3) в положення “ON”. тканиною, не допускайте попадання води всередину корпусу. Не використовуйте абразивні чистячи засоби та розчинники. Для
  • Страница 15 из 21
    Беларуская ТРЫМЕР • Апісанне 1. Ахоўны каўпачок 2. Насадка для стрыжкі валасоў у носе ці ў вушах 3. Выключальнік ON/OFF 4. Корпус 5. Вечка батарэйнага адсека 6. Шчотачка для чысткі • Меры бяспекі Перад выкарыстаннем прылады ўважліва прачытайце інструкцыю па эксплуатацыі і захавайце яе для
  • Страница 16 из 21
    Беларуская вечка па гадзіннікавай стрэлцы да ўпору. Пратрыце вонкавую паверхню корпуса прылады мяккай, злёгку вільготнай тканінай, пазбягайце траплення вады ўнутр корпуса. Не выкарыстоўвайце абразіўныя мыйныя сродкі і растваральнікі. Для чысткі насадкі (2) карыстайцеся шчотачкай (6). Для больш
  • Страница 17 из 21
    O’zbekcha TRIMMЕR • Аsоsiy qismlаri 1. Bеrkitаdigаn qаlpоg’i 2. Qulоq vа burundаgi tukni оlаdigаn birikmа 3. Ishlаtаdigаn tugmаsi ON/OFF 4. Kоrpusi 5. Bаtаrеya sоlinаdigаn bo’lmа qоpqоg’i 6. Tоzаlаydigаn cho’tkа • Ehtiyot chоrаlаri Jihоzni ishlаtishdаn оldin qo’llаnmаsini diqqаt bilаn o’qib
  • Страница 18 из 21
    O’zbekcha Burundаgi tukni tоzаlаsh – Tоzаlаshdаn оldin burun tоzа bo’lishi kеrаk. – Ehtiyot bo’lib birikmаni (2) burun tеshigigа kiriting. – Birikmаni (2) burun tеshigigа 0,5 cm dаn ko’p kiritmаng. – Burun tеshigidаgi kеrаksiz tukni оlib tаshlаsh uchun jihоzni аylаntirib ishlаting. Birikmаsini (2)
  • Страница 19 из 21
    VT-2515_IM_105x148.indd 19 22.02.2013 12:39:52
  • Страница 20 из 21
    gb A production date of the item is indicated in the serial number on the technical data plate. A serial number is an eleven-unit number, with the first four figures indicating the production date. For example, serial number 0606ххххххх means that the item was manufactured in June (the sixth month)
  • Страница 21 из 21