ENGLISH
4
openings of the unit; it can lead to fire or
electric shock. If it happens unplug the unit
and apply to the service centre.
Do not use high volume while using the ear-
phones. Doctors do not recommend con-
tinuous using of earphones.
Conditions Requiring Service
Unplug this unit from the wall outlet and re-
fer servicing to qualified service personnel
under the following conditions:
a) When the power supply cord or plug is
damaged.
b) There are foreign objects inside the unit.
c) If the unit has been exposed to rain or
water.
d) If the unit does not operate normally by
following the operating instructions.
e) If the unit has been dropped or its cabi-
net has been damaged.
f) When the unit exhibits a distinct change
in performance-this indicates a need for
service.
Cleaning
Unplug this unit from the wall outlet before
cleaning. Use a damp cloth for cleaning.
Do not use liquid cleaners or aerosol clean-
ers.
Cleaning discs
Do not use cracked or deformed discs, it
can damage a unit.
Hold the disc by the edges. Do not touch
the surface. Dust, scratches or fingerprints
on the surface may lead to a failure of the
unit.
Protect the disc from direct sunlight; keep
them away from heat sources, high tem-
perature and moisture.
After usage, put the discs in the case for
storage.
Wipe periodically the surface of the discs
with a soft cloth from the center to the edg-
es.
Before operation
Unpack the unit. Press the OPEN /CLOSE
button and remove the protective insert be-
fore starting to operate.
Remove all advertising labels/stickers,
which prevent the operation of the unit, from
the upper and front part of the recorder.
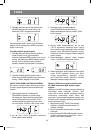
DESCRIPTION
1 – REP/RAN button
2 – POWER button
3 – – VOL+ control
4 – BASS control
5 – operating modes (MP3/CD, AUX, RA-
DIO) switch
6 – AUX IN jack for connecting of the exter-
nal device
(Set the operating modes switch to the
AUX position, connect the MP3 play-
er.)
7 – PHONES jack
8 – PROG button
9 – disc slot
10 - OPEN/CLOSE button
11 - BACK/ button
(press and hold the
button for more than 1,5 seconds to
back wind)
12 - FM –antenna
13 –band switch (AM, FM, FM. ST)
14 –PLAY/PAUSE/USB (
►
) button (press
and hold the button for more than 1,5
seconds to switch between CD/USB)
15 - NEXT/
button (press and hold the
button for more than 1,5 seconds to
fast forward)
16 – TUNING knob
17 - STOP/
button
18 – speakers
19 – LCD-display (reflects FM/AM frequen-
cy and the current state of the unit)
20 - USB-jack
21 – BASS indicator
22 - FM ST indicator
23 – battery compartment lid
24 – power supply jack
3450IM.indd 4
3450IM.indd 4
11.12.2009 11:27:48
11.12.2009 11:27:48