ENGLISH
5
•
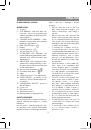
To connect the unit to the mains, insert
the plug of the power cord (16) into the
mains socket.
•
Power surges or electrostatic dis-
charge may cause malfunction in the
unit operation. In such a case unplug
the unit and remove the battery. After
5 minutes install the battery back to
its place (see above) and switch the
device on.
Attention!
Battery leakage can cause injuries or unit
damage. To avoid the unit damage, follow
the instructions given below:
•
insert the battery following the polarity
(«plus» upward);
•
remove the battery if you are not plan-
ning to use the unit for a long time;
•
do not dismantle the battery, do not
subject it to high temperatures;
•
replace the batteries in time.
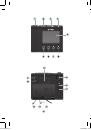
CURRENT TIME MODE
Date and time setting
–
Insert the plug of the power cord (16)
into the mains socket.
–
Press and hold the «SET/MEM/M+»
button (2) for 2 seconds, the year dig-
its («YR») will be flashing on the display.
–
Use the buttons (9) «
7
» and (8) «
8
»
to set the year.
–
Press the «SET/MEM/M+» button (2),
the month digits («М») will be flashing.
–
Use the buttons (9) «
7
» and (8) «
8
»
to set the month.
–
Press the «SET/MEM/M+» button (2),
the day digits («D») will be flashing.
–
Use the buttons (9) «
7
» and (8) «
8
»
to set the day.
Note: The symbol of the day of week
which corresponds to the set date will
be shown in the upper part of the dis-
play (5): «MON» — Monday, «TUE» —
Tuesday, «WED»- Wednesday, «THU» —
Thursday, «FRI» — Friday, «SAT» —
Saturday, «SUN» — Sunday.
•
Press the «SET/MEM/M+» button (2),
the time format symbol will be flashing:
24 hours («24 H») or 12 hours («12 H»).
•
Use the buttons (9) «
7
» and (8) «
8
»
to select the time format (12 hours or
24 hours).
•
Press the «SET/MEM/M+» button (2),
the hour digits will be flashing on the
display. Use the buttons (9) «
7
» and
(8) «
8
» to set the necessary hour.
Note: To set the afternoon time in the
12 hour format («12 H»), press the but-
tons (9) «
7
» and (8) «
8
» consequently
until the «PM» indicator appears.
–
Press the «SET/MEM/M+» button (2),
the minute digits will be flashing on the
display. Use the buttons (9) «
7
» and
(8) «
8
» to set time in minutes.
–
Press the «SET/MEM/M+» button (2)
to save the settings.
Note: If the buttons (9) «
7
» and (8)
«
8
» are not pressed within 30 seconds
during the setup process, the unit will
be switched to the current time mode.
Date view
–
To view the date (day and month)
press the «M/D» button (9) while in the
current time mode.
–
To view the year, press the «YEAR» but-
ton (8) while in the current time mode.
Setting the clock to winter/summer time
–
To switch the clock to summer time
(+1 hour), press the «
7
DST» button
(9) while in the current time mode and
hold it down for 2 seconds, the symbol
«
» will appear on the display.
–
To return to winter time, press and hold
the «
7
DST» button (9) for 2 seconds,
the symbol «
» will go out.
VT-6606.indd 5
29.05.2014 9:11:29