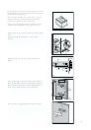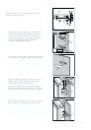
FRIDGE-FREEZER
ïéãéÑàãúçàä-
åéêéáàãúçàä
ZBB 6286
INSTRUCTION BOOKLET
àçëíêìäñàü èé ìëíÄçéÇäÖ à
ùäëèãìÄíÄñàà èêàÅéêÄ
2223 208-4
7
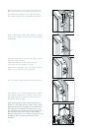
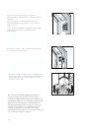
FRIDGE-FREEZER
ïéãéÑàãúçàä-
åéêéáàãúçàä
ZBB 6286
INSTRUCTION BOOKLET
àçëíêìäñàü èé ìëíÄçéÇäÖ à
ùäëèãìÄíÄñàà èêàÅéêÄ
2223 208-4
7