5
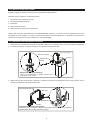
4. Заполните резервуар жидкостью ANTARI SL-5(A). Любой другой вид жидкости может повредить устройство. После
заполнения резервуара установите крышку на место.
5. Подключите шнур питания в заземленную розетку и включите питание генератора расположенным на задней па-
нели выключателем.
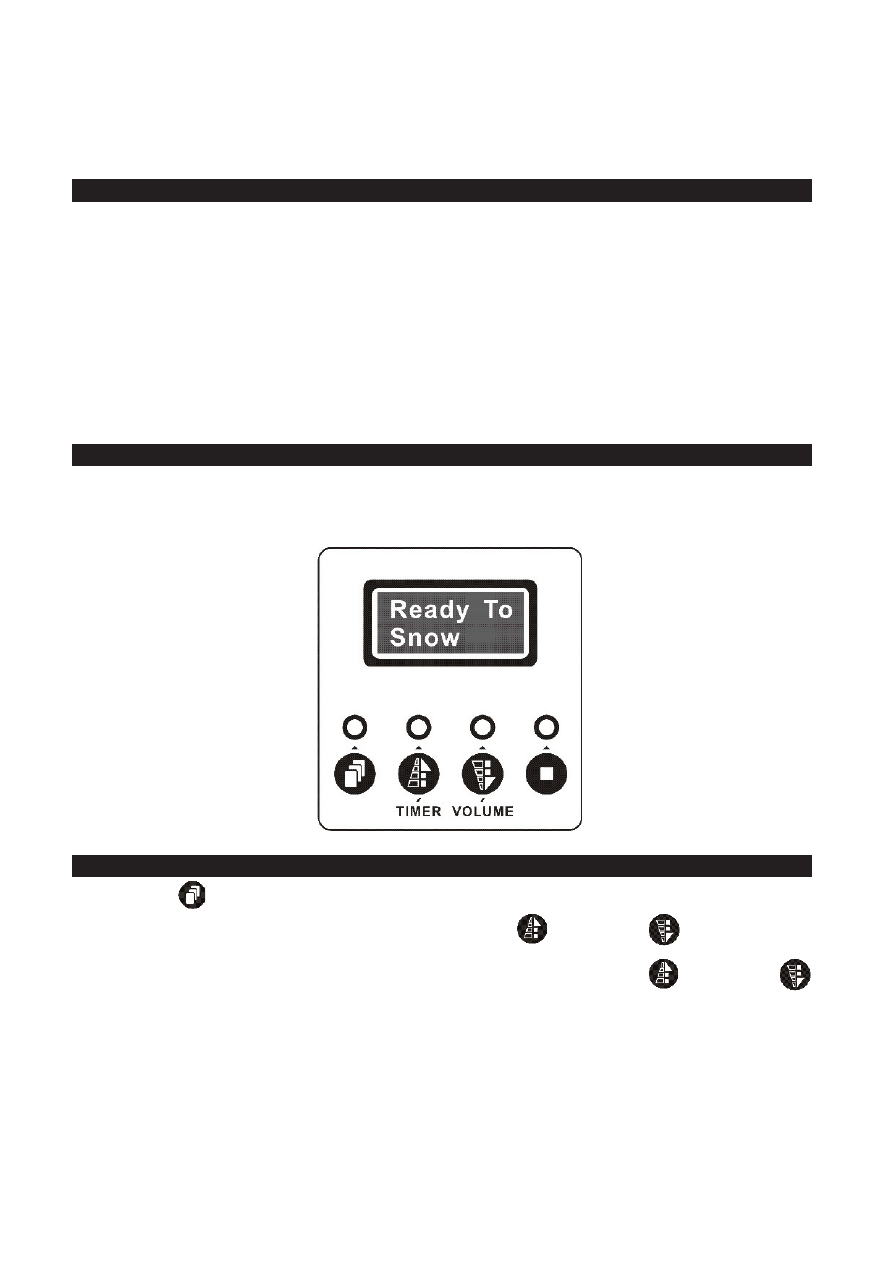
РЕГиСТРАЦия пЕРЕдАТчикА
После включения питания на экране попеременно будут отображаться сообщения “Antari SW-250” и “Wireless Setup...”.
Для регистрации нажмите кнопку “A” на передатчике при отображении на экране сообщения “Wireless Setup”. Подо-
ждите около 15 секунд для завершения регистрации передатчика. По завершении процедуры регистрации экран
начнет мигать и генератор издаст звуковой сигнал. Через 15 секунд на экране будет отображено сообщение “Wireless
Setup.OK”. Вы можете зарегистрировать до 5 передатчиков на генераторе SW-250. Входящий в комплект передатчик
был зарегистрирован на генераторе до его поставки, поэтому может использоваться без предварительной настройки.
Таким образом, регистрация необходима только при использовании нового передатчика W-1.
примечание:
Регистрация всех передатчиков должна выполняться в течение 15 секунд, затем питание генератора
SW-250 должно быть снова включено для последующей регистрации.
ОпЕРАЦии НА экРАНЕ
По завершении регистрации передатчика(ов) на экране будет отображено сообщение “Ready To Snow”. Теперь гене-
ратор готов к использованию.
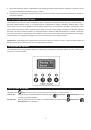
НАСТРОЙкА ФУНкЦиЙ
Нажмите кнопку
5
4. Fill with ANTARI SL-5(A) snow fluid. Any other types of fluid can damage the unit. When filled, place cap
back on liquid tank.
5. Plug the power cable into a grounded electrical outlet and switch the power switch at the rear of the
machine for powering on.
TRANSMITTER REGISTRATION
After powering on, the LCD screen will show sequentially “Antari SW-250” and then “Wireless Setup…”. Press
button “A” on the transmitter(s) to register when see “Wireless Setup…” is on. There are totally 15 seconds for
finishing the registration of the transmitter(s). Once registration is completed, the LCD screen will blink and
beep. The LCD screen will finally show “Wireless Setup.OK” once the 15 seconds ends. Up to 5 transmitters
are allowed to be registered with one SW-250. The included transmitter has been registered with the machine
before shipment and can be directly operated without any start-up setting. Therefore, the registration is only
needed before use of new W-1.
Note:
All transmitter(s) registration must be completed within 15 seconds or SW-250 has to be power on
again for next registration.
LCD CONTROL OPERATION
After transmitter(s) registration time ends, LCD screen will then show “Ready To Snow”. Now the machine is
ready for operating.
FUNCTIONS SETTING
Press
Menu
button for setting different functions per sequence as below.
Interval Set
To set the interval time under timer mode by pressing
Up/Timer
and
Down/Volume
buttons (20 to 2000 seconds).
Duration Set
To set the duration time under timer mode by pressing
U
p/Timer
and
Menu
для выполнения настроек различных функций, как описано далее.
Interval Set
Для настройки интервала времени нажатием кнопок
6
Down/Volume
buttons (10 to 200 seconds).
Timer Out
To set the output volume under timer mode by pressing
Up/Timer
and
Down/Volume
buttons (1 to 100 %).
Volume Out
To set the output volume under continuous mode by pressing
Up/Timer
and
Down/Volume
buttons (1 to 100 %).
DMX512 Add
. To set the DMX channel under DMX control mode by pressing
Up/Timer
and
Down/Volume
buttons (1 to 512 channels).
Wireless ON
To activate/terminate the wireless control system by pressing
Up/Timer
and
Down/Volume
buttons (ON/OFF). When wireless control system is activated, letter “W” will
be showed under main screen display “Ready To Snow”. Once the wireless control system is
terminated then the letter “W” will disappear accordingly.
Quick Start
To activate / terminate quick start function by pressing
Up/Timer
and
Down/Volume
buttons (ON/OFF). Once Quick Start function is on, the output job under timer
or continuous output (LCD/W-1/DMX) mode terminated by power off will be directly resumed
after power on again. When the unit is power off not under output mode then the LCD screen
will resume to “Ready To Snow” main screen display directly.
OUTPUT UNDER TIMER MODE
Press
Up/Timer
button to execute the interval/duration timing set and press
Stop
to stop.
OUTPUT UNDER CONTINUOUS OUTPUT MODE
Press
Down/Volume
button to output continuously until
Stop
button is pressed.
AIR VOLUME SETTING
There’s a small button “
AIR VOLUME
” located at rear of the machine used for adjusting the fan output volume.
In general, when the fan output is increased the snow flakes produced are smaller. In contrast, when the fan
Вверх/Timer
и
6
Down/Volume
buttons (10 to 200 seconds).
Timer Out
To set the output volume under timer mode by pressing
Up/Timer
and
Down/Volume
buttons (1 to 100 %).
Volume Out
To set the output volume under continuous mode by pressing
Up/Timer
and
Down/Volume
buttons (1 to 100 %).
DMX512 Add
. To set the DMX channel under DMX control mode by pressing
Up/Timer
and
Down/Volume
buttons (1 to 512 channels).
Wireless ON
To activate/terminate the wireless control system by pressing
Up/Timer
and
Down/Volume
buttons (ON/OFF). When wireless control system is activated, letter “W” will
be showed under main screen display “Ready To Snow”. Once the wireless control system is
terminated then the letter “W” will disappear accordingly.
Quick Start
To activate / terminate quick start function by pressing
Up/Timer
and
Down/Volume
buttons (ON/OFF). Once Quick Start function is on, the output job under timer
or continuous output (LCD/W-1/DMX) mode terminated by power off will be directly resumed
after power on again. When the unit is power off not under output mode then the LCD screen
will resume to “Ready To Snow” main screen display directly.
OUTPUT UNDER TIMER MODE
Press
Up/Timer
button to execute the interval/duration timing set and press
Stop
to stop.
OUTPUT UNDER CONTINUOUS OUTPUT MODE
Press
Down/Volume
button to output continuously until
Stop
button is pressed.
AIR VOLUME SETTING
There’s a small button “
AIR VOLUME
” located at rear of the machine used for adjusting the fan output volume.
In general, when the fan output is increased the snow flakes produced are smaller. In contrast, when the fan
Вниз/Volume
(от 20
до 2000 с) в режиме таймера.
Duration Set
Для настройки длительности работы в режиме таймера нажатием кнопок
6
Down/Volume
buttons (10 to 200 seconds).
Timer Out
To set the output volume under timer mode by pressing
Up/Timer
and
Down/Volume
buttons (1 to 100 %).
Volume Out
To set the output volume under continuous mode by pressing
Up/Timer
and
Down/Volume
buttons (1 to 100 %).
DMX512 Add
. To set the DMX channel under DMX control mode by pressing
Up/Timer
and
Down/Volume
buttons (1 to 512 channels).
Wireless ON
To activate/terminate the wireless control system by pressing
Up/Timer
and
Down/Volume
buttons (ON/OFF). When wireless control system is activated, letter “W” will
be showed under main screen display “Ready To Snow”. Once the wireless control system is
terminated then the letter “W” will disappear accordingly.
Quick Start
To activate / terminate quick start function by pressing
Up/Timer
and
Down/Volume
buttons (ON/OFF). Once Quick Start function is on, the output job under timer
or continuous output (LCD/W-1/DMX) mode terminated by power off will be directly resumed
after power on again. When the unit is power off not under output mode then the LCD screen
will resume to “Ready To Snow” main screen display directly.
OUTPUT UNDER TIMER MODE
Press
Up/Timer
button to execute the interval/duration timing set and press
Stop
to stop.
OUTPUT UNDER CONTINUOUS OUTPUT MODE
Press
Down/Volume
button to output continuously until
Stop
button is pressed.
AIR VOLUME SETTING
There’s a small button “
AIR VOLUME
” located at rear of the machine used for adjusting the fan output volume.
In general, when the fan output is increased the snow flakes produced are smaller. In contrast, when the fan
Вверх/Timer
и
6
Down/Volume
buttons (10 to 200 seconds).
Timer Out
To set the output volume under timer mode by pressing
Up/Timer
and
Down/Volume
buttons (1 to 100 %).
Volume Out
To set the output volume under continuous mode by pressing
Up/Timer
and
Down/Volume
buttons (1 to 100 %).
DMX512 Add
. To set the DMX channel under DMX control mode by pressing
Up/Timer
and
Down/Volume
buttons (1 to 512 channels).
Wireless ON
To activate/terminate the wireless control system by pressing
Up/Timer
and
Down/Volume
buttons (ON/OFF). When wireless control system is activated, letter “W” will
be showed under main screen display “Ready To Snow”. Once the wireless control system is
terminated then the letter “W” will disappear accordingly.
Quick Start
To activate / terminate quick start function by pressing
Up/Timer
and
Down/Volume
buttons (ON/OFF). Once Quick Start function is on, the output job under timer
or continuous output (LCD/W-1/DMX) mode terminated by power off will be directly resumed
after power on again. When the unit is power off not under output mode then the LCD screen
will resume to “Ready To Snow” main screen display directly.
OUTPUT UNDER TIMER MODE
Press
Up/Timer
button to execute the interval/duration timing set and press
Stop
to stop.
OUTPUT UNDER CONTINUOUS OUTPUT MODE
Press
Down/Volume
button to output continuously until
Stop
button is pressed.
AIR VOLUME SETTING
There’s a small button “
AIR VOLUME
” located at rear of the machine used for adjusting the fan output volume.
In general, when the fan output is increased the snow flakes produced are smaller. In contrast, when the fan
Вниз/Volume
(от 10 до 2000 с).