Инструкция для ARISTON 7HKRC 631 T

(скачивание инструкции бесплатно)
Формат файла: PDF
Доступность: Бесплатно как и все руководства на сайте. Без регистрации и SMS.
Дополнительно: Чтение инструкции онлайн
background image

13

GB

Care and maintenance

Switching the appliance off

Disconnect your appliance from the electricity supply 
before carrying out any work on it.

Cleaning the appliance

!


 Do not use abrasive or corrosive detergents 

(for example, products in spray cans for cleaning 
barbecues and ovens), stain removers, anti-rust 
products, powder detergents or sponges with abrasive 
surfaces: these may scratch the surface beyond repair.

!


Never use steam cleaners or pressure cleaners on the 

appliance.
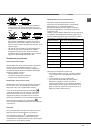
•  It is usually sufficient simply to wash the hob using 

a damp sponge and dry it with absorbent kitchen 
towel.

•  If the hob is particularly dirty, rub it with a special 

glass ceramic cleaning product, then rinse well and 
dry thoroughly.

•  To remove more stubborn dirt, use a suitable 

scraper. Remove spills as soon as possible, without 
waiting for the appliance to cool, to avoid residues 
forming crusty deposits. You can achieve excellent 
results by using a rust-proof steel wire sponge - 
specifically designed for glass ceramic surfaces - 
soaked in soapy water.

•  If any plastic or sugary substances are accidentally 

melted on the hob, remove them immediately with 
the scraper, while the surface is still hot.

•  Once it is clean, the hob may be treated with 

a special protective maintenance product: the 
invisible film left by this product protects the surface 
from drips during cooking. This maintenance task 
should be carried out while the appliance is warm 

(not hot) or cold.

•  Always remember to rinse the appliance well with 

clean water and dry it thoroughly: residues can 
become encrusted during subsequent cooking 
processes.

Stainless steel frame 

(only in models with outer frame)

Stainless steel can be marked by hard water which has 
been left on the surface for a long time, or by cleaning 
products containing phosphorus.
After cleaning, it is advisable to rinse the surface well 
and dry it thoroughly. If water is spilt on the surface, 
dry it quickly and thoroughly.

!


Some hobs have an aluminium frame which is 

similar to stainless steel. Do not use any cleaning or 
degreasing products which are not suitable for use 
with aluminium.

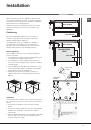
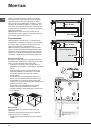
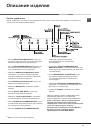
Disassembling the hob

If it is necessary to disassemble the hob:
1. Loosen the screws fixing the alignment springs on 
each side.
2. Loosen the screws holding the fixing hooks in each 
corner.
3. Take the hob out of its installation cavity.

!


Do not attempt to repair the appliance yourself. If the 

appliance breaks down, contact a Service Centre.

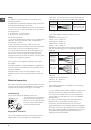
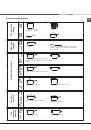
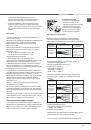
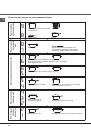
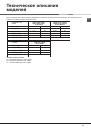
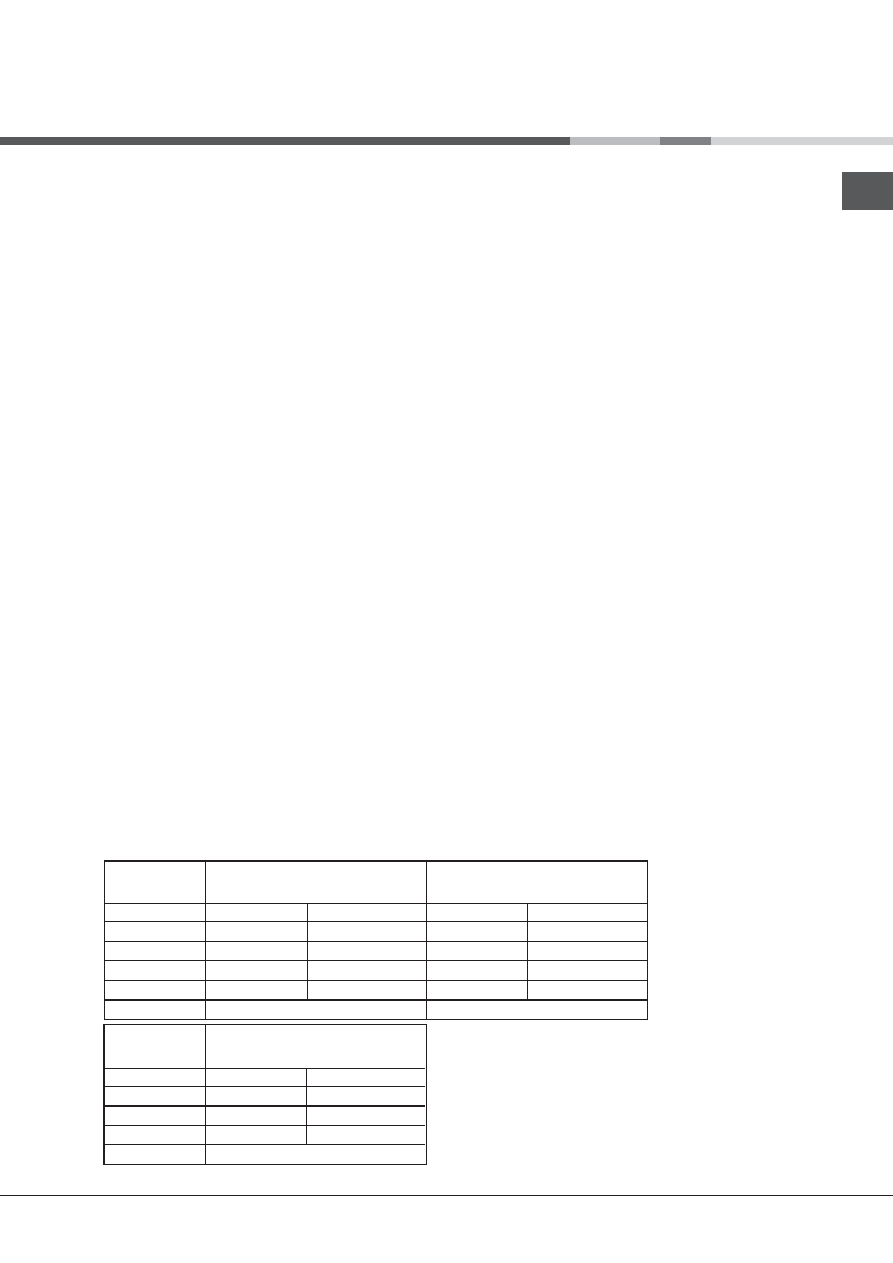
Technical description of the models

This table provides a model-by-model list of the energy absorption values, type of heating elements and diameters 
of each cooking zone.

Key:

H = single hilight 
HD = double hilight 
HT = triple hilight 

Hobs

Cooking zone

Back Left

Back Right

Front Left

Front Right

Total power

Power (W)

H 2300

H 1300

H 1200

H 1800

Diameter (mm)

210

160

145

180

6700

Power (W)

HD 2200/1000

H 1400

H 1200

H 1800

Diameter (mm)

210/140

160

145

180

6600

Hobs

Cooking zone

Back Left

Centre Left

Front Right

Total power

Power (W)

H 1400

HT 2700/1950/1050

H 1800

Diameter (mm)

160

270/210/145

180

5900

7HKRC 640 B RU/HA

7HKRC 640 X RU/HA

RC 640 IRFH S

7HKRC 641 D X RU/HA

7HKRC 641 D B RU/HA

7HKRC 631 T RU/HA

RC 631 TIRFH S

RC 641 DBRFH S

1
2
3
4
5
6
7
8
9
10
11
12
13
14
15
16
17
18
19
20
21
22
23
24
25
26
27
28
Оглавление инструкции
  • Страница 1 из 29
    Operating Instructions HOB Contents GB English,1 RS Русский, 14 WARNING, 2 Installation, 3-5 Positioning Electrical connection Description of the appliance, 6-7 Control panel Extendable cooking zones Start-up and use, 8-11 7HKRC 640 B RU/HA 7HKRC 640 X RU/HA 7HKRC 631 T RU/HA 7HKRC 641 D X RU/HA
  • Страница 2 из 29
    WARNING! GB • WARNING: The appliance and its accessible parts become hot during use. • Care should be taken to avoid touching heating elements. • Children less than 8 years of age shall be kept away unless continuously supervised. • This appliance can be used by children aged from 8 years and above
  • Страница 3 из 29
    Installation GB 5 mm ! Before operating your new appliance please read this instruction booklet carefully. It contains important information concerning the safe operation, installation and maintenance of the appliance. ! Please keep these operating instructions for future reference. Pass them on to
  • Страница 4 из 29
    Fixing GB The appliance must be installed on a perfectly level supporting surface. Any deformities caused by improper fixing could affect the features and operation of the hob. The thickness of the supporting surface should be taken into account when choosing the length of the screws for the fixing
  • Страница 5 из 29
    Voltage and mains frequency Electrical connections 400V 3-N ~ 50/60 Hz Terminal board Three-phase 400 5. Secure the power supply cable by fastening the cable clamp screw, then put the cover back on. Phase Phase Phase 3 2 1 Three-phase 400 • The socket can withstand the maximum power of the
  • Страница 6 из 29
    Description of the appliance GB Control panel The control panel described in this manual is only a representative example: it may not exactly match the panel on your appliance. TIMER* indicator light INCREASE POWER button PROGRAMME TIMER* display COOKING ZONE PROGRAMMED* indicator light POWER and
  • Страница 7 из 29
    Extendable cooking zones GB Certain models are fitted with extendable cooking zones. A list of controls is given below (these controls are only present in models with the extendable cooking zone option). Circular extendable hotplate DOUBLE HOTPLATE ON indicator light TRIPLE HOTPLATE ON indicator
  • Страница 8 из 29
    Start-up and use GB ! The glue applied on the gaskets leaves traces of grease on the glass. Before using the appliance, we recommend you remove these with a special nonabrasive cleaning product. During the first few hours of use there may be a smell of rubber which will disappear very quickly. ! A
  • Страница 9 из 29
    The lights corresponding to the other hotplates programmed will be switched on. To visualise the time remaining for the other programmed Switching off the hob GB button repeatedly: the time hotplates, press the remaining for each hotplate will be shown sequentially in a clockwise order, starting
  • Страница 10 из 29
    GB For example: the right rear hotplate is set to 5 and will switch off after 5 hours of continuous operation, while the front left hotplate is set to 2 and will switch off after 8 hours. Safety devices Pan sensor Power level Maximum operating time in hours 1 9 2 8 3 7 4 6 5 5 Residual heat
  • Страница 11 из 29
    Very low-flame cooking Low-flame cooking Medium-flame cooking High-flame cooking Very high-flame cooking Practical cooking advice ª • • ¶ ¶ § § S S ¢ ¢ £ ™ ™ ¡ GB Pressure cooking Pressure cooker Frying Grilling Boiling Crêpes Cooking on a high flame and browning (roasts, steaks, escalopes, fish
  • Страница 12 из 29
    Precautions and tips GB ! This appliance has been designed and manufactured in compliance with international safety standards. The following warnings are provided for safety reasons and must be read carefully. This appliance conforms to the following European Economic Community directives: -
  • Страница 13 из 29
    Care and maintenance Switching the appliance off Disconnect your appliance from the electricity supply before carrying out any work on it. Cleaning the appliance ! Do not use abrasive or corrosive detergents (for example, products in spray cans for cleaning barbecues and ovens), stain removers,
  • Страница 14 из 29
    Руководство по эксплуатации ВАРОЧНАЯ ПАНЕЛЬ Содержание RS GB English,1 RS Русский, 14 ВНИМАНИЕ,15 Монтаж, 16-18 Расположение Электрическое подключение Описание изделия, 19-20 Панель управления Расширяющиеся варочные зоны Включение и эксплуатация, 21-24 7HKRC 640 B RU/HA 7HKRC 640 X RU/HA 7HKRC 631
  • Страница 15 из 29
    ВНИМАНИЕ • ВНИМАНИЕ: Данное изделие и его доступные комплектующие сильно нагреваются в процессе эксплуатации. • Будьте осторожны и не касайтесь нагревательных элементов. • Не разрешайте детям младше 8 лет приближаться к изделию без контроля. • Данное изделие может быть использовано детьми старше 8
  • Страница 16 из 29
    ! Важно сохранить данное руководство для его последующих консультации. В случае продажи, передачи изделия или при переезде на новое место жительства необходимо проверить, чтобы руководство оставалось вместе с изделием, для того чтобы его новыи владелец мог ознакомиться с правилами эксплуатации и с
  • Страница 17 из 29
    • между проемом под варочную панель и расположенным снизу кухонным элементом должно быть расстояние не менее 20 мм. • Кухонные элементы, расположенные рядом с кухонной плитой, высота которых превышает уровень варочной панели, должны находиться на расстояние не менее 600 мм от края варочной панели.
  • Страница 18 из 29
    RS H05RR-F или с большим значением, надлежащего размера (сечение кабеля: 25 мм). 2. При помощи отвертки поднимите язычки крышки клеммнои колодки и откроите ее (см. изображение клеммнои колодки). 3. Отвинтите прижимнои винт провода и винты зажимов, соответствующих типу необходимого соединения, затем
  • Страница 19 из 29
    Описание изделия Панель управления RS Панель управления, описание которои приводится ниже, служит только в качестве примера: она может не в точности соответствовать Вашеи модели. • Кнопка УВЕЛИЧЕНИЕ МОЩНОСТИ служит для включения варочнои зоны и регуляции мощности нагрева (см. Включение и
  • Страница 20 из 29
    RS Расширяющиеся варочные зоны В некоторых моделях имеются расширяющиеся варочные зоны. Ниже приводится описание соответствующих управлении, имеющихся только в моделях, оснащенных этими функциями. Круглая расширяющаяся варочная зона • Кнопка ВКЛЮЧЕНИЕ ДВОИНОИ ВАРОЧНОИ ЗОНЫ служит для включения
  • Страница 21 из 29
    Включение и эксплуатация ! На стекляннои поверхности варочнои панели могут быть видны сальные следы от клея, нанесенного на прокладки Перед началом эксплуатации изделия следует удалить следы клея при помощи специального неабразивного моющего средства. В первые часы работы вы можете почувствовать
  • Страница 22 из 29
    RS блокируются, и индикатор над этои кнопкои загорается. Для разблокировки управлении (напр., для прерывания приготовления) необходимо: нажать отсчет времени варочной зоны, на которой приготовление ближе всего к завершению, с указанием ее положения соответствующим мигающим индикатором. Индикаторы
  • Страница 23 из 29
    RS Предохранительный выключатель • Использовать посуду с дном такого диаметра, чтобы полностью закрыть варочную зону для оптимального использования всего выделяемого тепла. • Проверить, чтобы дно используемои посуды было всегда совершенно сухим и чистым для идеального прилегания к варочнои зоне и
  • Страница 24 из 29
    Приготовление на малом огне Приготовление на умеренном огне Приготовление на среднем огне Приготовление на большом огне Практические советы по приготовлению блюд Приготовление на самом малом огне RS 24 ª • • ¶ ¶ § § S S ¢ ¢ £ ™ ™ ¡ Приготовление под давлением Скороварка Фритюр Бифштексы Варка Блины
  • Страница 25 из 29
    Предосторожности и рекомендации ! Изделие спроектировано и изготовлено в соответствии с международными нормативами по безопасности. Необходимо внимательно прочитать настоящие предупреждения, составленные в целях вашеи безопасности. Данное оборудование отвечает требованиям нижеуказанных Директив
  • Страница 26 из 29
    Техническое обслуживани и уход RS Отключение электропитания Перед началом какои-либо операции по обслуживанию или чистке отсоедините изделие от сети электропитания. Чистка изделия ! Не следует пользоваться абразивными или коррозивными чистящими средствами такими как спраи для чистки духовок и
  • Страница 27 из 29
    Техническое описание моделей В этих таблицах для каждои модели указываются значения поглощения электроэнергии, тип нагревательного элемента и диаметр каждои варочнои зоны. 7HKRC 640 B RU/HA 7HKRC 640 X RU/HA RC 640 IRFH S Ìîäåëè âàðî÷íûõ ïàíåëåé Âàðî÷íûå çîíû Ìîùíîñòü (Âò) Äèàìåòð (ìì) 7HKRC 641 D
  • Страница 28 из 29
    04/2012 - 195101083.00 XEROX FABRIANO RS Изделие: Электрическая рабочая поверхность Торговая марка: HOTPOINT ARISTON Торговый знак изготовителя: Изготовитель: 7HKRC 640 B RU/HA 7HKRC 640 X RU/HA 7HKRC 641 D X RU/HA 7HKRC 631 T RU/HA 7HKRC 641 D B RU/HA RC 640 IRFH S RC 631 TIRFH S RC 641 DBRFH S
  • Страница 29 из 29