Инструкция для ARISTON LDF 123147 X

(скачивание инструкции бесплатно)
Формат файла: PDF
Доступность: Бесплатно как и все руководства на сайте. Без регистрации и SMS.
Дополнительно: Чтение инструкции онлайн
background image

EN

16

Installation

Only available in selected models.

Keep this instruction manual in a safe place for

future reference. If the appliance is sold, given away or

moved, please ensure the manual is kept with the

machine, so that the new owner may benefit from the

advice contained within it.

Please read this instruction manual carefully: it

contains important information regarding the safe

installation, use and maintenance of the appliance.

If the appliance must be moved at any time, keep it in

an upright position; if absolutely necessary, it may be

tilted onto its back.

This appliance is intended to be used in household and

similar applications such as:
- staff kitchen areas in shops, offices and other working
environments;
- farm houses;
- by clients in hotels, motels and other residential type
environments;
- bed and breakfast type environments.

Positioning and levelling

1. Remove the appliance from all packaging and check

that it has not been damaged during transportation.

If it has been damaged, contact the retailer and do not

proceed any further with the installation process.
2. Check the dishwasher by placing it so that its sides or

back panel are in contact with the adjacent cabinets or

even with the wall. This appliance can also be recessed
under a single worktop

*

 (

see the Assembly instruction

sheet

).

3. Position the dishwasher on a level and sturdy floor. If

the floor is uneven, the front feet of the appliance may be

adjusted until it reaches a horizontal position. If the

appliance is levelled correctly, it will be more stable and

much less likely to move or cause vibrations and noise

while it is operating.

4. Adjust the height of the rear foot from the front of the
appliance

*

 on the central lower part of the dishwasher, turning

a hexagonal spanner (red color) with an opening of 8 mm in a
clockwise direction to increase the height or in an
anticlockwise direction to decrease the height.

Connecting the water and electricity

supplies

Connection to the water and electricity supplies

should only be performed by a qualified technician.

The dishwasher should not stand on top of the water

hoses or the electricity supply cable.

The appliance must be connected to the water

supply network using new hoses.

Do not use old hoses.
The water inlet and outlet hoses and the electricity

supply cable may be positioned towards the right or the
left in order to achieve the best possible installation.

Connecting the water inlet hose

• To a suitable cold water connection point: before

attaching the hose, run the water until it is perfectly

clear so that any impurities that may be present in the

water do not clog the appliance; after performing this

operation, screw the inlet hose tightly onto a tap with

a ¾ gas threaded connection.

• To a suitable hot water connection point: your

dishwasher may be supplied with hot water from the

mains supply (if you have a central heating system

with radiators) provided that it does not exceed a

temperature of 60°C.

Screw the hose to the tap as described for connection

to a cold water supply.

If the inlet hose is not long enough, contact a

specialist store or an authorised technician (

see

Assistance

).

The water pressure must be within the values

indicated in the Technical data table (

see adjacent

information

).

The hose should not be bent or compressed.

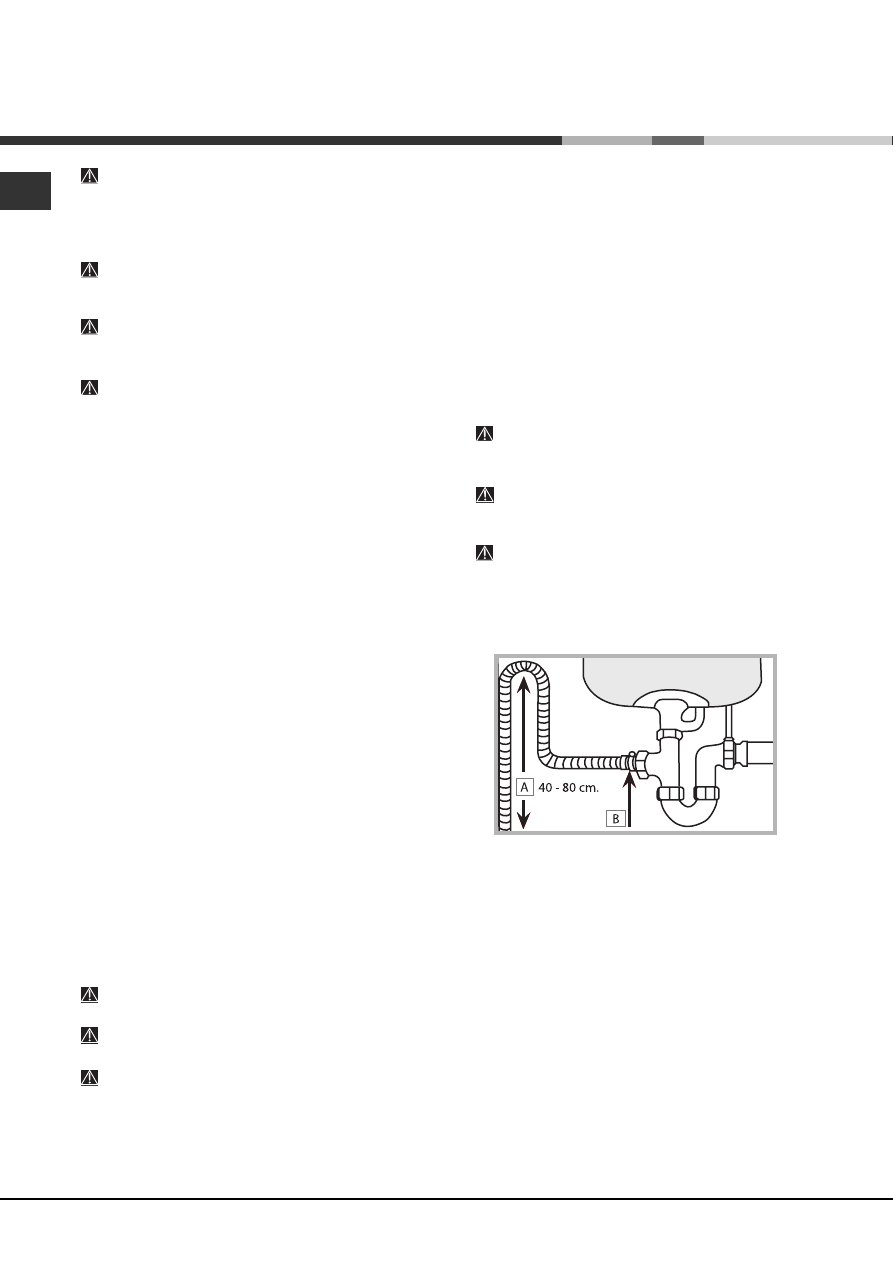
Connecting the water outlet hose

Connect the outlet hose (without bending it) to a drain

duct with a minimum diameter of 4 cm.

The outlet hose must be at a height ranging from 40 to

80 cm from the floor / surface where the dishwasher

rests (A).

Before connecting the water outlet hose to the sink
drain, remove the plastic plug (B).

1
2
3
4
5
6
7
8
9
10
11
12
13
14
15
16
17
18
19
20
21
22
23
24
25
26
27
28
Оглавление инструкции
  • Страница 1 из 29
    Руководство по эксплуатации CIS EN ПОСУДОМОЕЧНАЯ МАШИНА Содержание Монтаж, 2-3-4 Русский, 1 English,15 Расположение и нивелировка Водопроводное и электрическое подсоединение Предупреждения по первому использованию машины Технические данные Описание изделия, 5 Общий вид Панель управления Загрузка
  • Страница 2 из 29
    Монтаж CIS Важно сохранить данное руководство для его последующих консультации. В случае продажи, передачи или переезда проверьте, чтобы данное техническое руководство сопровождало изделие. Внимательно прочитайте инструкции: в них содержатся важные сведения об установке изделия, его эксплуатации и
  • Страница 3 из 29
    Защита против затопления Во избежание затопления посудомоечная машина: - оснащена системой, перекрывающей подачу воды в случае аномалии или внутренних утечек. Некоторые модели оснащены дополнительным защитным устройством New Acqua Stop*, предохраняющим от затопления даже в случае разрыва
  • Страница 4 из 29
    CIS Изделие: Посудомоечная машина Торговая марка: Торговый знак изготовителя: Модель: LDF 123147X Изготовитель: Indesit Company Страна-изготовитель: Польша - POLAND Загрузка 14 столовых наборов Размеры ширина 60 см высота 85 см глубина 60 см Номинальное значение напряжения электропитания или
  • Страница 5 из 29
    Описание изделия Общий вид CIS 1. 2. 3. 4. 5. 6. 7. 8. 9. 10. 11. 12. Верхняя корзина Верхний ороситель Откидные полки Регулятор высоты корзины Нижняя корзина Нижний ороситель Корзинка для столовых приборов Фильтр мойки Бачок соли Дозаторы моечного средства и дозатор ополаскивателя Паспортная
  • Страница 6 из 29
    Загрузка корзин CIS Перед загрузкой корзин удалите с посуды остатки пищи, вылейте оставшееся содержимое из стаканов и чашек. Загрузив посуду, проверьте, чтобы лопасти оросителей могли свободно вращаться. Наклон А Наклон В Наклон С Нижняя корзина В нижнюю корзину можно загружать кастрюли, крышки,
  • Страница 7 из 29
    Включение и эксплуатация Первое включение Выбрать язык Нажмите кнопку ВКЛ./ВЫКЛ., включится короткий звуковой сигнал, и на дисплее появится заданный язык. Используйте кнопку ОТЛОЖЕННЫЙ ЗАПУСК для просмотра перечня языков вперед, или кнопку ПОЛОВИНА ЗАГРУЗКИ для просмотра перечня назад, вплоть до
  • Страница 8 из 29
    CIS сигнала, и индикатор функции погаснет, в то время как останется включенной последняя выбранная функция. Для отмены ошибочно выбранной функции вновь нажмите соответствующую кнопку. Половина загрузки в верхней или нижней корзине Если у Вас мало грязной посуды, можно выбрать режим половина
  • Страница 9 из 29
    Программы Описание ДОПОЛНИТЕЛЬНЫХ ФУНКЦИЙ смотрите в таблице Дополнительных функций на странице разделов Запуск и эксплуатация. Количество и тип программ и дополнительных функций варьирует в зависимости от модели посудомоечной машины. Рекомендации по выбору программы Стиральное вещество (А) =
  • Страница 10 из 29
    Ополаскиватель и регенерирующая соль CIS Используйте только специальные средства для посудомоечных машин. Не используйте поваренную или промышленную соль и моющие средства для ручного мытья посуды. Следуйте инструкциям, приведенным на упаковке моющего средства. Если вы используете
  • Страница 11 из 29
    Техническое обслуживание и уход Отключение воды и электрического тока • Перекрывайте водопроводный кран после каждой мойки во избежание опасности утечек. • Выньте штепсельную вилку машины из электророзетки перед началом чистки и технического обслуживания. Чистка посудомоечной машины • Для чистки
  • Страница 12 из 29
    Предупреждения и рекомендации CIS Изделие спроектировано и изготовлено в соответствии с международными нормативами по безопасности. Необходимо внимательно прочитать настоящие предупреждения, составленные в целях вашей безопасности. Экономия электроэнергии и охрана окружающей среды Общие требования
  • Страница 13 из 29
    Неисправности и методы их устранения В случае обнаружения аномалий в работе изделия проверьте следующие пункты перед тем, как обратиться в Сервис технического обслуживания. Неисправности: CIS Возможные причины / Методы устранения: Посудомоечная машина не запус • Выключите машину при помощи кнопки
  • Страница 14 из 29
    Сервисное обслуживание CIS Мы заботимся о своих покупателях и стараемся сделать сервисное обслуживание наиболее качественным. Мы постоянно совершенствуем наши продукты, чтобы сделать Ваше общение с техникой простым и приятным. Уход за техникой Продлите срок эксплуатации и снизьте вероятность
  • Страница 15 из 29
    Operating instructions DISHWASHER EN English, 15 Contents EN Installation, 16-17 Positioning and levelling Connecting the water and electricity supplies Advice regarding the first wash cycle Technical data Description of the appliance, 18 Overall view Control panel Loading the racks, 19 Lower rack
  • Страница 16 из 29
    Installation EN Keep this instruction manual in a safe place for future reference. If the appliance is sold, given away or moved, please ensure the manual is kept with the machine, so that the new owner may benefit from the advice contained within it. Please read this instruction manual carefully:
  • Страница 17 из 29
    Anti-flooding protection To ensure floods do not occur, the dishwasher: - is provided with a special system which blocks the water supply in the event of anomalies or leaks from inside the appliance. Some models are also equipped with the supplementary safety device New Acqua Stop*, which
  • Страница 18 из 29
    Description of the appliance EN Overall view 1. 2. 3. 4. 5. 6. 7. 8. 9. 10. 11. 12. Upper rack Upper sprayer arm Tip-up compartments Rack height adjuster Lower rack Lower sprayer arm Cutlery basket Washing filter Salt dispenser Detergent and rinse aid dispensers Data plate Control Panel *** Control
  • Страница 19 из 29
    Loading the racks Before loading the racks, remove all food residues from the crockery and empty liquids from glasses and cups. After loading the appliance, check that the sprayer arms can rotate freely. Tilt A Tilt B Tilt C EN Lower rack The lower rack can hold pans, lids, plates, salad bowls,
  • Страница 20 из 29
    Start-up and use EN Switching the appliance on for the first time Selecting the language Press the ON/OFF symbol; you will hear a short beep and the display will show the set language. Use the DELAYED START button to scroll forwards, or the HALF LOAD button to scroll backwards through the list
  • Страница 21 из 29
    Half load using the upper or lower rack If there are not many dishes to be washed, a half load cycle may be used in order to save water, electricity and detergent. Select the wash cycle and press the HALF LOAD button repeatedly: the triangle corresponding to the selected load will illuminate and
  • Страница 22 из 29
    Wash cycles EN For available OPTIONS please refer to the Table of options on the Start-up and use page. The number and type of wash cycles and options may vary depending on the dishwasher model. Wash cycle selection instructions Heavily soiled dishes and pans (not to be used for delicate items).
  • Страница 23 из 29
    Rinse aid and refined salt Only use products which have been specifically designed for dishwashers. Do not use table salt or industrial salt, or washing up liquid. Follow the instructions given on the packaging. If using a multi-functional product it is not necessary to add rinse aid; however, we
  • Страница 24 из 29
    Care and maintenance EN Shutting off the water and electricity supplies • Turn off the water tap after every wash cycle to avoid leaks. • Always unplug the appliance when cleaning it and when performing maintenance work. Cleaning the dishwasher • The external surfaces of the machine and the control
  • Страница 25 из 29
    Precautions and advice This appliance was designed and manufactured in compliance with current international safety standards. The following information has been provided for safety reasons and should therefore be read carefully. General safety • This appliance is not intended for use by persons
  • Страница 26 из 29
    Troubleshooting EN Whenever the appliance fails to work, check for a solution from the following list before calling for Assistance. Problem: Possible causes / Solutions: The dishwasher does not start or cannot be controlled • Switch off the appliance by pressing the ON/OFF button, switch it back
  • Страница 27 из 29
    Assistance We care about our consumers and we always try to provide the highest level of service. We keep improving our products to make your contact with the appliance simple and pleasant. EN Accessories Extend the life of your appliance and decrease the possibility of its breakdown. Try out the
  • Страница 28 из 29
    195082103.01 03/2011 - Xerox Fabriano EN 28
  • Страница 29 из 29