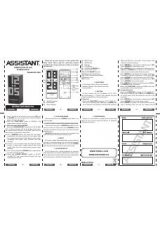
LOCATION OF CONTROL
1
On/off/Auto Set
2
Time set
3
Alarm
Off
4
Sleep
5
Snooze
button
6
Hour
7
Minute
8
Volume Control / Buzzer
9
Band
Switch
10
Tuning
Control
11
AUTO
Indicator
12
HI-LO
Dimmer
13
Alarm
Set
O W N E R ’ S M A N U A L
– 1 –
– 2 –
– 3 –
– 4 –
– 5 –
– 7 –
ENGLISH
ENGLISH
ENGLISH
ENGLISH
ENGLISH
ENGLISH
ENGLISH
ENGLISH
ENGLISH
ENGLISH
ENGLISH
ENGLISH
– 6 –
ENGLISH
ENGLISH
– 8 –
ENGLISH
ENGLISH
AM/FM ALARM CLOCK RADIO
Model AH-1088
Warranty period
Гарантийный
срок
Date of sale
Дата
продажи
Model
Номер
модели
Stamp
Печать
магазина
Thank you for buying Assistant product. Read this manual
carefully to get the best performance form this unit.
5
10
9
8
11
3
7
6
4
13
2
1
12
WARNING : TO REDUCE THE RISK OF FIRE OR ELECTRIC
SHOCK, DO NOT EXPOSE THIS APPLIANCE TO RAIN
OR MOISTURE.
CAUTION : THE CLOCK RADIO MUST NOT BE USED IN
ANY ENVIRONMENT WHERE IT MAY BE SUBJECT TO
THE DRIPPING OR SPLASHING OR WATER OR OTHER
LIQUIDS.
DO NOT CONNECT THE ANTENNA WIRE ON THE BACK OF THIS SET
TO ANY OUTDOOR ANTENNA
Mains plug is used as the disconnect device. It shall remain
readily operable and should not be obstructed during intended
used. To be completely disconnected the apparatus from supply
mains, the mains plug of the apparatus shall be disconnected
from the mains socket outlet completely.
BOTTOM OF SET:
Battery compartment for 9 volt (6F22/6LR61)
battery (not included) for temporary time storage.
ELECTRONIC CLOCK OPERATION
1. Plug the AC line cord into 220V AC home outlet
2. The set is now working as an electronic clock and it will
fl
ash
the clock
fi
gures to show you it is not set correctly.
3. To set the correct time, depress the Time Set Button
2
and
Hour Button
6
simultaneously, release the buttons approxi-
mately before the correct time is reached. Now depress the
Minute Button
7
and the Time Set Button
2
simultaneously,
to set the readout to the correct time precisely.
RADIO OPERATION
4. Slide the ON/OFF/AUTO Switch
1
to “ON” position.
5. Slide Band Switch
9
to FM or AM position.
6. Turn the Volume Control
8
to desired volume.
7. Turn the Tuning Control
10
to select your favorite station.
8. Antenna
For AM reception, this radio incorporates a highly sensitive
ferrite core bar antenna.
For FM reception, this set is specially equipped with an external
wire as FM antenna. Be sure to untwist it to its fullest length for
peak performance.
WAKE TO RADIO
Having selected your station and set the volume at the desired
level, proceed as follows :
1. Slide the ON/OFF/AUTO Switch
1
to “AUTO” position.
1. Press the
[ALARM SET]
13
and whilst this button is de-
pressed, press the Hour Button
6
and then the Minute Button
7
until the time is reached at which you wish to wake. The
wake up time is now entered into the timer memory. To check
the wake up time, simply press the
[ALARM SET]
Button
13
and the clock will show the present time. The preset wake up
time will continue to be registered in the time memory and the
radio will switch on by itself at the same time the next day. To
switch the radio off, simply press the
[ALARM OFF]
Button
3
.
When wake to radio is set, but want to listen radio before alarm
time set. Press
[SLEEP]
button
4
once will turn radio on and
press
[SNOOZE]
button
5
once will turn radio off.
WAKE TO BUZZER
Set the controls as for “Wake to Radio” but volume control
8
to BUZZER position. The buzzer can then be switched off by
pressing the
[ALARM OFF]
3
or it can be converted to the radio
by selecting switch
1
to “ON” position.
SLEEP TO RADIO
The radio can be set to play and to switch off automatically for
a length of time from 1 minute to 1 hour 59 minutes by following
this procedure – With all the controls preset in the “Wake to Radio”
positions, depress the
[SLEEP]
Button
4
and press the Minute
Button
7
to count down to the desired sleep time. To switch off
the radio before the end of the registered sleep time period, simply
press the Snooze Button
5
. Slide the ON/OFF/AUTO switch
1
to 'OFF' position if 'Wake to Radio' is not desire.
Press
[SNOOZE]
Button
5
once to elminate Sleep to Radio
memory effect when AC power is resume after temporaily suspen-
sion or unplug the unit.
SNOOZE CONTROL
The Snooze Button
5
allows the user an extra sleep time of
about 8 minutes after radio alarm is switched on at the preset
wake up time.
BATTERY BACK-UP
(For Temporary Time Storage Only)
Connect a 9 volt (6F22/6LR61) battery (not included) to the
terminals inside the battery compartment. In the event of a power
interruption, your set will not work normally from the mains supply
but there is now the advantage that your clock will continue to
work. The clock display will not light up, as the clock time will be
held in the memory. This also enables you to move the set from
place to place without re-setting the clock every time. The battery
back-up system is only meant to be used from short temporary
power interruption. For longer durations, the battery may become
exhausted or there may be some deviation in accuracy. When
the battery is exhausted, it should be removed from the set to
prevent leakage. If you do not wish to take advantage of the bat-
tery back-up system, your set will work normally without a battery.
However, if disconnected from the mains, the clock
fi
gures will
fl
ash when the mains are re-connected and you must re-set the
clock as described in the Electronic Clock Operation paragraph.
GENERAL CARE
2. The cabinet can be cleaned with a slightly damp cloth (make
sure mains lead is disconnected from mains supply)
3. Avoid leaving the clock radio in direct sunlight or in hot,
humid, dusty places.
4. Keep the set away from heating appliances and appliances
that generate noise, such as
fl
uorescent lamps, or motors.
5. Keep minimum 10 cm around the apparatus for suf
fi
cient
ventilation
6. The ventilation should not be impeded by covering the ventila-
tion openings with items, such as newspapers, table-cloths,
curtains, etc.
7. No
naked
fl
ame sources, such as lighted candles, should be
placed on the apparatus.
8. Attention to be drawn to be environmental aspects of bat-
tery disposal.
9. The apparatus shall not be exposed to dripped or splashing
and that no objects
fi
lled with liquids, such as vases, shall be
placed on the apparatus.
10. Battery shall not be exposed to excessive heat such as
sunshine,
fi
re or the like.
11. If the external
fl
exible cable or cord of this unit is damaged,
it shall be exclusively replaced by the manufacturer or his
service agent or a similar quali
fi
ed person in order to avoid
a hazard.
12. For indoor use only.
SPECIFICATION
Power Source:
AC 220V ~ 50Hz
Radio Frequency:
AM
530-16000kHz
FM
64-108MHz
Power Consumption:
4W