11
ULTRA-G GI100 User Manual
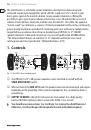
(4)
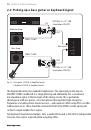
BATTERY COMPARTMENT
. To install or replace the 9 V battery, remove the screw and lift
the lid.
(5)
The
CLIP
LED lights up when the input signal level is too high.
(6)
The two
-20 dB PAD
switches noticeably increase the operating range of the ULTRA-G,
allowing it to accept anything from the low-level signal of a high-impedance microphone
or guitar to the loudspeaker output of a guitar amp. These switches have repeatedly
proven themselves in the BEHRINGER ULTRA-DI DI100. Pressing both switches results in a
gain reduction of 40 dB.
◊ Before using the PAD switches, be sure that the ULTRA-G is clipping, and not the
mic preamp on the console. You should only attenuate the input signal via the
GI100’s PAD switches if its CLIP LED lights up frequently or remains lit. If this is not
the case and distortion occurs, check the console settings. It is always best to avoid
attenuation of the DI input to ensure an optimal signal-to-noise ratio.
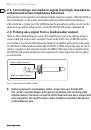
(7)
INPUT
. Use this ¼" mono jack to connect the signal source, e.g. your guitar,
with a high-quality standard instrument cable.
◊ The GI100 is switched on as soon as you insert a plug into the INPUT. The battery is
“disconnected” when the plug is removed. For this reason, the GI100 has no on/off
switch. To preserve battery life, always disconnect the input when the ULTRA-G is
not in use.
(8)
The
DIRECT LINK TO CABINET
is a direct output of the input signal, allowing you for
example to simultaneously run your instrument through the GI100 and complete your
normal signal path by connecting the DIRECT LINK to an amp or speaker cabinet.
◊ The Input and DIRECT LINK sockets are directly connected. When connecting the
speaker output of a tube amp to the input of the GI100, please be sure to connect
a guitar speaker or other appropriate impedance load to the DIRECT LINK socket in
order to avoid possible damage to your amplifier.