14
X32 DIGITAL MIXER Preliminary User Manual
2.3 Display and Monitoring
VIEW
VIEW
(16)
(23)
(20)
(26)
(25)
(17)
(22)
(27)
(21)
(19)
(18)
(15)
(24)
(15)
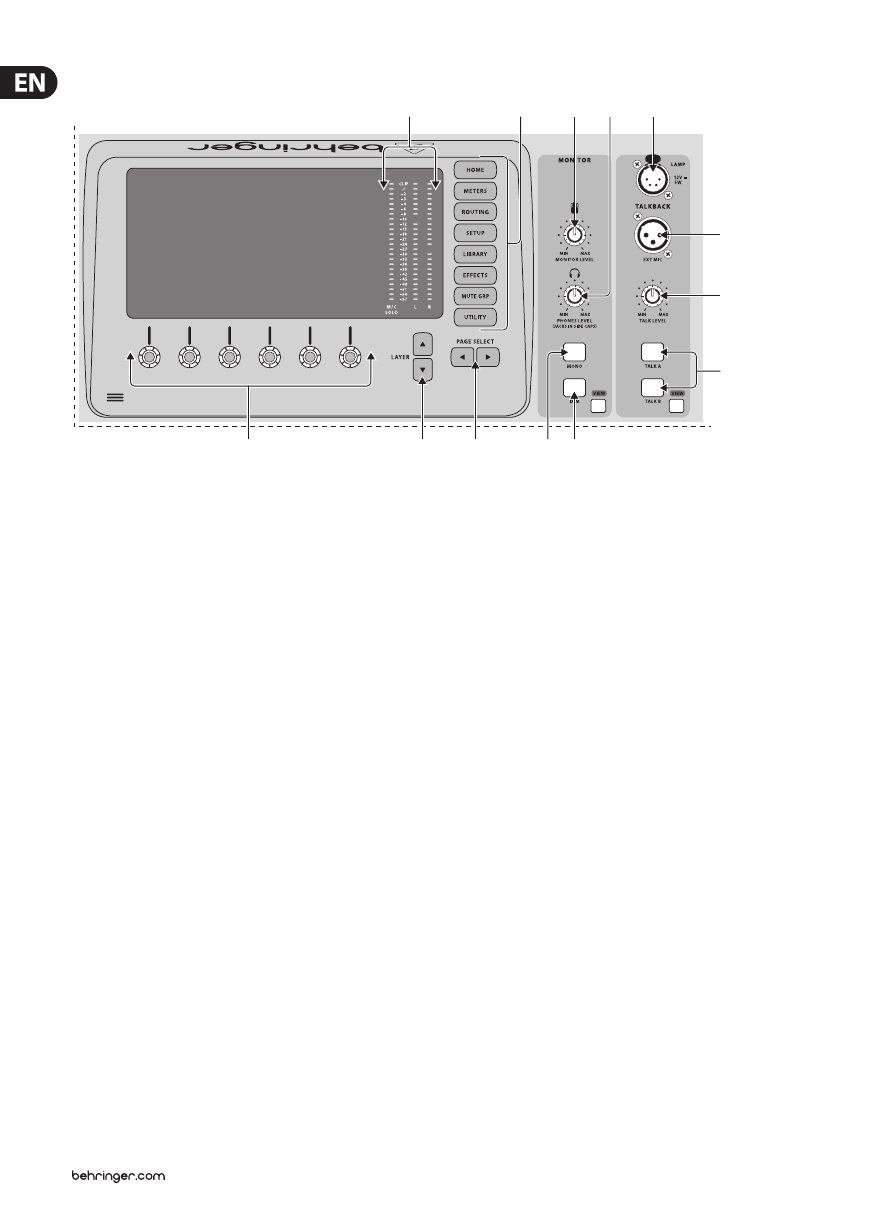
PUSH ENCODERS
– These 6 controls adjust the parameters presented at
the bottom of the Main Display. The editable function will show a circular
icon in the display when continuous control is available. The function will
show a broad rectangular icon to indicate that a switch or toggle can be
accessed by pushing the encoder.
(16)
LAYER BUTTONS
– Some screens in the Main Display have more than
6 editable parameters which can be accessed by pressing the Layer Up or
Down buttons.
(17)
PAGE SELECT BUTTONS
– Use these to scroll through the available screens
or to confirm/decline certain actions.
(18)
MAIN/SOLO METERS
– The main stereo output level is displayed here
along with the solo level of all channels whose Solo button is active.
(19)
CATEGORY SELECT BUTTONS
– Press one of these buttons to jump directly
to the subject you wish to edit or configure.
(20)
MONITOR LEVEL
– Adjust the level of the Monitor outputs with this knob.
(21)
PHONES LEVEL
– Adjust the volume of the headphone outputs,
located inside the left and right side caps.
(22)
MONITOR MONO
– Press this button to monitor the audio in mono.
(23)
DIM
– Press this button to reduce the monitor volume. Press the
View button to adjust the amount of attenuation along with all other
monitoring-related functions.
(24)
LAMP INPUT
– Connect a standard 12 V, 5 Watt gooseneck lamp here.
(25)
TALKBACK INPUT
– Connect a talkback mic via standard XLR cable to
this input.
(26)
TALK LEVEL
– Adjust the level of the talkback mic with this knob.
(27)
TALK A/B
– Select the destination for the talkback mic signal with these
buttons. Press the View button to edit the talkback routing for A and B.