Инструкция для BENQ PE8720

(скачивание инструкции бесплатно)
Формат файла: PDF
Доступность: Бесплатно как и все руководства на сайте. Без регистрации и SMS.
Дополнительно: Чтение инструкции онлайн
background image

  21

  Using the projector

Eng
lish

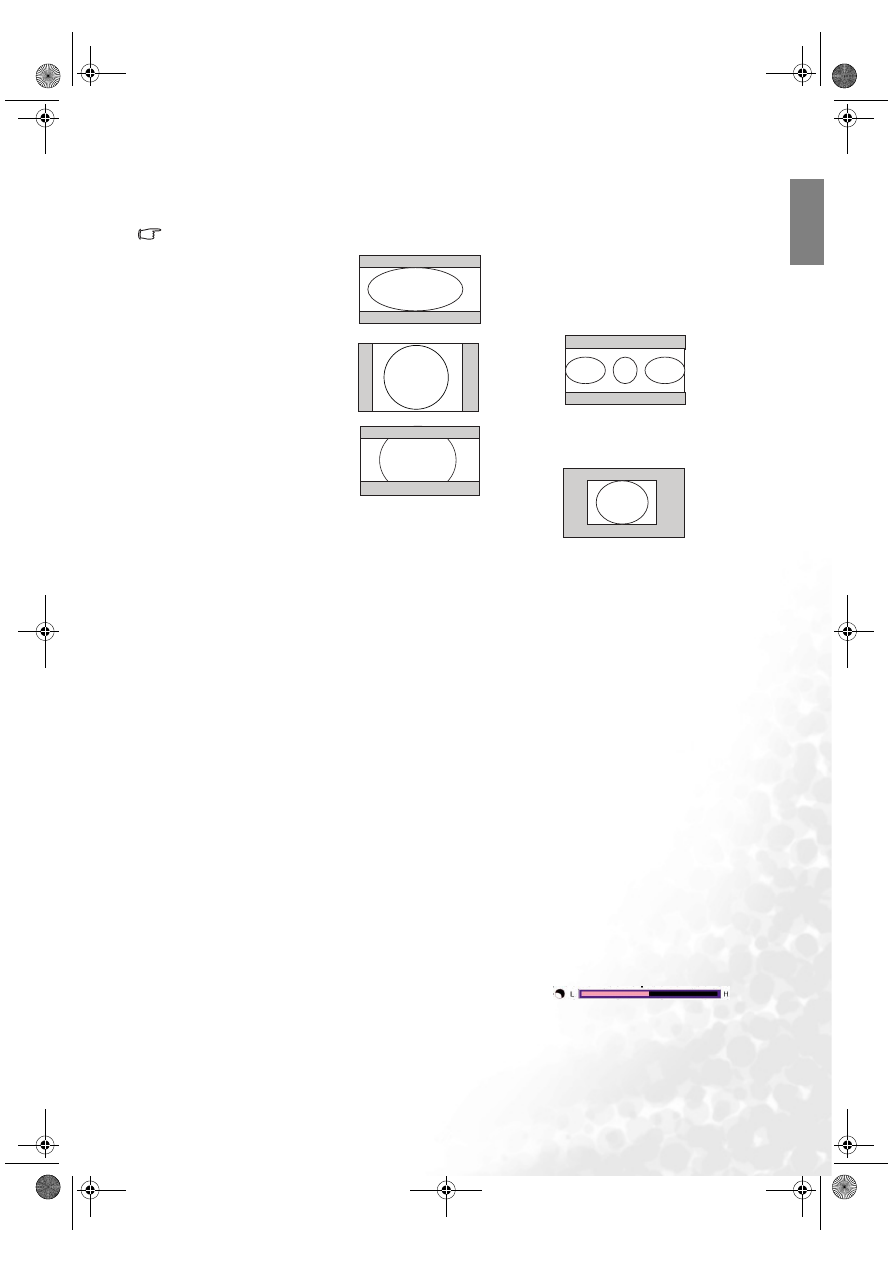
You can change the projected image ratio (no matter what aspect the source is) by using the Aspect buttons on 
the remote control or in the Display > Aspect Ratio OSD menu. Select an aspect ratio to suit the format of the 
video signal and your display requirements. There are five aspect ratios available:

In the pictures below, the black portions are inactive areas and the white portions are active areas.

The Anamorphic setting stretches and resizes linearly, except that it treats the vertical and horizontal 
dimensions independently. It stretches the height of the source image until it reaches the full projected height, 
and stretches the width of the source image until it reaches the full projected width. This may alter the projected 
aspect, depending upon the original aspect of the source image. Anamorphic is most suitable for images which 
are already in a 16:9 aspect, like high definition TV, as it displays them without aspect alteration.

The 4:3 setting is most suitable for 4:3 images like standard definition TV and 4:3 aspect DVD movies, as it 
displays them without aspect alteration. 

The Letterbox setting resizes an image proportionately both vertically and horizontally from the width of a 4:3 
aspect to the width of a 16:9 aspect and centers it onscreen. This produces an image greater in height than can 
be displayed, so part of the image is lost (not displayed) along the top and bottom edges of the projection. This 
is suitable for the display of movies which are presented in letterbox format (with black bars top and bottom. 

The Wide setting stretches the image horizontally in a non-linear manner, that is, the edges of the image are 
stretched more than the centre of the image, to prevent distortion of the central part of the image. This is 
suitable for occasions where you want to stretch the width of a 4:3 aspect image to the width of a 16:9 aspect 
screen. It does not alter the height. Some widescreen movies have been produced with their width squashed 
down to the width of a 4:3 aspect, and are best viewed when restretched back to their original width using the 
Wide setting. 

The Real setting displays the image in a one-to-one pixel mapping without alteration or resize in the centre of 
the projection. This is most suitable for use with PC and RGBHD source inputs. 

3. Adjusting contrast ratio

The contrast ratio is the measurement of the difference between the brightest whites and the darkest blacks a 
display can show. A projector with larger contrast ratio is able to show more subtle color details and allow 
extraneous room light. The projector is with very high contrast ratio. You are able to tune a suitable contrast 
ratio according to your room light and preference. To manually adjust the contrast ratio, press the IRIS button 
on the remote control. When the button is pressed, an adjustment bar "

displays on the screen. To lower the contrast and increase brightness, press the 

e

 button on the remote control 

or in the Advanced --> Advanced - 30 step IRIS menu. To raise the contrast and decrease brightness, press the 

f

 button on the remote control or in the Advanced --> Advanced - 30 step IRIS menu. The "L" and "H" on the 

adjustment bar’s both sides represent the contrast ratio Low or High. There are 30 phases from Low to High 
available for adjustments.

1. Anamorphic: Scales an image 

so that it is displayed in the 
center of the screen with a 
16:9 aspect ratio.

2. 4:3: Scales an image so that it 

is displayed in the center of 
the screen with a 4:3 aspect 
ratio.

3. Letterbox: Enlarges an image 

with letterbox format to 
display it in full-screen format 
with a 16:9 aspect ratio. The 
upper and lower portions of 
the image are cropped.

4. Wide: A 4:3 aspect ratio image is enlarged 

NON-linearly in horizontal direction to 
accommodate 16:9 full-screen display. This 
stretches only the right and left sides of the 
image; the central part is unchanged.

5. Real: One-to-one mapping is performed on the 

input signal without any scaling with the image 
displayed at the center of the screen.

PE8720-en.book  Page 21  Friday, May 13, 2005  5:19 PM

1
2
3
4
5
6
7
8
9
10
11
12
13
14
15
16
17
18
19
20
21
22
23
24
25
26
27
28
29
30
31
32
33
34
35
36
Оглавление инструкции
  • Страница 1 из 37
    PE8720-en.book Page 1 Friday, May 13, 2005 5:19 PM PE8720 Digital Projector Home Cinema Series User’s Manual Welcome
  • Страница 2 из 37
    PE8720-en.book Page 2 Friday, May 13, 2005 5:19 PM Copyright Copyright © 2005 by BenQ Corporation. All rights reserved. No part of this publication may be reproduced, transmitted, transcribed, stored in a retrieval system or translated into any language or computer language, in any form or by any
  • Страница 3 из 37
    PE8720-en.book Page 3 Friday, May 13, 2005 5:19 PM English Table of contents Safety, regulatory and legal information ........................................................... 5 FCC statement (for United State users) .....................................................................5 EEC
  • Страница 4 из 37
    PE8720-en.book Page 4 Friday, May 13, 2005 5:19 PM Fine-tuning the image size and clarity ...................................................................... 20 English Optimizing the image ................................................................................20 1. Selecting a preset
  • Страница 5 из 37
    PE8720-en.book Page 5 Friday, May 13, 2005 5:19 PM English Safety, regulatory and legal information Thank you for your purchase of this quality BenQ video projector! It has been designed to provide you with an enjoyable home theater viewing experience. For the best results, please read this manual
  • Страница 6 из 37
    PE8720-en.book Page 6 Friday, May 13, 2005 5:19 PM Safety instructions English Your BenQ projector is designed and tested to meet the latest standards for safety of information technology equipment. However, to ensure safe use of this product, it is important that you follow the instructions
  • Страница 7 из 37
    PE8720-en.book Page 7 Friday, May 13, 2005 5:19 PM Do not block the ventilation holes whilst the projector is on (even in standby mode): - Do not cover the projector with any item; - Do not place the projector on a blanket, bedding or any other soft surface. 9. English Safety instructions
  • Страница 8 из 37
    PE8720-en.book Page 8 Friday, May 13, 2005 5:19 PM English Safety instructions (continued) 13. Never attempt to replace the lamp assembly 16. Do not store the projector on end vertically. until the projector has cooled down and is Doing so may cause the projector to fall over, unplugged from the
  • Страница 9 из 37
    English Overview Shipping contents The projector is shipped with the cables required for connection to a video and PC equipment.Some of the items may not be available depending on your region of purchase. Please check with your place of purchase. Some of the accessories may vary from region to
  • Страница 10 из 37
    PE8720-en.book Page 10 Friday, May 13, 2005 5:19 PM BenQ PE8720 projector features English • • • • • • • • • • • • Highest picture quality This single Dark Chip 3 DLP™ projector provides excellent picture quality due to its high resolution, excellent home theatre brightness, super high contrast
  • Страница 11 из 37
    PE8720-en.book Page 11 Friday, May 13, 2005 5:19 PM Projector exterior view English Front and upper side view PE 87 1 2 3 4 5 6 7 8 20 1. Rear IR sensor 2. Control panel (See page 12 for detailed information.) 3. Focus and Zoom adjustment 4. Indicator lights 5. Dust filter grill (cool air intake)
  • Страница 12 из 37
    PE8720-en.book Page 12 Friday, May 13, 2005 5:19 PM Controls and functions English Control panel 1 2 3 4 5 8 11 12 6 7 9 10 13 1. POWER indicator light Lights up or flashes when the projector is operating. See page 34 for details. 2. TEMPerature warning light Lights up or flashes if the projector’s
  • Страница 13 из 37
    PE8720-en.book Page 13 Friday, May 13, 2005 5:19 PM Remote control 1 2 3 4 5 6 3 2 7 ENTER 9 C 2. Source selection buttons (COMP1, COMP2, VIDEO, HDMI, RGB HD, SVIDEO) Selects an input source for display. See page 27 for details. 3. Aspect buttons (ANA, 4:3, LB, WIDE, REAL) Selects the display
  • Страница 14 из 37
    PE8720-en.book Page 14 Friday, May 13, 2005 5:19 PM English Positioning your projector Choosing a location Your projector is designed to be installed in one of four possible installation locations: 1. Floor in front of screen; 2. Ceiling in front of screen; 3. Floor at rear of screen; or 4. Ceiling
  • Страница 15 из 37
    PE8720-en.book Page 15 Friday, May 13, 2005 5:19 PM Obtaining a preferred projected image size English The distance from the projector lens to the screen, the zoom setting, and the video format each factors in the projected image size. BenQ has provided separate tables of dimensions for both 16:9
  • Страница 16 из 37
    PE8720-en.book Page 16 Friday, May 13, 2005 5:19 PM Installation for a 4:3 ratio screen English Ceiling Installation Diagonal Projection Distance Diagonal Floor Installation Ceiling Image Height Screen Offset Center of the lens Center of the lens Offset Screen Projection Distance Image Height Floor
  • Страница 17 из 37
    PE8720-en.book Page 17 Friday, May 13, 2005 5:19 PM You can connect the projector to any type of video equipment, such as a VCR, DVD player, digital tuner, cable or satellite decoder, video game console or digital camera. You can also connect it to a desktop or laptop PC or Apple Macintosh system.
  • Страница 18 из 37
    PE8720-en.book Page 18 Friday, May 13, 2005 5:19 PM Connecting video inputs English Connecting HDMI devices You should use an HDMI cable when making connection between the projector and HDMI devices. HDMI (High-Definition Multimedia Interface) supports uncompressed video data transmission between
  • Страница 19 из 37
    PE8720-en.book Page 19 Friday, May 13, 2005 5:19 PM English Using the projector Preparations 1. Plug in and turn all of the connected equipment on. 2. If not already in, plug the supplied power cable into the AC inlet on the rear of the projector and turn on the power switch. 3. Plug the power
  • Страница 20 из 37
    PE8720-en.book Page 20 Friday, May 13, 2005 5:19 PM Fine-tuning the image size and clarity English 1. Adjust the projected image to the size that you need using the zoom buttons. When the ZOOM button is pressed, an adjustment bar " e Zoom f" displays on the screen. To enlarge the image size, press
  • Страница 21 из 37
    PE8720-en.book Page 21 Friday, May 13, 2005 5:19 PM In the pictures below, the black portions are inactive areas and the white portions are active areas. 1. Anamorphic: Scales an image so that it is displayed in the center of the screen with a 16:9 aspect ratio. 4. Wide: A 4:3 aspect ratio image is
  • Страница 22 из 37
    PE8720-en.book Page 22 Friday, May 13, 2005 5:19 PM 4. Other adjustments English You can adjust Brightness, Contrast, Color, and Tint settings using the Picture menu or with the remote control. Some picture adjustments are available only when certain input ports are in use. Unavailable adjustments
  • Страница 23 из 37
    PE8720-en.book Page 23 Friday, May 13, 2005 5:19 PM Personalizing the projector menu display • Language in Setup menu sets your familiar language for the on-screen menus. • You can select the projector’s Background Color from purple, black or white in Options menu. • OSD Off (Secs) in Options Menu
  • Страница 24 из 37
    PE8720-en.book Page 24 Friday, May 13, 2005 5:19 PM English Menus On Screen Display (OSD) structure Picture Contrast Brightness Color Tint Filter Sharpness Preset Mode Extended Picture Settings Preset Cinema Mode Preset Home Theater Mode Preset Family Room Mode Preset Photo Mode Preset Gaming Mode
  • Страница 25 из 37
    PE8720-en.book Friday, May 13, 2005 5:19 PM Advanced - 30 step IRIS Whisper mode Edge Optimizing Clarity Control White Balance Fine Tuning Color Temp. Info. User 1 User 2 Lamp Native Warm Normal Cool RGB Gain Red Gain Green Gain Blue Gain RGB Offset Store Color Temp To User1 Store Color Temp To
  • Страница 26 из 37
    PE8720-en.book Page 26 Friday, May 13, 2005 5:19 PM Picture menu English The Picture menu allows you to adjust the finer details of the projected image quality. Before making adjustments, you are suggested to choose a desired preset mode in this menu which has set some certain values in order to
  • Страница 27 из 37
    PE8720-en.book Page 27 Friday, May 13, 2005 5:19 PM Display menu English Use this menu to set the way that the projector displays the picture. 1. Aspect Ratio: There are a few aspect ratios that can be selected for different video signals. For more information. See page 20 for details. 2. PIP G in
  • Страница 28 из 37
    PE8720-en.book Page 28 Friday, May 13, 2005 5:19 PM Options menu English In this menu, global settings for the projector can be made. 1. Background Color: Allows you to choose the color of the background screen that will be displayed when there is no input signal detected. 2. OSD Off (Secs): Sets
  • Страница 29 из 37
    PE8720-en.book Page 29 Friday, May 13, 2005 5:19 PM Advance menu English 1. Advanced - 30 step IRIS: Adjusts the contrast ratio toward Low or High. See page 21 for more information. 2. Whisper mode: This projector features a whisper mode which achieves an astonishing low 23dB of emitted noise
  • Страница 30 из 37
    PE8720-en.book Page 30 Friday, May 13, 2005 5:19 PM English Additional information Care of the projector Your projector needs little maintenance. The only thing you have to do on a regular basis is keep the lens clean and clean or replace the air filter. Never remove any parts of the projector
  • Страница 31 из 37
    PE8720-en.book Page 31 Friday, May 13, 2005 5:19 PM To clean the filter: Shut down the projector if turned on and wait until the fans stop running. 3. Remove the filter cover by gently lifting the 4. loosened cover vertically upwards and then away from the projector body. Remove the dust filter
  • Страница 32 из 37
    PE8720-en.book Page 32 Friday, May 13, 2005 5:19 PM Installing the cable connector-panel cover English The cable connector-panel cover is used to cover those unsightly cables and connections in the rear of the projector. To install the cover: 32 1. Repeat Step 1~Step 3 in the "To clean the filter:"
  • Страница 33 из 37
    PE8720-en.book Page 33 Friday, May 13, 2005 5:19 PM Replacing the lamp This lamp contains mercury. Consult your local hazardous waste regulations to dispose of this lamp in a proper manner. 1. 2. Turn the power off and disconnect the projector from the wall socket. Turn off all connected equipment
  • Страница 34 из 37
    PE8720-en.book Page 34 Friday, May 13, 2005 5:19 PM Indicators English There are three indicators which show the status of the projector. Check the following for information about the indicator lights. If there is anything wrong, turn the projector off and contact your dealer. When the projector is
  • Страница 35 из 37
    PE8720-en.book Page 35 Friday, May 13, 2005 5:19 PM Troubleshooting Cause There is no power from the power cable. The projector does not turn on. The power switch is not in the on position. Attempting to turn the projector on again during the cooling process. The lamp cover is not securely
  • Страница 36 из 37
    PE8720-en.book Page 36 Friday, May 13, 2005 5:19 PM Specifications English All specifications are subject to change without notice. Optical Projection system DMD chip Lens Projection screen size Lamp Single-chip DLPTM system. 0.8" DLP (1280 x 720) 1.35x zoom 23.5" ~ 300" 250W Electrical Video
  • Страница 37 из 37