13
en
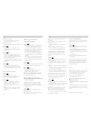
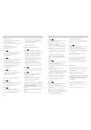
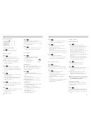
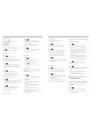
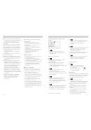
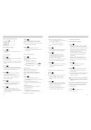
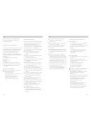
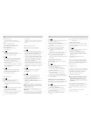
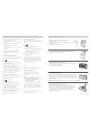
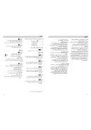
Ⅲ Empty the motor protection filter by
tapping it.
Ⅲ If the motor protection filter is very
dirty, wash it out.
Leave the filter to dry for at least 24
hours.
Ⅲ After cleaning, insert the motor
protection filter in the machine and
close the dust compartment cover.
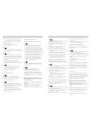
Replacing the micro-hygiene filter
The motor protection filter should be
changed when starting a new pack of
bags.
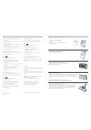
Figure
Ⅲ Open the dust bag compartment lid
(see figure 17)
Ⅲ Unlock the filter holder by pushing the
locking tab in the direction of the
arrow.
Ⅲ Remove the foam and micro-hygiene
filter.
Place a new micro-hygiene filter and
the foam in the filter holder.
Ⅲ Insert the filter holder back into the
vacuum cleaner and click it into place.
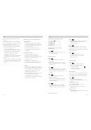
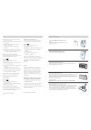
Replacing the activated carbon filter
If your vacuum cleaner is equipped with an
activated carbon filter, this must be
replaced every six months.
Figure
Ⅲ Open the dust bag compartment lid
(see figure 17)
Ⅲ Unlock the filter holder by pushing the
locking tab in the direction of the
arrow
Ⅲ Remove the activated carbon filter.
Ⅲ Fit a new activated carbon filter.
Ⅲ Insert the filter holder back into the
vacuum cleaner and click it into place.
21*
20*
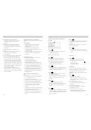
Replacing the HEPA filter
If your vacuum cleaner is equipped with a
HEPA filter, this should be replaced once a
year.
Figure
Ⅲ Open the dust bag compartment lid
(see figure 17)
Ⅲ Unlock the HEPA filter by pushing the
locking tab in the direction of the
arrow and remove it from the vacuum
cleaner.
(see figure 20)
Ⅲ Insert the new HEPA filter and click it
into place.
After vacuuming up fine dust particles,
shake out the motor protection filter to
clean it and replace the micro-hygiene
filter, activated carbon filter or HEPA
filter if necessary.
Care
Always switch the vacuum cleaner off and
disconnect the power cord from the mains
before cleaning the vacuum cleaner.
The vacuum cleaner and plastic
accessories can be cleaned with a
commercial plastic cleaner.
!
Do not use abrasive, glass or all-
purpose cleaners.
Never immerse the vacuum cleaner in
water.
The dust compartment can, if necessary,
be cleaned with a second vacuum cleaner
or simply wiped with a dry cloth or dusting
brush.
Subject to technical changes.
22*
12
en
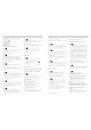
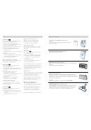
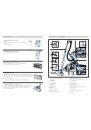
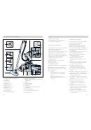
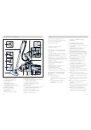
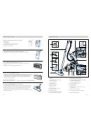
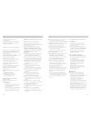
d)Hard-floor brush
For cleaning hard floor coverings
(tiles, parquet flooring, etc.)
e) Mattress nozzle
For vacuuming mattresses, upholstery
etc.
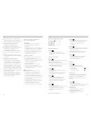
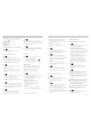
Figure
Small accessories that you do not
need can be stored in the vacuum
cleaner lid.
Figure
You can use the parking aid on the
back of the appliance during short
pauses in vacuuming after switching
off the vacuum cleaner.
To do this, slide the catch on the floor
tool into the groove on the back of the
appliance.
Figure
The vacuum cleaner can also be
carried using the swing handle when
negotiating obstacles such as stairs.
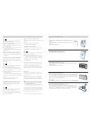
When the work is done
Figure
Ⅲ Rewinding the power cord.
Ⅲ Tug the power cord and let go (the
cable automatically rewinds).
Figure
To store or transport the vacuum
cleaner, use the storage aid on the
underside of the cleaner.
Stand the vacuum cleaner up on its
end.
Slide the catch on the floor tool into
the groove on the underside of the
appliance.
15
14
13
12
11
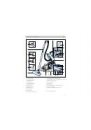
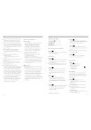
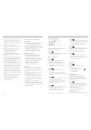
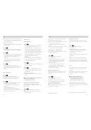
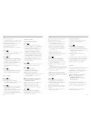
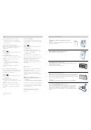
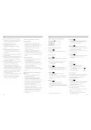
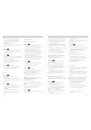
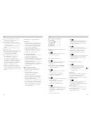
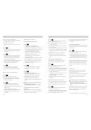
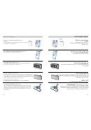
Changing the dust bag
Replacing the dust bag
Figure
If the dust bag change indicator in the
cover is completely yellow when the
floor tool is lifted off the floor and the
highest suction setting is selected, the
dust bag must be replaced even if it
should not be completely full yet. In
this case it is essential to change the
dust bag due to the type of material it
contains.
The nozzles, suction pipe and flexible
hose should not be blocked, as this
will also trigger the dust bag change
indicator.
Figure
Open the cover by moving the locking
lever in the direction of the arrow.
Figure
a) Seal and remove the
MEGAfilt
®
SuperTEX dust bag by
pulling on the tab as shown.
b)Place a new MEGAfilt
®
SuperTEX dust
bag in the holder and close the dust
bag compartment lid.
!
Caution: The cover only closes
when a MEGAfilt
®
SuperTEXdust bag
has been inserted.
Cleaning the motor protection filter
The motor protection filter should be
cleaned at regular intervals by tapping it
or washing it out.
Figure
Ⅲ Open the dust compartment cover
(see figure 17).
Ⅲ Remove the motor protection filter in
the direction of the arrow.
19
18
17
16
*Depending on equipment