Black plate (8,1)
Cadillac SRX Navigation System (Include Mex) - 2012
8
Infotainment System
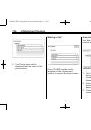
3. Select the street name field.
Enter the street name. Do not
enter directional information or
street type. Use the space
U
screen button between street
and city names. Use the
backspace
q
screen button to
delete an incorrect character.
A list displays if four or fewer
names are available. If there are
more than four, there is a match
counter with a number of
available streets. Press the List
button to view the list and select
the street.
4. Select the city from the list or
enter the city name.
5. Enter the house number. This
field is automatically selected.
6. Press OK. The address
information screen displays the
address entered.
7. Press Go if correct. The route
will calculate.
8. Select the route preference for
Fastest, Shortest, or Easiest.
The chosen route preference
highlights. See
“
Navigation
Settings
”
under
9. Press the Start Guidance screen
button and the route is now
ready to be started.
See
“
Address Entry
”
under
Entering a Point of Interest (POI)
To set a destination by entering a
Point of Interest (POI):
1. Press
O
to turn the system on.
2. A caution could appear. Press
OK to proceed.
3. Press DEST.
4. Press the Point of Interest
screen button.
5. Enter the specific title of the POI
in the POI name space.
If four or less names are
available, a list displays. If more
than four are available, there is a
match counter with a number in
it, representing the number of
available POI names. Press List
to view the list. Select the POI.
6. Press Go. The system
calculates the route.
7. Select the route preference for
Fastest, Shortest, or Easiest.
The system highlights the route.
8. Press the Start Guidance screen
button. The route is now ready
to be started.
See
“
Point of Interest (POI)
”
under
.
Storing Preset Destinations
1. Press
O
to turn the system on.
2. A caution could appear. Press
OK to proceed.
3. Press DEST.
 1
1
 2
2
 3
3
 4
4
 5
5
 6
6
 7
7
 8
8
 9
9
 10
10
 11
11
 12
12
 13
13
 14
14
 15
15
 16
16
 17
17
 18
18
 19
19
 20
20
 21
21
 22
22
 23
23
 24
24
 25
25
 26
26
 27
27
 28
28
 29
29
 30
30
 31
31
 32
32
 33
33
 34
34
 35
35
 36
36
 37
37
 38
38
 39
39
 40
40
 41
41
 42
42
 43
43
 44
44
 45
45
 46
46
 47
47
 48
48
 49
49
 50
50
 51
51
 52
52
 53
53
 54
54
 55
55
 56
56
 57
57
 58
58
 59
59
 60
60
 61
61
 62
62
 63
63
 64
64
 65
65
 66
66
 67
67
 68
68
 69
69
 70
70
 71
71
 72
72
 73
73
 74
74
 75
75
 76
76
 77
77
 78
78
 79
79
 80
80
 81
81
 82
82
 83
83
 84
84
 85
85
 86
86
 87
87
 88
88
 89
89
 90
90
 91
91
 92
92
 93
93
 94
94
 95
95
 96
96
 97
97
 98
98
 99
99
 100
100
 101
101
 102
102
 103
103
 104
104
 105
105
 106
106
 107
107
 108
108
 109
109
 110
110
 111
111
 112
112
 113
113
 114
114
 115
115
 116
116
 117
117
 118
118
 119
119
 120
120
 121
121
 122
122
 123
123
 124
124
 125
125
 126
126
 127
127
 128
128
 129
129
 130
130
 131
131
 132
132
 133
133
 134
134
Инструкции и руководства похожие на CADILLAC SRX (2012), SRX (2012) навигационная система