Replacing the display assembly
WARNING: Before working inside your computer, read the safety
information that shipped with your computer and follow the steps in
. After working inside your computer, follow
the instructions in
After working inside your computer
. For more safety best
practices, see the Regulatory Compliance home page at
www.dell.com/
regulatory_compliance
.
Procedure
CAUTION: Place the computer on a soft and clean surface to avoid
scratching the display back-cover and antenna assembly.
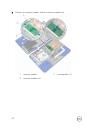
1
Place the display assembly on a flat and clean surface.
2
Align the screw holes on the display hinges with the screw holes on the palm
rest and keyboard assembly.
3
Replace the screws that secure the display assembly to the palm rest and
keyboard assembly.
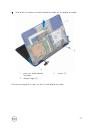
4
Slide the display cable into the connector on the system board and close the
latch to secure the cable.
5
Slide the display-cable bracket into the slot on the palm rest and keyboard
assembly.
6
Align the screw hole on the display-cable bracket with the screw hole on the
system board.
7
Replace the screw that secures the display-cable bracket to the system board.
Post-requisites
1
Replace the
.
2
Follow the step 4 procedure in “
3
Replace the
4
Follow the procedure from step 2 to step 5 in “
”.
59


Инструкции и руководства похожие на DELL Inspiron 3162 3162-3041, Inspiron 3162 3162-3058