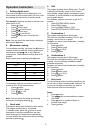
Инструкция для GORENJE SMO23DGW

(скачивание инструкции бесплатно)
Формат файла: PDF
Доступность: Бесплатно как и все руководства на сайте. Без регистрации и SMS.
Дополнительно: Чтение инструкции онлайн
background image


Cooking menu: 

Code  Food 

Note 

A-01 

Coffee / Soup (200 

ml/cup) 


Press   button to indicate weight 
of food or number of serving. 
For cooking meat, oven will pause 
and sound beeps during cooking 
to let you to turn food over and 
then close the door, press the 


to resume cooking. 
 
For cooking spaghetti, add boiling 
water before cooking. 
The result of auto cooking 
depends on factors such as the 
shape and size of food, your 
personal preference as to the 
doneness of certain foods and 
even how well you happen to 
place food in the oven. If you find 
the result at any rate not quite 
satisfactory, please adjust the 
cooking time a little bit 
accordingly. 


A-02 

Potatoes 

(230g/unit) 

A-03 

Spaghetti (g) 

A-04 

Reheat (g) 

A-05 

Pizza defrost (g) 

A-06 

Pizza (g) 

A-07 

Vegetables (g) 

A-08 

Meat (g) 

A-09 

Auto defrost (g) 

8.   AUTO DEFROST 

The oven could be used to defrost food by 
weight. The defrosting time and power level are 
automatically set once the weight is 
programmed. The weight varies between 100g 
and 1800g. 

 
FOR EXAMPLE:

 Suppose you want to defrost 

600g of shrimp. 
1. 

Press 

 L button. 

2. 

Turn 

 anti-clockwise to show auto 

defrost code of 

“A-09”. 

3. 

Press   button to select the weight of 
food. 

4. 

Press   button. 


Note:

 During the course of the defrosting, the 

system will pause and sound beeps to remind 
user to turn food over, and then depress the            
button to resume the defrosting program. 

9.   MULTI-STAGE COOKING  

The oven can be programmed to do several (2 
stages or 3 stages) consecutive functions.  
Suppose you want to set the following cooking 
program: 


Microwave cooking. 


Grill cooking. 


Combination1 cooking. 

 
1. 

Press 

 button. 

2. 

Input a microwave cooking program. 

3. 

Input a grill cooking program. 

4. 

Input a combination1 cooking program. 

5. 

Press   button.  

Note:  

Auto Defrost, Express Cook, and Auto Cook 
functions can not be set in multi-stage cooking 
program.  
The respective indicator lights of cooking stages 
will turn on to indicate which stage is operating. 

10.  CHILD LOCK 

Use to prevent unsupervised operation of the 
oven by little children. The child lock indicator will 
show up on display screen, and the oven can not 
be operated while the Child Lock is set. 
To set: In standby or preset mode, hold down the 

 button for 3 seconds, a beep sounds and lock 

indicator lights. In the locked mode, all buttons 
are disabled. 
To cancel: Hold down the 

 button for 3 

seconds until lock indicator on display goes off. 

Care of your microwave oven 

1. 

Turn the oven off and remove the power 
plug from the wall socket before cleaning. 

2. 

Keep the inside of the oven clean. When 
food splatters of spilled liquids adhere to 
oven walls,wipe with a damp cloth. The use 
of harsh detergent or abrasives is not 
recommended. 

3. 

The outside oven surface should be 
cleaned with a damp colth. To prevent 
damage to the operating parts inside the 
oven, water should not be allowed to seep 
into the ventilation openings. 

4. 

Do not allow the Control Panel to become 
wet. Clean with a soft, damp cloth, Do not 
use detergents, abrasives or spray-on 
cleaners on the control Panel. 

5. 

If steam accumulates inside or around the 
outside of the oven door, wipe with a soft 
cloth.This may occur when the microwave 
oven is operated under high humidity 
conditions and in no way indicates 
malfunction of the unit. 

6. 

It is occasionally necessary to remove the 
glass tray for cleaning. Wash the tray in 
warm sudsy water or in a dishwasher. 

7. 

The roller ring and oven cavity floor should 
be cleaned regularly to avoid excessive 
noise. Simply wipe the bottom surface of 
the oven with mild detergent, water or 
window cleaner and dry. The roller ring may 
be washed in mild sudsy water or sish 
washer. Cooking vapours collect during 
repeated use but in no way affect the 
bottom surface or roller ring wheels. 
When removing the roller ring from cavity 
floor for cleaning, be sure to replace it in the 
proper position. 

1
2
3
4
5
6
7
8
9
10
11
12
13
14
15
16
Оглавление инструкции
  • Страница 1 из 17
    EN Instruction manual ................................................ 2 RU Инструкция по эксплуатации ............................. 9 1
  • Страница 2 из 17
    OWNERS INSTRUCTION MANUAL GB Read the Instructions carefully and Keep for Future Reference. SPECIFICATIONS Power consumption: ............................................................................................... 230V~50Hz,1400W
  • Страница 3 из 17
    9. The plug socket should be within easy reach of the power cord 10. This oven requires 1.4 KVA for its input consultation with service engineer is suggested when installing the oven. CAUTION: This oven is protected internally by a 250V,10 Amp Fuse.   IMPORTANT The wires in this mains lead are
  • Страница 4 из 17
    3. Do not operate the oven when empty. This could damage the oven. 4. Do not use the oven cavity for any type of storage, such a papers, cookbooks, etc. 5. Do not cook any food surrounded by a membrane,such as egg yolks, potatoes, chicken livers, etc without first being pierced several times with a
  • Страница 5 из 17
    Computer control panel  MENU ACTION SCREEN Cooking time, power, action indicators, and clock time are displayed.  MICROWAVE Touch this button a number of times to set microwave cooking power level.  GRILL Press this button to set a grill-cooking program  COMBI. 1 Press to set combination 1
  • Страница 6 из 17
    4. Operation Instruction 1. Setting digital clock The oven is equipped with a digital clock, you can choose to set the clock time in 24-hour cycle by pressing the clock button in waiting mode. For example: Suppose you want to set the oven clock time to 8:30. 1. Press button. 2. Press button once.
  • Страница 7 из 17
    Note: Auto Defrost, Express Cook, and Auto Cook functions can not be set in multi-stage cooking program. The respective indicator lights of cooking stages will turn on to indicate which stage is operating. Cooking menu: Code A-01 A-02 Food Coffee / Soup (200 ml/cup) Potatoes (230g/unit) A-03
  • Страница 8 из 17
    8. 9. Remove odors from your oven by combining a cup of water with the juice and skin of one lemon in a deep microwaveable bowl. Microwave for 5 minutes, wipe thoroughly and dry with a soft cloth. When it becomes necessary to replace the oven light, please consult a dealer to have it replaced.
  • Страница 9 из 17
    ИНСТРУКЦИЯ ПО ЭКСПЛУАТАЦИИ RU Перед эксплуатацией прибора внимательно прочитайте инструкцию и сохраните ее для использования в будущем. СПЕЦИФИКАЦИЯ Потребляемая мощность: .................................................................................... 230В~50Гц,1400Вт Выходная мощность:
  • Страница 10 из 17
    Вес этой микроволновой печи составляет 14,1 кг, потому её следует устанавливать на поверхность, способную выдержать этот вес. 4. Поместите печь подальше от источников высокой температуры и пара. 5. Не кладите никакие предметы на печь. 6. Расстояние между печью и боковыми стенами должно быть как
  • Страница 11 из 17
    Инструкции по технике безопасности при работе с прибором ВАЖНО – ПОСУДА, НЕ ПОДХОДЯЩАЯ ДЛЯ ИСПОЛЬЗОВАНИЯ В МИКРОВОЛНОВОЙ ПЕЧИ - металлические сковороды, кастрюли и посуда с металлическими ручками. - посуда с металлическими элементами. - бумажная посуда с проволочными завязками и пластиковые
  • Страница 12 из 17
    ПАНЕЛЬ УПРАВЛЕНИЯ  ЭКРАН МЕНЮ Время приготовления, мощность, индикация функций и время демонстрируются на дисплее  MICROWAVE Коснитесь этой кнопки несколько раз, чтобы установить уровень мощности микроволн, необходимый для приготовления  ГРИЛЬ Нажмите кнопку для установки приготовления с помощью
  • Страница 13 из 17
    ОПИСАНИЕ ПРИБОРА 1. Система блокировка дверцы 2. Смотровое окошко 3. Вентиляционные отверстия 4. Вращающаяся опора 5. Стеклянная тарелка 6. Панель управления 7. Решётка гриля Инструкции по работе с прибором 1. Дисплей Установление цифровых часов Допустим, Вам нужно установить реальное время на
  • Страница 14 из 17
    Максимальное время приготовления 95 минут. Приготовление на гриле особенно подходит для тонких кусков мяса, стейков, шашлыка, сосисок, кусочков курицы, а для приготовления горячих бутербродов и блюд, запеченных под сыром. НАПРИМЕР, для приготовления на гриле в течение 12 минут: 1. Нажмите кнопку .
  • Страница 15 из 17
    9. Поэтапное приготовление Уход за прибором Работу микроволновой печи можно запрограммировать, разделив на два или три этапа. Например, вы хотите установить следующую последовательность программы:  микроволны,  гриль,  комбинированное приготовление 1. 1. Нажмите кнопку . 2. Внесите программу
  • Страница 16 из 17
    Гарантия и обслуживание Дополнительные рекомендации по приготовлению методами микроволн, гриль и полезные советы можно найти на веб-сайте: Для получения дополнительной информации или в случае возникновения проблем обратитесь в Центр поддержки покупателей в вашей стране (номер телефона центра указан
  • Страница 17 из 17