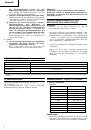
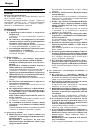
5
English
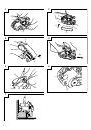
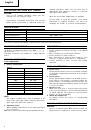
1. How to attach sanding belt
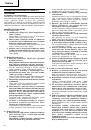
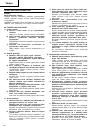
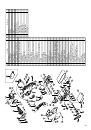
(1) Pull lever with finger, idle pulley will then move
backward. (
Fig. 1
)
(2) Place on drive pulley and idle pulley passing it over
the outside of shoe plate and making sure that
arrow on inside of belt coincides with rotational
direction of drive pulley. (
Fig. 2
)
(3) Push lever with finger, idle pulley will then move
forward and give proper tension to sanding belt.
In this case, be careful not to be hit your finger
by lever.
Then, adjust sanding belt position.
CAUTION:
Sanding belt installed in the wrong direction will
lower work efficiency and shorten life of sanding
belt.
2. How to remove sanding belt
Pull lever with finger, sanding belt will then sag and
can be taken off pulleys eqsily.
DUST REMOVAL
When an excessive amount of dust is deposited in the
dust bag, dust-collecting efficiency will sharply drop.
Remove dust from the bag when it is deposited up to
about 2/3 the bag capacity, where by dust collecting
efficiency (as well as working efficiency) will be ensured.
Remove dust from the bag as follows:
(1) Loosen the support bar and remove the dust bag.
(
Fig. 5
)
(2) The bag inlet can be opened by unzipping the slide
fastener.
HOW TO USE THE BELT SANDER
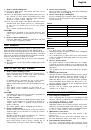
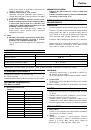
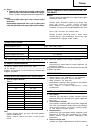
1. How to adjust sanding position.
Push switch and turn sanding belt te check position.
Adjust sanding belt so that both edges protrude
1.6mm – 3mm past edges of pulleys.
lf sanding belt is operated too far on the inside,
it may ceuse abrasion and damage machine.
Adjust sanding belt position by turning adjust screw.
(
Fig. 3
)
䡬
Turn adjust screw clockwise to move belt in.
䡬
Turn adjust screw counterclockwise to move belt
out.
CAUTION:
If sanding belt moves during operation, adjustment
can be made while in operation.
2. To turn on switch
Turn on switch while holding machine away from
surface to be worked on. If machine is placed on
surface when switch is pushed, surface may be
badly scratched.
The same applies when stopping the machine.
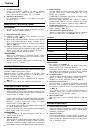
3. How to hold machine
Grasp handle and handle knob and hold machine
against surface to be worked on so that it contacts
surface lightly.
Weight of machine itself is sufficient for sanding
and polishing at highest efficiency.
Do not apply any additional pressure, for this would
place unnecessary load on motor, shorten life of
sanding belt and lower work efficiency.(
Fig. 4
)
4. How to move machine
Move mechine forward first and then backward,
repeating this motion.(
Fig. 4
)
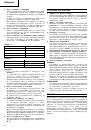
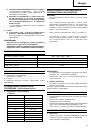
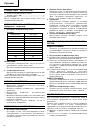
5. How to select proper sanding belt
Choose sanding belt of proper grain size and grain
type for your specific purpose, by referring to
Table
2
and
3
below.
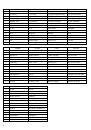
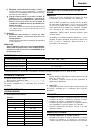
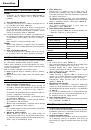
Table 2
Derived finish
Proper grain size
Coarse finish
30 – 40
Medium finish
40 – 100
Semi fine finish
80 – 240
Fine finish
180 – 400
Table 3
Grain type
Surface to be worked on
AA
Steel, Wood
WA
Wood, Bamboo
CAUTION:
䡬
For grain sizes, refer to
Table 3
䡬
Sanding belt grain should be coarser than sandpaper
used for manual work.
䡬
Use sanding belt of same grain size until uniform
surface is obtained. Changing grain sizes may result
in poor finish.
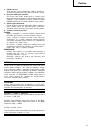
6. How to operate switch
The power switch is turned ON when the trigger
is pulled, and if the stopper is once depressed, the
power switch becomes locked, allowing continuous
operation.
The stopper can be released pulling the trigger.
(
Fig. 5
)
7. Adjusting the belt speed
The Belt Sander is equipped with the electric control
circuit which enables stepless speed control. To
adiust the speed, turn the dial shown in
Fig. 6
.
When the dial is set to “1”, the belt sander operates
at the minimum speed. When the dial is set to “5”,
the belt sander operetes at the maximum speed.
8. How to work on corner
Corners can be sanded and polished by using
machine as in
Fig. 7
.
MAINTENANCE AND INSPECTION
1. Inspecting the sanding belt
Since continued use of a worn-out sanding belt will
degrade efficiency, replace the sanding belt as soon
as excessive abrasion is noted.
2. Inspecting the mounting screws
Regularly inspect all mounting screws and ensure
that they are properly tightened. Should any of the
screws be loose, retighten them immediately. Failure
to do so could result in serious hazard.
3. Maintenance of the motor
The motor unit winding is the very “heart” of the
power tool.
Exercise due care to ensure the winding does not
become damaged and/or wet with oil or water.
4. Inspecting the carbon brushes
For your continued safety and electrical shock
protection, carbon brush inspection and replacement